Wood SCARA Arm Gets A Grip

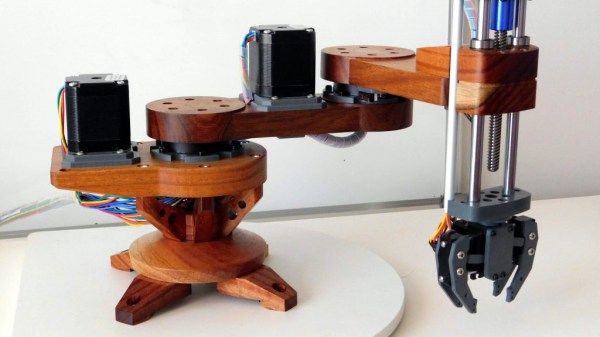
[Ignacio]’s VIRK I is a robot arm of SCARA design with a very memorable wooden body, and its new gripper allows it to do a simple pick and place demo. Designing a robot arm is a daunting task, and the fundamental mechanical design is only part of the whole. Even if the basic framework for a SCARA arm is a solved problem, the challenge of building it and the never-ending implementation details make it a long-term project.

When we first saw VIRK I in all its shining, Australian Blackwood glory, it lacked any end effector and [Ignacio] wasn’t sure of the best way to control it. Since then, [Ignacio] has experimented with Marlin and Wangsamas support for SCARA arms, and designed a gripper based around a hobby servo. It’s as beautiful to see this project moving forward as it is to see the arm moving ping-pong balls around, embedded below.

Continue reading “Wood SCARA Arm Gets A Grip”

[Ben Krasnow] Drills Really Small Holes With Electricity

Drilling holes is easy; humans have been doing it in one form or another for almost 40,000 years. Drilling really tiny holes in hard materials is more challenging, but still doable. Drilling deep, straight holes in hard materials is another thing altogether.

Luckily, these days we have electric discharge machining (EDM), a technique that opens up all kinds of possibilities. And just as luckily, [Ben Krasnow] got his hands on some EDM gear to try out, with fascinating results. As [Ben] explains, at its heart EDM is just the use of a small arc to ablate metal from a surface. The arc is precisely controlled, both its frequency via an arc controller, and its location using CNC motion control. The arc controller has always been the sticking point for home EDM, but the one [Ben] tried out, a BaxEDM BX17, is squarely aimed at the small shop market. The whole test platform that [Ben] built has a decidedly home-brew look to it, with a CNC gantry rigged up to a water tank, an EDM drill head spinning the drill rods slowly, and an airless paint gun providing high-pressure process fluid. The video below shows that it works remarkably well nonetheless.

While we’re certainly keen to see [Ben]’s promised videos on EDM milling and cutting, we doubt we’ll line up to shell out €2,950 for the arc controller he used. If you have more courage than money, this mains-powered EDM might be a better fit.

Continue reading “[Ben Krasnow] Drills Really Small Holes With Electricity”

Omni Wheels Move This CNC Plotter

We’ve always had a soft spot for omni wheels and the bots that move around somewhat bumpily on them. Likewise, CNC pen plotters are always a welcome sight in our tip line. But a CNC plotter using omni wheels is new, and the results are surprisingly good.

Built from the bottom of a spring-form baking pan, [lingib]’s plotter is simplicity itself. Four steppers turn the omni wheels while a hobby servo raises and lowers the pen. The controller is an Uno with a Bluetooth module for smartphone control. Translating wheel rotations into X- and Y-axis motions was not exactly trivial, and the video below shows the results. Lines are a bit wobbly, and it’s clear that the plotter isn’t hitting the coordinates very precisely. But given the somewhat compliant nature of the omni wheels, we’re surprised [lingib] got results as good as these, and we applaud the effort.

[lingib] reports the most expensive part of this $100 build was the omni wheels themselves. We suppose laser-cut MDF omni wheels could reduce the price, or even Mecanum wheels from bent metal and wood. We’re not sure either will help with the precision, though.

Continue reading “Omni Wheels Move This CNC Plotter”

Painting With Light And A Little G-Code

Most photographs are made in the fraction of a second that the camera’s shutter is gathering reflected light from the scene. But there’s fun to be had by leaving the shutter open and directing light into the camera. Called light painting, it can be as simple as a camera on a tripod in a dark room and a penlight spelling out dirty words – not like we’d know – or as complicated as this CNC dot-matrix light printer.

The first idea that [Jeremy S. Cook] had for this build didn’t go so well. He fitted an LED to the gantry of his 3D-printer, intending to send it G-code representing bitmaps. The idea would be to set it up in a dark place, open the shutter, and let the machine build up the image by rastering through the X- and Y- axes while blinking the LED on and off at the right time. But since the gantry only moves in one axis, he abandoned the printer in favor of his CNC router. He printed a collar to fit the dust collector shroud we previously featured, added a battery-powered LED, and affixed a pushbutton switch to the let the Z-axis turn on the light. It took some tweaking such as adding a translucent PLA diffuser, to get decent images, but in the end it worked. We like the soft look of the floating voxels, which were really helped by the later addition of a Nano and a Neopixel. Check out the build in the video below.

One thing we’d suggest is better reflection control. [Jeremy] used a black platen as a background, but it wasn’t quite enough. We suggest going none more black next time.

Continue reading “Painting With Light And A Little G-Code”

Creating Lenses On Cheap CNC Machines

There are a lot of CNC machines sitting around in basements and garages, but we haven’t seen anything like this. It’s making lenses using a standard CNC machine and a lot of elbow grease.

The process of making a lens with a CNC machine begins by surfacing a waste board and taping an 8mm sheet of cast acrylic down with double-stick tape. The lens is then cut out with an 8mm endmill, removed from the stock material, and wet sanded to remove the tool marks. Wet sanding begins at 400 grit and progresses to 2000 grit, after which the lens is polished with a polishing compound meant for high-gloss car finishes. This was done by hand, but in this instance there’s no shame in using a real buffing wheel.

Several other lenses are demonstrated, including a cylindrical convex lens, but these are only planoconvex lenses, or lenses that are flat on one side. Biconvex lenses can be constructed by gluing two planoconvex lenses back to back, which is done with an acrylic glue, in this case Acrifix adhesive. The result is remarkable: with a lot — and we mean a lot — of sanding and polishing, you can make an acrylic lens on a cheap hobby CNC machine. The trick is just a very small stepover on your CNC path.

There are a few more videos planned in this series, including one on using Fusion 360 on defining the shape of the lens to have the right focal length. We can’t wait to see that.

Continue reading “Creating Lenses On Cheap CNC Machines”

CNC Your Own PCB With This Tutorial

It is getting so easy to order a finished printed circuit board that it is tough to justify building your own. But sometimes you really need a board right now. Or maybe you need a lot of fast iterations so you can’t wait for the postal service. [Thomas Sanladerer] shows how he makes PCBs with a CNC machine and has a lot of good advice in the video below.

He starts with Eagle, although, you could use any creation package. He shows what parameters he changes to make sure the traces don’t get eaten away and how to do the CAM job to get the files required to make the boards. If you don’t use Eagle, you’ll need to infer how to do similar changes and get the same kind of output.

We’ve only heard a few people pronounce Gerber (as in Gerber file) with a soft G sound, but we still knew what he meant. We have the same problem with GIF files. However, once you have Gebers, you can join the video’s workflow about 5 minutes in.

At that point, he uses FlatCAM to convert the Gerbers to a single G-code file that integrates the paths and drill files. There were a few tricks he used to make sure all the tracks are picked up. Other tricks include leveling a spoil board by just milling it down and mounting different size bits. He also has ideas on aligning the Z axis.

Continue reading “CNC Your Own PCB With This Tutorial”

Polar Platform Spins Out Intricate String Art Portraits

We have semi-fond memories of string art from our grade school art class days. We recall liking the part where we all banged nails into a board, but that bit with wrapping the thread around the nails got a bit tedious. This CNC string art machine elevates the art form far above the grammar school level without all the tedium.

Inspired by a string art maker we recently feature, [Bart Dring] decided to tackle the problem without using an industrial robot to dispense the thread. Using design elements from his recent coaster-creating polar plotter, he built a large, rotating platform flanked by a thread handling mechanism. The platform rotates the circular “canvas” for the portrait, ringed with closely spaced nails, following G-code generated offline. A combination of in and out motion of the arm and slight rotation of the platform wraps the thread around each nail, while rotating the platform pays the thread out to the next nail. Angled nails cause the thread to find its own level naturally, so no Z-axis is needed. The video below shows a brief glimpse of an additional tool that seems to coax the threads down, too. Mercifully, [Bart] included a second fixture to drill the hundreds of angled holes needed; the nails appear to be inserted manually, but we can think of a few fixes for that.

We really like this machine, both in terms of [Bart]’s usual high build-quality standards and for the unique art it creates. He mentions several upgrades before he releases the build files, but we think it’s pretty amazing as is.

Continue reading “Polar Platform Spins Out Intricate String Art Portraits”