
It could be said that there are two types of people: those for whom the actor LeVar Burton is the host of Reading Rainbow, and those for whom he is Geordi LaForge, Chief Engineer of Star Trek TNG‘s Enterprise NCC1701-D. For those of us engineers who lie in the second camp, we can at least feel a little closer to the action thanks to a project from [Darian Johnson], a Star Trek TNG mini-computer which functions as a desktop information display.
Inside the 3D-printed case is an ESP32 version of the Adafruit Feather, talking to cloud services to pull in and aggregate the information on the TFT screen. It combines weather data, environmental sensor readings, his fitness tracker readings, and his schedule, with two useful applications. There’s a resistor colour code chart, and an LED series resistor calculator. He’s made a video showing it in operation which we’ve placed below the break, and in it, he’s captured the aesthetic of the LCARS interface perfectly. We can’t speak for a fictional future spacecraft officer, but we suspect that Geordi would be right at home with it.
We may not be able to bring you Geordi LaForge, but we can bring you a real Starfleet officer. She even shares something with LeVar Burton, in that she’s (much more) famous for something else.
Continue reading “Mini Computer Brings Starfleet To Your Desk”

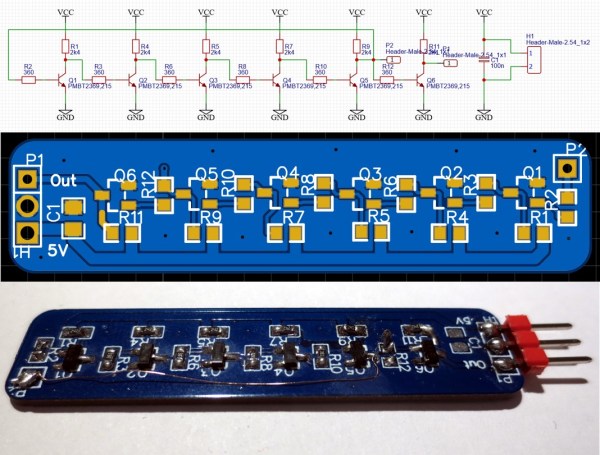


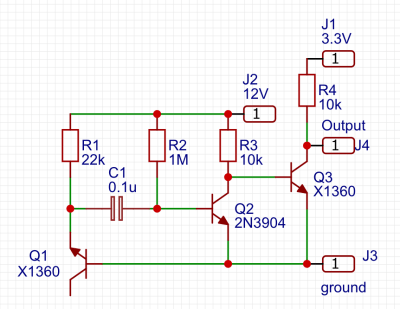 One of the simplest circuits for generating random analogue noise involves a reverse biased diode in either Zener or avalanche breakdown, and it is a variation on this that he’s using. A reverse biased emitter junction of a transistor produces noise which is amplified by another transistor and then converted to a digital on-off stream of ones and zeroes by a third. Instead of a shift register to create his four bits he’s using four identical circuits, with no clock their outputs randomly change state at will.