Traditional desktop 3D printing technology has effectively hit a wall. The line between a $200 and a $1000 printer is blurrier now than ever before, and there’s a fairly prevalent argument in the community that you’d be better off upgrading two cheap printers and pocketing the change than buying a single high-end printer if the final results are going to be so similar.
The reason for this is simple: physics. Current printers have essentially hit the limits of how fast the gantry can move, how fast plastic filament can pushed through the extruder, and how fast that plastic can be melted. To move forward, we’re going to need to come up with something altogether different. Recently a team from MIT has taken the first steps down that path by unveiling a fundamental rethinking of 3D printing that specifically addresses the issues currently holding all our machines back, with a claimed 10-fold increase in performance over traditional printing methods.
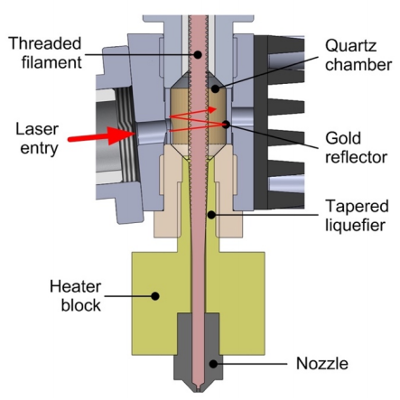
As anyone who’s pushed their 3D printer a bit too hard can tell you, the first thing that usually happens is the extruder begins to slip and grind the filament down. As the filament is ground down it starts depositing plastic on the hobbed gear, further reducing grip in the extruder and ultimately leading to under-extrusion or a complete print failure. To address this issue, MIT’s printer completely does away with the “pinch wheel” extruder design and replaces it with a screw mechanism that pulls special threaded filament down into the hot end. The vastly increased surface area between the filament and the extruder allows for much higher extrusion pressure.
An improved extruder doesn’t do any good if you can’t melt the incoming plastic fast enough to keep up with it, and to that end MIT has pulled out the really big guns. Between the extruder and traditional heater block, the filament passes through a gold-lined optical cavity where it is blasted with a pulse modulated 50 W laser. By closely matching the laser wavelength to the optical properties of the plastic, the beam is able to penetrate the filament and evenly bring it up to nearly the melting point. All without physically touching the filament and incurring frictional losses.
There are still technical challenges to face, but this research may well represent the shape of things to come for high-end printers. In other words, don’t expect a drop-in laser hot end replacement for your $200 printer anytime soon; the line is about to get blurry again.
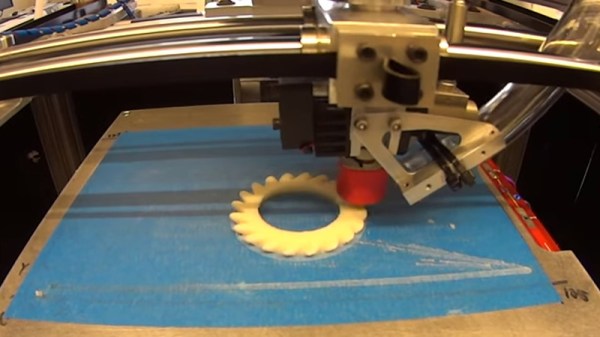
Speeding up 3D printing is a popular topic lately, and for good reason. While 3D printing is still a long way off from challenging traditional manufacturing in most cases, it’s an outstanding tool for use during development and prototyping. The faster you can print, the faster you can iterate your design.
Thanks to [Maave] for the tip.

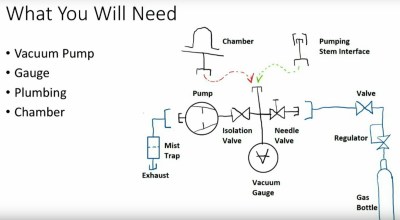 Introduction over, he starts on the subject of equipment with a quick word about safety, before giving an overview of the components a typical small-scale vacuum experimenter’s set-up. We see the different types of vacuum gauges, we’re introduced to two different types of service pumps for air conditioning engineers, and we learn about vacuum manifolds. Tips such as smelling the oil in a vacuum pump to assess its quality are mentioned, and how to make a simple mist trap for a cheaper pump. There is a fascinating description of the more exotic pumps for higher vacuums, even though these will be out of reach of the experimenter it is still of great interest to have some exposure to them. He takes us through vacuum chambers, with a warning against cheap bell jars not intended for vacuum use, but suggests that some preserving jars can make an adequate chamber.