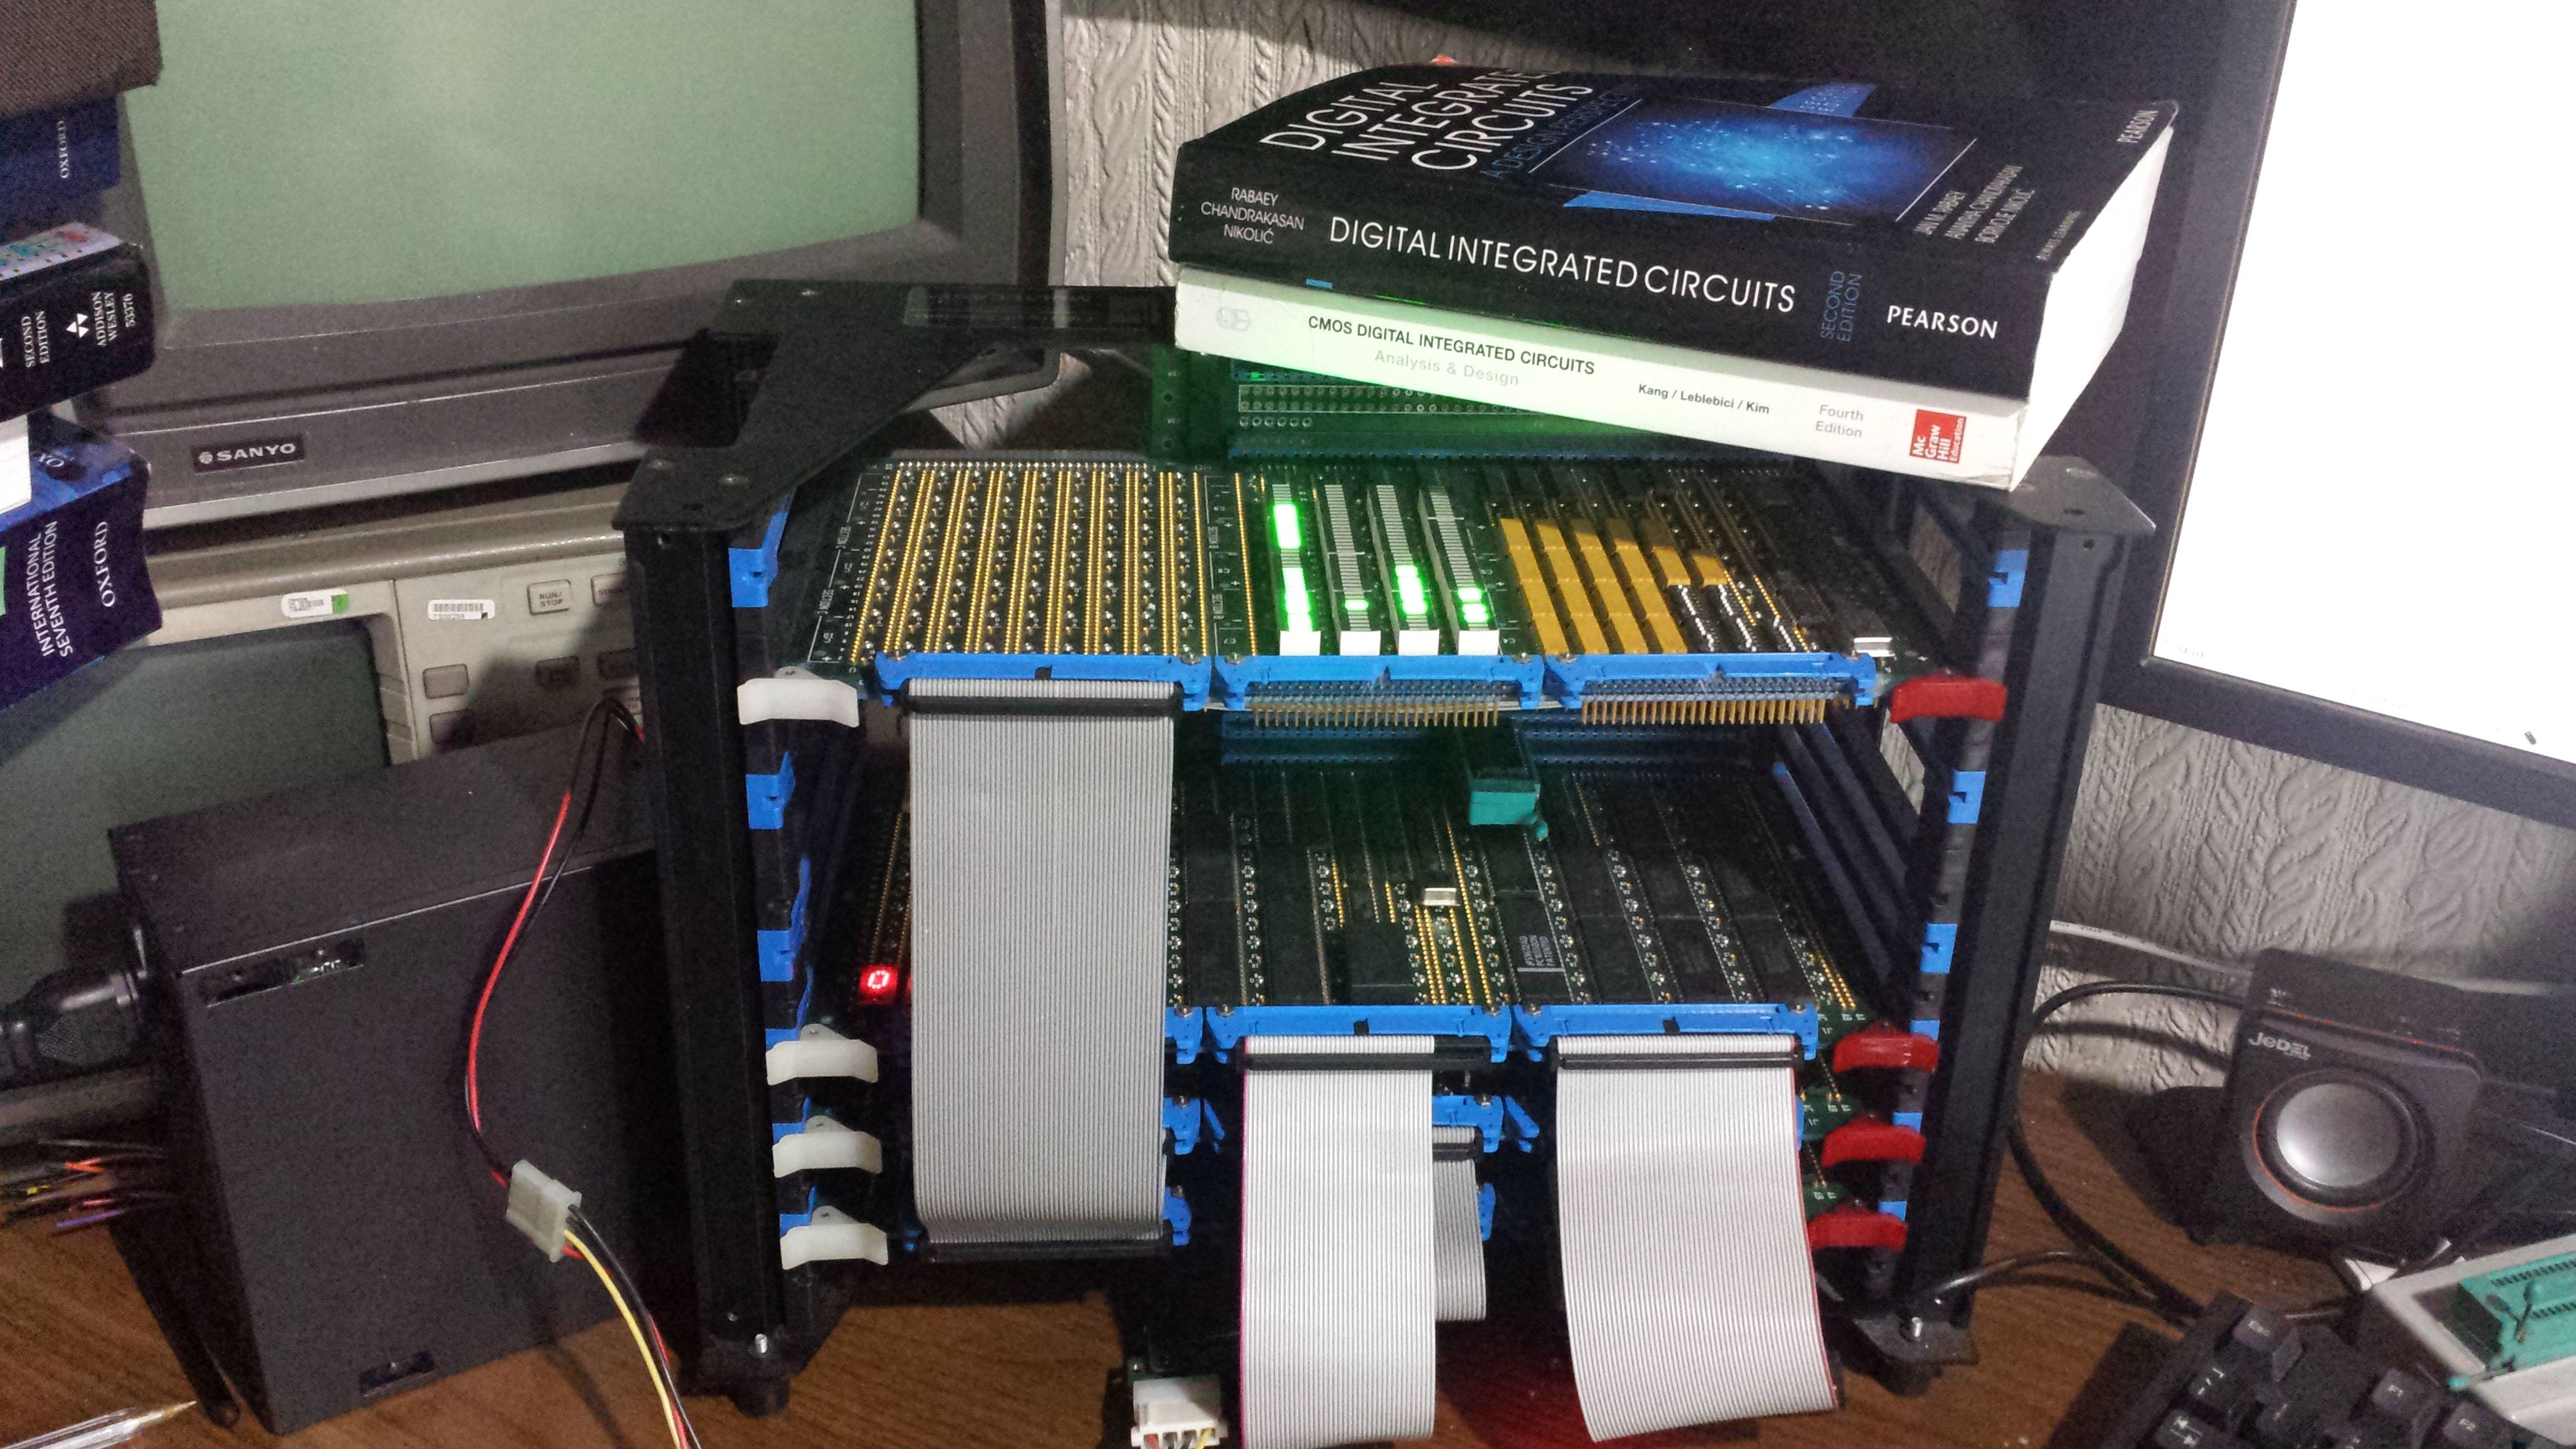
You might have already seen the pretty pictures in pastel colors online — a small netbook-like computer with a full-size keyboard. This, while a render, is what the MNT Pocket Reform is going to look like. Reminiscent of the netbook aesthetic in all the right ways, it’s a small device with a mechanical keyboard taking as much space as possible, trackball for navigation, and we assume, exactly the kind of screen that’d be comfortable to use.
We’ve reviewed the MNT Reform a year ago, and this device inherits a lot of its good parts. The motherboard’s connectivity is likely subject to change, but on the motherboard renders, we can spot three USB-C ports, a Micro HDMI port, a microSD card slot, ix Industrial Ethernet, and M.2 B-key and M-key slots for WWAN and SSD cards respectively.
If you expected computational specs, there isn’t really a specific CPU+RAM configuration announced – for a good reason. The Pocket Reform takes advantage of the CPU card concept designed into the MNT Reform – able to take a card with an NXP i.MX8M CPU, Raspberry Pi CM4, Pine SOQuartz, a Kintex-7 FPGA, or any of the cards yet to be developed. The design files are open-source, the prototype motherboards have been ordered, mechanical usability aspects have been worked through. This is a very compelling project, and we can’t wait to see it bear fruit!
In a recent video, [SomeSkillStudio] created a tidy tool storage system for their slim garage workbench. We have seen the “five knuckle” 270 degree hinges used here before and knew they’d enable some cool hacks. Here you’ll see how he puts this unique type of hardware to work building a densely packed work surface. For anyone who’s set up shop in a garage that’s somehow also supposed to still regularly host vehicles, you’ll know how important it is to have a place to put everything away and make it easy to do so.
The video has several great tips on making sure everything fits together, something key for anyone reproducing this with their own tool collection. If you have even less space, we have some great past workshop builds from portable, to tiny, to elaborate. Even if you’ve already established a place to work, we have tips on organizing your shop, giving each tool a home in a shadow board or across an infinite grid. Clearly, making a work space is one of our favorite kinds of projects.
We’re not in the habit of recommending Kickstarter projects here at Hackaday, but when prototype hardware shows up on our desk, we just can’t help but play with it and write it up for the readers. And that is exactly where we find ourselves with the Turing Pi 2. You may be familiar with the original Turing Pi, the carrier board that runs seven Raspberry Pi Compute boards at once. That one supports the Compute versions 1 and 3, but a new design was clearly needed for the Compute Module 4. Not content with just supporting the CM4, the developers at Turing Machines have designed a 4-slot carrier board based on the NVIDIA Jetson pinout. The entire line of Jetson devices are supported, and a simple adapter makes the CM4 work. There’s even a brand new module planned around the RK3588, which should be quite impressive.
One of the design decisions of the TP2 is to use the mini-ITX form-factor and 24-pin ATX power connection, giving us the option to install the TP2 in a small computer case. There’s even a custom rack-mountable case being planned by the folks over at My Electronics. So if you want 4 or 8 Raspberry Pis in a rack mount, this one’s for you. Continue reading “Turing Pi 2: The Low Power Cluster”→
[Mark Rehorst] tells us about a tragic incident involving an untimely demise of $200 worth of motor driving hardware, and shares a simple circuit so that we can prevent such tragedies in the future. His Arrakis sand table project has quite a few motors involved, and having forgotten to add limits into the software, he slammed a motor-driven mechanism into a well-fixed part of the table. The back EMF of the motor created a burst of energy, taking out the motor driver, the controller board, and the power supply.
With the postmortem done, he had to prevent this from happening again – preferably, in hardware. Based on a small appnote from Gecko Drives, he designed a simple PCB that shunts the motor with a high-power resistor, as soon as the current starts flowing into a direction it’s not supposed to flow into. He goes in depth about the way that the circuit works and the reasoning behind parts selection, as well as shows an LTSpice simulation and shares the PCB files. This was his first time designing PCBs in KiCad, and we believe he’s done a great job! This worklog is certainly worth reading if you’d like to understand how such circuits work and what goes into building one.
He dubs this a “bank account protection” circuit, and we can absolutely relate. It’s not just CNC tables that need such protections of course – we’ve seen a solution for small hacky makeshift electric vehicles, for instance. A motor’s generative properties aren’t always a problem, however – here’s just one example of a hacker trying to put them to good use.
Personal head-up displays are a technology whose time ought by now to have come, but which notwithstanding attempts such as the Google Glass, have steadfastly refused to catch on. There’s an intriguing possibility in [Basel Saleh]’s CaptionIt project though, a head-up display that provides captions for everyday situations.
The hardware is a tiny I²C OLED screen with a reflector and a 3D-printed mount attached to a pair of glasses, and it’s claimed that it will work with almost any ARM v7 SBC, including more recent Raspberry Pi boards. It uses the vosc speech recognition toolkit to read audio from a USP audio device, with the resulting text being displayed on the screen.
The device is shown in action in the video below the break, and without trying it ourselves we can’t comment on its utility, but aside from the novelty we can see it could have a significant impact as an accessibility aid. But it’s as an electronic Babel fish coupled with translation software that we’d like to see it develop, so that inadvertent but hilarious international misunderstandings can be shared by all.
Regular readers will know that we’ve brought you plenty of HUD tomfoolery in the past.
Competition sure brings out the brute in people, doesn’t it? So what do you do when you need a bunch of switches you can let people fist-pound or stomp on repeatedly without them taking damage? You could look to the guitar pedal industry and their tough latching switches, or you could simply build your own smash-resistant buttons as [wannabemadsci] has done.
The main thing about these switches is that they aren’t easily destroyed by shoes or angry fists. That’s because the shiny red push-me part of the button is made by cutting a foam ball in half.
Not easily crush-able Styrofoam, mind you — squishy, coated foam like an indoor football. This is mounted to the top of a sandwich made of hardboard and a couple pieces of easily-compressible foam from craft paintbrushes.
A brass washer is mounted to the middle of both pieces of hardboard, and these have wires soldered to them to read button presses. Then it’s just a matter of hooking it to a microcontroller like any other momentary.
There are all kinds of things you could cut in half for the top, like maybe tennis balls. Or, do what [Sprite_TM] did and use inverted plastic bowls.
I hope last week’s introduction to bulk material handling got you all thinking up amazing hacks, and we’ll soon be reporting on DIY Cap’n Crunch Robots galore. This week we’ll look at how to measure particle sizes, separate particles, and even grind them up when you need to.
Measuring Material Properties
Last week we talked about cohesive strength. Bulk material behaves somewhere between a solid and a liquid — if you’ve done your homework, it flows down the funnel just fine. But if you haven’t, it sticks together and holds up the rest of the material. Cohesive strength is the measure of how much weight the material at the bottom of the funnel can hold up.
You can get a rough measurement by packing material in a box with a square hole at the bottom. One side of the hole should have a retractable slide. Slowly withdraw the slide, making the hole rectangular. Material will bridge over, and then at some point a larger chunk will fall out. This is about the size of the minimum opening that will not arch, and a practical measure of the material’s cohesive strength.
Many materials cohere better when wet. Dry a sample in a microwave to determine the percent moisture by weighing it before and after.
Cohesive strength is closely allied to shear strength. If you want to measure shear strength, cut two 1 cm wide rings of 5 cm diameter PVC pipe, stack them, pack with material, put a disk atop the material and load it, then drag the top ring off the bottom with a spring scale. The force per unit area is the shear strength at that pressure. If it starts packing you’ll see it in the curve.
Packing factor is another useful measurement. Gently shake material to fill a rigid container and weigh it. Now empty the container and refill, packing the material as hard as you can with a length of 1” dowel. Reweigh, and the ratio of the two weights tells you how well the material packs.
Real bulk material is almost always made up of particles of varying sizes, shapes, and compositions. Dirt is particles of different kinds of mineral and organic matter varying from outright rocks to sub micron clay particles. If you’re having problems, getting a graph of material size distribution can be helpful.
For particles above about 75 μM, you can measure the sizes with sieves. If you want to be fancy, they sell nice sets of metal sieves with wire mesh in the bottom. Screen assortments are cheaper. Below 75 μM, you have to use a hydrometer. This is messy and takes a while, but does work.
The idea is to mix the material with soapy water and then use a hydrometer from the auto parts store to measure the density. The particles fall out by Stokes law, big ones first. Stokes law is just that the drag force on a sphere is proportional to the square of the radius. Mass will go up as cube of the radius, so large particles fall faster than small ones. As they fall out, the density of the fluid decreases. This page describes how to do it, and this page has a handy calculator for interpreting the results.
Grinding
You can also change the size of particles in your mix. If particles are too large, they can be crushed or ground. You can separate by size and only grind some of the sizes or discard some of the material. There’s a whole science to grinding. The finer you grind, the harder it gets to grind. Cosmetics and pharmaceutical companies are full of grinding experts.
In general, there are three ways to make something smaller – crush it, cut it, or hit it.
Crushing is straightforward. Use rollers or jaws, a rolling pin or a rock crusher. Don’t overlook the vise. A jaw crusher only crushes particles larger than the jaw space, useful to make a certain size. Rock crushers have a complex motion (video) that should nonetheless be easily imitated by a hacker project. Amateur/hobby gold prospectors have an accessible community.
Crushing action in rollers only works until the particle is small enough that the surface of the roller deforms instead of the particle. Stones have been used to crush grain into flour for most of history.
Cutting is best for soft things, like gummy worms, and tough things (video.). Make sure the cut material has an easy path out. Think of an old fashioned kitchen meat grinder. .
If you want small particles, you need an impact grinder. A coffee mill or blender works by striking the particle with a fast moving impactor. This can be a blade – useful if the material first needs to be cut up, as in a coffee mill – or blunt. Many industrial mills use two pivoting weights on a shaft, and this unit just uses chains (video).
Another impact mill is the ball mill. Rotate a drum on it’s side with steel balls and the material. The balls travel up the side, then fall back down, striking the material.
All these work by fracturing the material. What if you’re trying to powder something that doesn’t fracture, say rubber O rings? For that, there’s cryogenic grinding.
Many rubbery materials are really glasses — materials that are a gloppy liquid at a higher temperature, often brittle at a cool temperature, and soft in-between. The glass you’re probably thinking of is a brittle, breakable material at room temperature, but at high temperature is a liquid. The transition point is the ‘glass transition temperature’.
So what about our O rings? If they’re natural rubber their transition point is about -70° C. Below that temperature they’re brittle and can be ground up. Unfortunately, grinding is going to put heat back in. So consider grinding slowly – some labs grind biological materials like skin samples with a special mortar and pestle cooled beforehand with liquid nitrogen. Just be sure everything in contact with the material has been cooled, and use a thick walled container with lots of thermal mass.
Separating Wheat From Chaff
Sometimes you have a mix and need to separate it. Your roommate dumped all the gummy bears and all those weird ginger candies into a bowl or whatever. Last week we introduced particle segregation as a bad thing. But when you want to un-mix a mixture, it can be a good thing. Any of the techniques from last week can be an aid.
Sieves and screens work to separate by size. They clog unless the material keeps moving over them. One simple way to do this is to flow the material over sieves on a slanted board, finest sieve first. Another is to mechanically shake the screen. Paper filters are just fine screens, and do clog.
A trommel is a slowly turning cylinder with walls of different sized screens along it’s length. Material is fed into the fine screen end and slowly moves towards the other.
Stokes law provides another way to separate materials as we saw above. Make an upward air draft in a vertical pipe. Deliver the material into the pipe part way up. Materials with more drag than weight will go up, larger materials will go down. You can use the air speed to control the size of particle. An industrial machine called an air classifier does this with higher velocity air blowing material into the rim of a spinning set of blades.
It could be the air (or another gas) you want to remove. There are a couple ways to do it. The first is the cyclone familiar to wood shops. The second is even simpler – inject the air/material mix into the top of a tall, slender container with a tube that extends about halfway into the container. Let the air out from an outlet pipe in the roof. The air flow expands, slows down, and the material falls out.
You can just blow the material sideways – the age old system of threshing wheat works this way. Wheat comes from the plant with a husk, you beat it with a flail to loosen the husk, giving you wheat grains and chaff mixed. Put the mix on a blanket and have four peasants toss it repeatedly. The chaff blows away in the wind.
Inertial Separation
A very sensitive separation technique is inertial separation. Here’s a mix of gummy colas and jelly beans. We separated them by tilting and gently shaking the sheet. A material moves on a sheet by staying in place until the acceleration is more than some critical value. Then it rolls or slides.
If your material is dirt or such, run a magnet through it. There’s iron ore and bits of human generated iron in a lot of soil. It can get into motors and such. If you need it out run the material past magnets. An eddy current separator uses AC magnetic effects to do the same with nonferrous metals.
You can also segregate materials by dissolving them. A mixture of table salt and white sand would seem impossible, but if you stir it into water, then decant and boil off the water, the salt and sand can be recovered separately. But we think we’re veering into chemistry now, and we should stop.
Next time we’ll finish up by looking at controlling movement: building gates and contraptions that move your bulk material without clogging up.