This WiFi Spoofing Syringe Is For External Use Only

A browse through his collected works will tell you that [El Kentaro] loves to build electronics into interesting enclosures, so when he realized there’s enough room inside a 150 ml plastic syringe to mount an ESP8266, a battery, and a copious amount of RGB LEDs, the “Packet Injector” was the inescapable result.

Granted, the current incarnation of this device doesn’t literally inject packets. But [El Kentaro] wasn’t actually looking to do anything malicious, either. The Injector is intended to be a fun gag for him to bring along to the various hacker cons he finds himself at, like his DEAUTH “bling” necklace we saw at DEF CON 26, so having any practical function is really more icing on the cake than a strict requirement.

In the end, the code he came up with for the Adafruit Feather HUZZAH that uses the FakeBeaconESP8266 library to push out fictitious networks on demand. This is a trick we’ve seen used in the past, and makes for a relatively harmless prank as long as you’re not pumping out any particularly unpleasant SSIDs. In this case, [El Kentaro] punctuates his technicolor resplendency with beacons pronouncing “The WiFi Doctor is Here.”

But the real hack here is how [El Kentaro] controls the device. Everything is contained within the syringe chamber, and he uses a MPL3115A2 I2C barometric pressure sensor to detect when it’s being compressed. If the sensor reads a pressure high enough over the established baseline, the NeoPixel Ring fires up and the fake beacon frames start going out. Ease up on the plunger, and the code detects the drop in pressure and turns everything back off.

If this build has piqued your interest, [El Kentaro] gave a fascinating talk about his hardware design philosophy during the WOPR Summit that included how he designed and built some of his “greatest hits”; including a Raspberry Pi Zero enclosure that was, regrettably, not limited to external use.

Supercap Drink Coasters Are The Life Of The Party

You’ve probably seen multicolored flashing LEDs embedded into clear plastic cups or coasters before, they’re quite commonly used in fancy restaurants that also feature animatronic characters and a gift shop on the way out. But have you ever wondered about the logistics of maintaining such devices? When the anthropomorphic rodent shuts down for the night, you’re going to want to clean all those blinking doodads; but any opening to connect a charger or insert a battery is just a leak waiting to happen.

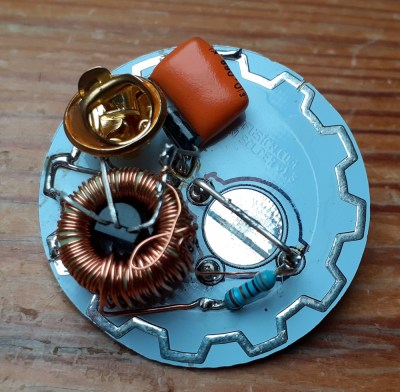
[Scott Clandinin] has come up with a solution to this problem that’s equal parts brilliant simplicity and unabashed overengineering. Using wireless charging and supercapacitors, he’s developing an LED coaster that can be hermetically sealed in clear resin.

With no plugs to connect or batteries to change, these coasters can be permanently encapsulated with no ill effects. Granted the supercapacitors will degrade with time and eventually won’t hold a charge for as long, but even the most conservative estimates would have these coasters still partying in a decade.

For his prototype version [Scott] has put together a simple charging base, but we imagine in a full deployment such devices could be charged with induction coils built into a bar or table. While the energy consumption could potentially be a showstopper, we’d love to see a future version that integrates a radio receiver. Then the coasters could double as pagers to let diners know their table is ready.

While this device is obviously much thicker than a traditional coaster, it looks fairly reasonable even at this early stage. We like the concentric design that puts the coil inside the PCB, and wonder if similar cutouts couldn’t be used to get the twin 15F supercapacitors and charging module hunkered down just a few millimeters more. The 2019 Hackaday Prize is all about evolving an idea into a design suitable for production, and those are the sort of incremental improvements that the judges will certainly be keeping an eye out for.

Make Your Own Flexible Panel Lights

In this day and age, production values are everything. Even bottom-rung content creators are packing 4K smartphones and DSLRs these days, so if you want to compete, you’re gonna need the hardware. Lighting is the key to creating good video, so you might find a set of flexible panel lights handy. Thankfully, [DIY Perks] is here to show you how to build your own. (Video embedded below.)

The key to building a good video light rig is getting the right CRI, or Color Rendering Index. With low CRI lights, colors will come out looking unnatural or with odd casts in your videos. [DIY Perks] has gone to the effort of hunting down a supplier of high-quality LED strips in a range of different color temperatures that have a high CRI value, making them great for serious video work.

To build the flexible panel, the LED strips are glued onto a fake leather backing pad, which is then given a steel wire skeleton to enable it to be bent into various shapes. Leather loops are built into each corner of the panel as well, allowing the light to be fitted to a stand using a flexible aluminium bracket. The LEDs are slightly under-volted to help them last longer and enable them to run from a laptop power supply.

The build is one that focuses on light quality and usability, rather than just throwing a bunch of bright LEDs at the problem and calling it good. The results are great, with the panel showing a significant improvement on [DIY Perks]’s earlier builds.
Continue reading “Make Your Own Flexible Panel Lights”

Driving P5 Panels With A Raspberry Pi

Building displays out of LEDs can be fun, but quickly becomes tedious as the pixel count increases. At this point, it’s worthwhile investing in off-the-shelf panels that have everything pre-soldered and ready to go. [Tom Hammond] wanted to run a P5 panel, and put a Raspberry Pi to work to get it going.

P5 panels are so-called for their 5 mm spacing between LEDs. The panels in question are built with RGB LEDs, allowing full-color graphics to be displayed. In this build, a 64 x 32 panel is used for a total of 2048 pixels. A Raspberry Pi Zero runs the display, using its GPIO to clock out pixel data. Software designed for Christmas light displays is used to program the light show, with xLights being the choice in this case. It’s all wrapped up in a tidy 3D printed frame, and the final product looks remarkably well put together.

It’s a great way to get familiar with P5 panels, and an excellent starting point if you’re contemplating a larger build down the track. If you’re going all out, consider how to make the most of your install from an architectural perspective. Video after the break.

Continue reading “Driving P5 Panels With A Raspberry Pi”

Big Ol’ LED Wall Looks Cool, Can Draw Over 170 Amps

Building giant LED walls comes with a serious set of challenges. Whether they lie in power, cable routing, or just finding a way to clock out data fast enough for all the pixels, it takes some doing to build a decent sized display. [Phill] wanted a statement piece for the office, so rolled up his sleeves and got to work.

The build uses P5 panels, which we’ve seen used before on a smaller scale. Initial testing was done with a Raspberry Pi 3, which started to run out of grunt when the build reached 28 panels. The refresh rate was slow, and anything with motion looked messy. At that point, a dedicated driver was sourced in order to handle the full 48-panel display. Other challenges involved dealing with the huge power requirements – over 170 amps at 5 volts – and building a frame to hold all the panels securely.

The final product is impressive, standing 2 meters wide and 1.2 meters high. Resolution is 384 x 256. With a Mac Mini running video into the display through the off-the-shelf driver, all manner of content is possible. [Phill] even whipped up a Slack channel for users to send GIFs and text messages to the display. Naturally, we’re sure nobody will take advantage of this functionality.

If you’ve got your own giant LED wall, and you’re dying to tell us about it, make sure you get in touch. Video after the break.

Continue reading “Big Ol’ LED Wall Looks Cool, Can Draw Over 170 Amps”

Preserving Historic NASA Display Technology

When [Patrick Hickey] spent a tidy sum on eBay to purchase a pair of seven-segment displays used in the Launch Control Center at Kennedy Space Center during the Apollo program, he could have just put them up on a shelf. It’s certainly what most people would have done. Instead, he’s decided to study and document their design with the hope of eventually creating 3D replicas of these unique pieces of NASA history.

With a half century now separating us from the Moon landing, it’s more important than ever to preserve the incredible technology that NASA used during mankind’s greatest adventure. Legitimate Apollo-era hardware is fairly scarce on the open market, and certainly not cheap. As [Patrick] explains on the Hackaday.io page for this project, being able to 3D print accurate replicas of these displays is perhaps the best way we can be sure they won’t be lost to history.

But more than that, he also wants others to be able to see them in operation and perhaps even use them in their own projects. So that means coming up with modern electronics that stand-in for the 60s era hardware which originally powered them.

Since [Patrick] doesn’t have access to whatever (likely incandescent) lighting source these displays used originally, his electronics are strictly functional rather than being an attempt at a historic recreation. But we have to say, the effect looks fantastic regardless.

Currently, [Patrick] is putting most of his efforts on the smaller of the two displays that he calls “Type A”. The chunk of milled aluminum with integrated cooling fins has a relatively simple shape that should lend itself to replication through 3D scanning or even just a pair of calipers. He’s also put together a proof of concept for how he intends to light the display with 5mm LEDs on a carefully trimmed bit of protoboard, which he plans on eventually refining to reduce the number of wires used.

One aspect he’s still a little unsure of is how best to replicate the front mask. It appears to be made of etched metal with an integrated fiberglass diffuser, and while he’s already come up with a few possible ways to create a similar front panel for his 3D printed version, he’s certainly open to suggestions from the community.

This isn’t the first time we’ve seen a dedicated individual use 3D printing to recreate a rare and expensive object. While the purists will say that an extruded plastic version doesn’t compare to the real thing, we think it’s certainly better than letting technology like this fade into obscurity.

College Project Nets 360 Degree POV Display

Senior college projects are the culmination of years of theoretical learning finally put into practice. For many students they are their first experience of doing some proper, real world engineering. [Melangeaddict] chose to take on a persistence of vision display for his final project, and learned plenty along the way.

The display consists of a row of 48 RGB LEDs mounted on an arm capable of rotating a full 360 degrees, with a simple paper diffuser. This arm is spun up by a belt drive from an electric motor at significant rotational speed, so getting close to this machine is quite inadvisable. Thanks to quality bearings and a careful build, rotating resistance is minimal. An infrared LED is mounted on the frame, and the light picked up by a photodiode on the rotating arm, allowing the images to remain fixed in space without drifting over time. Images can be loaded to the display wirelessly over a Bluetooth interface, which was quite advanced for a DIY project in 2011.

We’re a fan of the 360 degree approach to POV displays, and with the right rotational speed and fast data rates, it would be possible to get some seriously high resolution out of the device. Just be careful not to stick your hands in the mechanism.

There’s a deep well to explore when it comes to POV displays, from three-dimensional builds to vibrating flexible setups. Video after the break.

Continue reading “College Project Nets 360 Degree POV Display”