When the ESP32 microcontroller first appeared on the market it’s a fair certainty that somewhere in a long-forgotten corner of the Internet a person said: “Imagine a Beowulf cluster of those things!”.
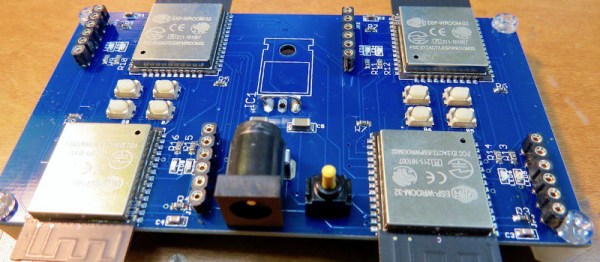
Someone had to do it, and it seems that the someone in question was [Kodera2t], who has made a mini-cluster of 4 ESP32 modules on a custom PCB. They might not be the boxed computers that would come to mind from a traditional cluster, but an ESP32 module is a little standalone computer with processing power that wouldn’t have looked too bad on your desktop only in the last decade. The WiFi on an ESP32 would impose an unacceptable overhead for communication between processors, and ESP32s are not blessed with wired Ethernet, so instead the board has a parallel bus formed by linking together a group of GPIO lines. There is also a shared SPI SRAM chip with a bus switchable between the four units by one of the ESp32s acting as the controller.
You might ask what the point is of such an exercise, and indeed as it is made clear, there is no point beyond interest and edification. It’s unclear what software will run upon this mini-cluster as it has so far only just reached the point of a first hardware implementation, but since ESP32 clusters aren’t exactly mainstream it will have to be something written especially for the platform.
Plenty of PC games rely on the mouse for input, and browser games are no exception. Unfortunately though, this isn’t always the most intuitive controller. [Nathan Ramanathan] combined a couple hacks to get the controller he wanted for playing browser games like Agar and Slither. No rodents were harmed in this project.
The games he wanted to dominate were top-down view so there was no need to move the mouse far from the center of the screen. For a more intuitive interface, a Wii nunchuck with its integrated joystick was selected. Nunchucks were notoriouslyhackable. An Arduino converted the nunchuck’s data into mouse movements. Inside the computer, Autohotkey kept the mouse pointer reined in where it was useful. Autohotkey was a scripting tool for executing keyboard and mouse macros.
The result was a joystick which controlled these browser games exactly the way you would expect a joystick to control a game. Mouse functionality, including standard and fast scrolling, was an added bonus so games like Minecraft aren’t left behind. The ergonomics of the nunchuck make us wonder why it hasn’t been seen in more wearable hacks.
Who knows how far the Vectrex system, or vector graphics gaming in general could have gone if not for the crash of ’83? The console wars might have been completely different if not for this market saturation-based reset button.
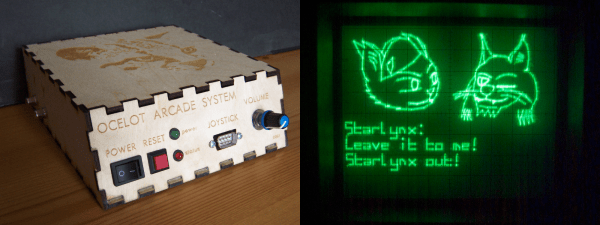
[Matt Carr] doesn’t own a Vectrex, but he does have a Tektronix 465 oscilloscope. After an intense labor of love and documentation, he also has a shiny new vector graphics arcade system that he built himself. It’s based on a dsPIC33 and uses a dual-channel DAC to produce wire frame 3-D graphics and send X-Y coordinates to the ‘scope via phono outputs. The PIC’s internal DAC is meant for audio and didn’t do so well with graphics, so [Matt] used a TLV5618A piggybacked on the PIC’s DAC pins.
The Ocelot doesn’t take cartridges, though it might someday. For now, changing games means getting out the PICkit. There are currently two to choose from: Star Lynx, an awesome flying shooter where you get to save a feline population, and Mattsteroids, which is exactly what it sounds like. There’s only one Ocelot in existence, and although it isn’t for sale, [Matt] has terrific technical documentation should you care to replicate it. One thing you might not be able to replicate is the awesome vintage advert he made for the Ocelot, which is cued up after the break.
What do you do, when you need a random number in your programming? The chances are that you reach for your environment’s function to do the job, usually something like rand() or similar. This returns the required number, and you go happily on your way.
A shift register configured as a pseudo-random number generator. [by KCAuXy4p CC0 1.0]Except of course the reality isn’t quite that simple, and as many of you will know it all comes down to the level of randomness that you require. The simplest way to generate a random number in software is through a pseudo-random number generator, or PRNG. If you prefer to think in hardware terms, the most elementary PRNG is a shift register with a feedback loop from two of its cells through an XOR gate. While it provides a steady stream of bits it suffers from the fatal flaw that the stream is an endlessly repeating sequence rather than truly random. A PRNG is random enough to provide a level of chance in a computer game, but that predictability would make it entirely unsuitable to be used in cryptographic security for a financial transaction.
There is a handy way to deal with the PRNG predictability problem, and it lies in ensuring that its random number generation starts at a random point. Imagine the shift register in the previous paragraph being initialised with a random number rather than a string of zeros. This random point is referred to as the seed, and if a PRNG algorithm can be started with a seed derived from a truly unpredictable source, then its output becomes no longer predictable.
Selecting Unpredictable Seeds
Computer systems that use a PRNG will therefore often have some form of seed() function alongside their rand() function. Sometimes this will take a number as an argument allowing the user to provide their own random number, at other times they will take a random number from some source of their own. The Sinclair 8-bit home computers for example took their seed from a count of the number of TV frames since switch-on.
The not-very-random result of a thousand analogRead() calls.
The Arduino Uno has a random() function that returns a random number from a PRNG, and as you might expect it also has a randomSeed() function to ensure that the PRNG is seeded with something that will underpin its randomness. All well and good, you might think, but sadly the Atmel processor on which it depends has no hardware entropy source from which to derive that seed. The user is left to search for a random number of their own, and sadly as we were alerted by a Twitter conversation between @scanlime and @cybergibbons, this is the point at which matters start to go awry. The documentation for randomSeed() suggests reading the random noise on an unused pin via analogRead(), and using that figure does not return anything like the required level of entropy. A very quick test using the Arduino Graph example yields a stream of readings from a pin, and aggregating several thousand of them into a spreadsheet shows an extremely narrow distribution. Clearly a better source is called for.
Noisy Hardware or a Jittery Clock
As a slightly old-school electronic engineer, my thoughts turn straight to a piece of hardware. Source a nice and noisy germanium diode, give it a couple of op-amps to amplify and filter the noise before feeding it to that Arduino pin. Maybe you were thinking about radioactive decay and Geiger counters at that point, or even bouncing balls. Unfortunately though, even if they scratch the urge to make an interesting piece of engineering, these pieces of hardware run the risk of becoming overcomplex and perhaps a bit messy.
The significantly more random result of a thousand Arduino Entropy Library calls.
The best of the suggestions in the Twitter thread brings us to the Arduino Entropy Library, which uses jitter in the microcontroller clock to generate truly random numbers that can be used as seeds. Lifting code from the library’s random number example gave us a continuous stream of numbers, and taking a thousand of them for the same spreadsheet treatment shows a much more even distribution. The library performs as it should, though it should be noted that it’s not a particularly fast way to generate a random number.
So should you ever need a truly random number in your Arduino sketch rather than one that appears random enough for some purposes, you now know that you can safely disregard the documentation for a random seed and use the entropy library instead. Of course this comes at the expense of adding an extra library to the overhead of your sketch, but if space is at a premium you still have the option of some form of hardware noise generator. Meanwhile perhaps it is time for the Arduino folks to re-appraise their documentation.
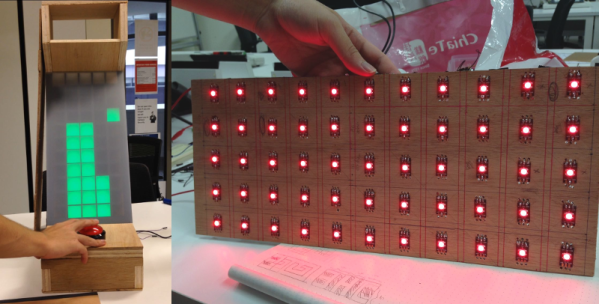
For [LumoW], what started as a school project turned into a passion project. He and his team made a hardware implementation of an arcade game called Stacker. Never heard of it? It’s pretty fun, kind of like an inverse Tetris. You can play the flash version here and see their mini arcade version after the break.
The game is based around the Mojo FPGA which the class required, and it’s programmed entirely in bitwise operators. It uses WS2812 RGB LEDs to represent the individual tower building blocks, and these are mounted on plywood in a matrix and separated into cells by a grid of foam board. After some trial and error, the team found the perfect shade of acrylic to diffuse the bright dots into glowing squares.
Since the game only needs one input, we don’t think [LumoW] should apologize at all for using the biggest, baddest button they could find. Besides, the game has that edge-of-your-seat action that can turn panic into heavy-handedness and cool DIY arcade games into shards of sadness.
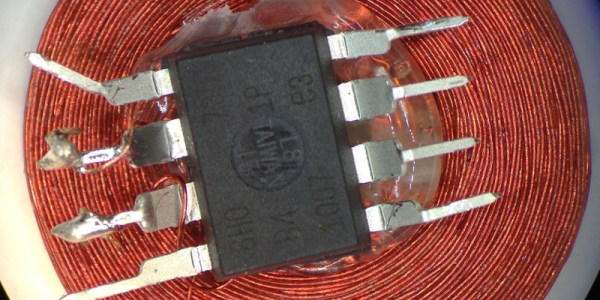
One of Atmel’s smallest microcontrollers, the ATtiny, is among the most inexpensive and reliable chips around for small applications. It’s also one of the most popular. If you don’t need more than a few inputs or outputs, there’s nothing better. As a show of its ability to thrive under adverse conditions, [Trammell Hudson] was able to shoehorn an ATtiny into an RFID circuit in a way that tests the limits of the chip design.
The RFID circuit only uses two of the ATtiny’s pins and neither of which is the ground or power pin. The ATtiny is equipped with protective diodes on its input pins, and if you apply an AC waveform to the input pins, the chip is able to use the leakage current to power itself. Once that little hurdle is crossed, the ATtiny can do the rest of its job handling the RFID circuitry.
This project takes a deep dive into the internals of the ATtiny. If you’ve ever wondered what was going on inside of everyone’s favorite tiny microcontroller, or if you’re looking for an RFID circuit that keeps parts counts to an absolute minimum, this is the project for you. The ATtiny is more than just a rugged, well-designed chip, though. It’s capable of a lot more than such a small chip should be able to.
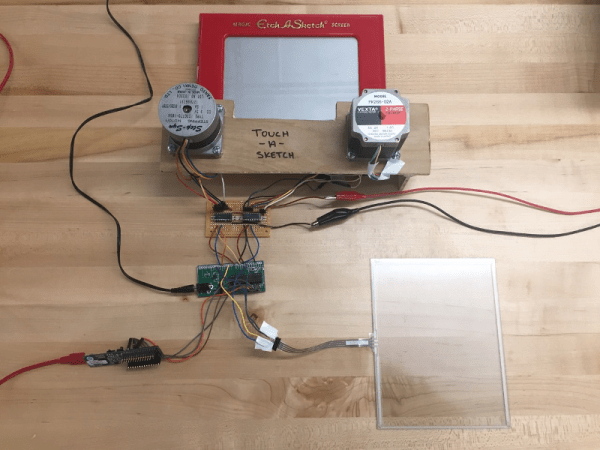
After nearly 60 years and a lot of stairs and squares, there is finally an easier way to draw on an Etch A Sketch®. For their final project in embedded microcontroller class, [Serena, Francis, and Alejandro] implemented a motor-driven solution that takes input from a touch screen.
Curves are a breeze to draw with a stylus instead of joysticks, but it’s still a 2-D plotter and must be treated as such. The Touch-A-Sketch system relies on the toy’s stylus starting in the lower left hand corner, so all masterpieces must begin at (0,0) on the knobs and the touch screen.
The BOM for this project is minimal. A PIC32 collects the input coordinates from the touch screen and sends them to a pair of stepper motors attached to the toy’s knobs. Each motor is driven by a Darlington array that quickly required a homemade heat sink, so there’s even a hack within the hack. The team was unable to source couplers that could deal with the discrepancy between the motor and knob shaft sizes, so they ended up mounting the motors in a small plywood table and attaching them to the stock knobs with Velcro. This worked out for the better, since the Etch A Sketch® screen still has to be reset the old-fashioned way.