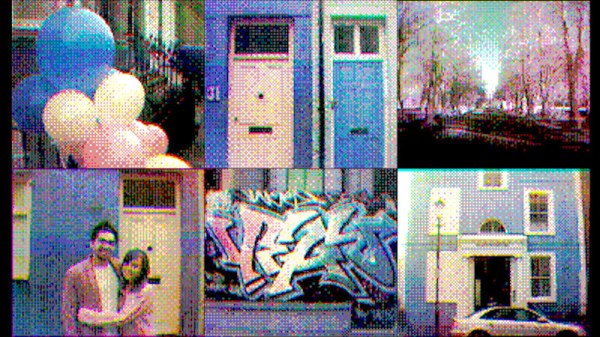
Adding Bluetooth To Original SNES Controllers

There’s a bunch of companies selling wireless Super Nintendo style controllers out there. You can go on Amazon and get any number of modern pads that at least kinda-sorta look like what came with Nintendo’s legendary 1990’s game console. They’ve got all kinds of bells and whistles, Bluetooth, USB-C, analog sticks, etc. But none of them are legitimate SNES controllers, and for some people that’s just not good enough.

[sjm4306] is one of those people. He wanted to add Bluetooth and some other modern niceties to a legitimate first-party SNES controller, so he picked up a broken one off of eBay and got to work grafting in his custom hardware. The final result works with Nintendo’s “Classic Edition” consoles, but the concept could also work with the original consoles as well as the computer if you prefer your classic games emulated.

A custom ATMEGA328P-powered board polls the controller’s SPI serial shift register in much the same way the original SNES would have. It then takes those button states and sends them out over UART with a HC-05 Bluetooth module. The controller is powered by a 330 mAh 3.7V battery, and a charging circuit allows for easily topping the controller off with a standard USB cable.

A particularly nice touch on the controller is the use of custom light pipes for the status LEDs. [sjm4306] made them by taking pieces of transparent PLA 3D printer filament, heating and flattening the end, and then sanding it smooth. This provides a diffusing effect on the light, and we’ve got to say it looks very good. Definitely a tip to file away for the future.

On the receiving side, this project was inspired by a custom NES Classic Edition Advantage controller we featured last year, and borrows the work creator [bbtinkerer] did to get his receiver hardware talking to the Classic console over I2C.

We’ve seen a number of projects which have added wireless functionality to the classic Super Nintendo controller, but most tend to be more invasive than this one. We like the idea of reading the controller’s original hardware rather than completely gutting it.

Continue reading “Adding Bluetooth To Original SNES Controllers”

A New Take On Building A Portable N64

When home consoles go mobile, whether in the form of modded original hardware or emulation, they usually take a pretty standard shape. A screen in the middle, with buttons either on the sides or below it. Basically the same layout Nintendo popularized with born-handheld systems such as the Game & Watch series and original Game Boy. Like the saying goes, if it ain’t broke…

But [Le Nerdarto] had a different idea. He came across a broken N64 and wanted to turn it into a portable console, but not necessarily a handheld one. Noticing the cartridge was about the perfect size to contain a small LCD and in an ideal position, he set out to make what is arguably the most literal interpretation of “portable N64” we’ve ever seen. It might not be the most practical iteration of this concept, but it definitely gets extra points for style.

After he stripped the N64 of its original hardware, he installed a Raspberry Pi 3 and an RC battery eliminator circuit (BEC) to get 5V out of the internal 6200 mAh 7.4V battery. [Le Nerdarto] says this provides power for the Pi, the LCD, and the various lighting systems for up to 10 hours. He’s also added USB ports in the front of the system for controllers, and an HDMI port on the back so he can still connect the system up to a TV when not on the move.

The 3.5 inch LCD in the cartridge is arguably the centerpiece of the build, and while it might be on the small side, we can’t deny it’s a clever idea. [Le Nerdarto] had the good sense to tilt the it back a few degrees to put the display at a more comfortable angle, but otherwise it looks stock since he was able to fit everything in without cutting the back of his donor cartridge out. For those who might be wondering, the “cartridge” can’t be removed, but we’ll admit that would have been a killer feature to add especially with the HDMI port on the back.

Of course, since it’s running emulators on a Raspberry Pi, this isn’t only a portable N64. The front mounted USB ports allow him to plug in all sorts of controllers and emulate classics from pretty much any console that’s older than the N64 itself. Ironically the Raspberry Pi 3 isn’t exactly an ideal choice for N64 emulation, but a good chunk of titles are at least playable.

If you’re more of a purist and want a true portable N64, we’ve covered plenty of those over the years to get you inspired.

Continue reading “A New Take On Building A Portable N64”

Bring Your Own Controller Kits Just Add Bluetooth

Known for their build quality and low latency, the [8bitdo] line of Bluetooth controllers are generally well liked among classic videogame devotees. They match modern conveniences like rechargeable batteries and Bluetooth connectivity with old school color schemes and the tried-and-true feel of a D-pad. All of their current offerings are modeled to invoke the same feel of console controllers of the past, however, for some there is no substitute for the original. For that type of hobbyist, the company created DIY Bluetooth mod kits in the form of drop-in replacement PCBs.

The featured mod kits are for the original NES controller, SNES controller, and 6-button Genesis Controller. They feature a 180 mAh Li-ion battery for an estimated 7.5 hours of gameplay, and a unique barrel plug type USB charging cable. The charging port fills the void left by the controller’s connection cable and also doubles a the LED status indicator. Though for the Sega Genesis mod kit, the charge port changes to a standard micro USB.

The [8bitdo] website boasts compatibility across Android, Linux, Mac, and Windows (drivers permitting) and even Nintendo Switch. With the addition of one of the company’s Retro Receivers, you are able to use the controllers on the original NES or SNES alongside their contemporary NES/SNES classic console counterparts.

Continue reading “Bring Your Own Controller Kits Just Add Bluetooth”

Now, Finally, We Can Play With Power

In case you’re not a ’90s kid, the Nintendo Power Glove is the greatest device for human-computer interaction ever created. It’s so good, they called it bad, and then they made a movie about it. At its heart, the Power Glove is just some force sensors in the fingers of a glove, but that hasn’t stopped hackers from cracking these gloves open for years. We’ve seen the Power Glove used in Hackaday Prize entries before, we’ve seen it control quadcopters, we’ve seen it used as a Vive controller, and the Ultimate Power Glove comes loaded up with Bluetooth, motion tracking, a 9-axis IMU, and a 20-hour battery life. With all these Power Glove hacks, what more can be done?

Surprisingly, we haven’t seen a Power Glove hack that transmutes this icon of cyberpunk into a usable keyboard and mouse. That’s exactly what [Scott] is doing for his Hackaday Prize entry, and the results are looking good so far.

First up, the mouse. This is actually a joystick-based version of cursor control, capitalizing on the force sensors in the Power Glove to register clicks. Add in a button, some perfboard, and an Arduino, and you have a USB input device that can control a cursor. Without any good solution for a small keyboard, [Scott] turned to a normal ‘ol Bluetooth keyboard mounted to the Power Glove’s wrist.

It might not be as fancy as the great Power Glove hacks out there, but this is certainly the most useful. Who wouldn’t want to wear their keyboard and mouse at all times, all while looking like they stepped out of a time machine controlled by a Commodore 64? This is the heights of early ’90s futurism, and a great entry for the Hackaday Prize.

Dumping A Zelda SNES ROM, And Learning A Few Things Along The Way

For many of us, being given a big old DIP ROM from nearly thirty years ago and being told to retrieve its contents would be a straightforward enough task. We’d simply do what we would have done in the 1980s, and hook up its address lines to a set of ports, pull its chip select line high, and harvest what came out of the data lines for each address.

But imagine for a minute that an old-fashioned parallel ROM is a component you aren’t familiar with, as [Brad Dettmer] did with the ROM from a SNES Zelda cartridge. We’ve seen plenty of reverse engineering stories with ancient computing gear as their subject, but perhaps it’s time to accept that some of the formerly ubiquitous devices are edging towards that sort of status.

So [Brad] takes us through the process of using the Saleae logic analyser to interrogate the chip while an Arduino stepped through its address lines, and the lesson is probably that while it seems like a sledgehammer to crack a nut it is important to factor in that unfamilarity. If you’d never worked with a 1980s ROM, it would make sense to use the tool you are familiar with, wouldn’t it?

Anyway, all’s well that ends well. While we’re on the subject of Nintendo ROMs, have a read about extracting the boot ROM from a cloned Game Boy.

Metroid, Zelda, And Castelvania Auto-Mapped With NES Emulation & Heuristics

The NES was one of the flagship consoles of the glorious era that was the 1980s. Many of the most popular games on the platform involved some sort of adventure through scrolling screens — Metroid, Super Mario, and Zelda all used this common technique. For many games, keeping track of the map was a huge chore and meant mapping by hand on graph paper or using the screenshots published in Nintendo Power magazine. These day’s there’s a better way. [Daniel] set out to automatically map these huge two-dimensional worlds, developing software he calls WideNES to do it.

WideNES is an add-on to [Daniel]’s own NES emulator, ANESE. As part of the emulator, WideNES can easily read the various registers of the NES’s Picture Processing Unit, or PPU. The registers of the PPU are used to control the display of the background and sprite layers of NES graphics, and by monitoring these, it is possible to detect and map out the display of levels in various NES games.

It’s an interesting piece of software that relies on a thorough understanding of the NES display hardware, as well as the implementation of some neat tricks to deal with edge cases such as vertical scrolling in The Legend of Zelda or room changes in games like Castlevania — the use of perceptual hashing is particularly genius. There’s source and more available on the project page, including a GitHub link, if you’re interested in getting down to brass tacks.

We’re impressed by the manner in which WideNES is able to so neatly map out these games of yesteryear, and can’t wait to see where the project goes next. [Daniel] notes that it should be possible to integrate into more popular emulators without too much trouble. If that’s not enough, check out this reverse-emulation Nintendo hack.

[Thanks to Michael for the tip!]

Using Modern Nintendo Controllers On The C64

There are plenty of people out there who still enjoy playing games on vintage computers like the Commodore 64. But while they likely return to these classic games themselves out of a sense of nostalgia, the feeling doesn’t always extend to the hardware itself. For example, one can enjoy playing Impossible Mission without having to use a contemporary C64 joystick.

Thanks to an open source project developed by [Robert Grasböck], C64 owners who want to take advantage of the improvements made to gaming controllers in the nearly 40 years since the system’s release now have another option. Called Nunchuk64, it allows you to use various Nintendo controllers which make use of the Wii “Nunchuk” interface on original C64 hardware. This includes the controllers from the recent “Classic Edition” NES and SNES systems, which offer a decidedly retro feel with all the benefits of modern technology and construction techniques.

Both the hardware and software for Nunchuck64 are open source, and everything you need to build your own version is in the project’s repository. [Robert] even has assembly instructions, complete with images, which walk you through building your own copy of the hardware and flashing the firmware onto it. This is a nice touch that we very rarely see even in open source projects. The board is populated with a ATmega328P microcontroller and a handful of passive components, making assembly fairly straightforward assuming you are comfortable with SMD work.

Bringing more modern controllers to classic systems seems to be gaining popularity recently, within the last few months we’ve seen Xbox 360 controllers on the Nintendo 64, and newly manufactured pads for the Atari 5200.

Continue reading “Using Modern Nintendo Controllers On The C64”