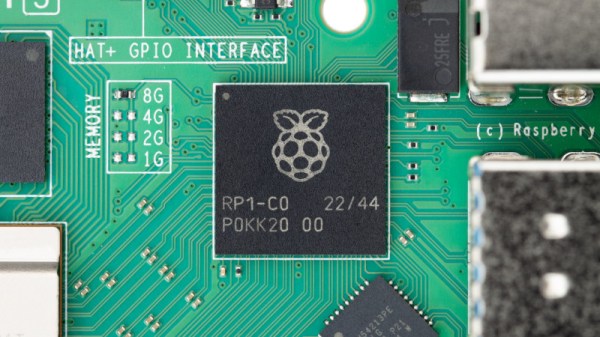
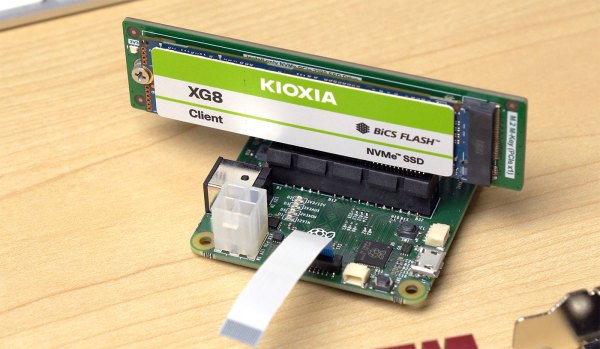
Showing a board with a Pi Pico plugged into it, a USB-A socket marked "USB host", and a character display that says "PASSED" referring to the board being the brains of a testing jig.

USB Host On RP2040 – With PIO

Folks from [Adafruit] are showing off a neat hack – USB host on RP2040, using the now-famous PIO peripheral. [Adafruit] builds a lot of RP2040 boards, and naturally, you gotta test them before you ship them to customers. They’ve been using very specific Teensies for that, and at some point, those became unobtainium. Based on the work of [sekigon-gonnoc] and with help of [Thach], they’ve made their TinyUSB library support bitbanging of USB over PIO, and successfully ported their test jig firmware to it!

The base Pico-PIO-USB repo by [sekigon-gonnoc] shows a pretty impressive state of affairs – with low-speed and full-speed USB host and full-speed USB device modes supported, and quite a few examples to get you started. [Adafruit]’s work integrates this code into their TinyUSB stack, specifically focusing on MST (mass storage) features – as this is what you need to program a RP2040. Of course, they also provide a mass storage example to boot!

Test jigs are pretty important to have when making multiple pieces of a board, and with RP2040 supporting more and more interfaces thanks to PIO, it sounds like the perfect chip for your next production testing-intended PCB. With the jig brains taken care of, you’ll want to look into building no less important mechanical part, and we’ve covered quite a few ways to sort that out – here’s an OpenSCAD script that generates lasercutting files out of KiCad boards, or a jig built out of scrap copperclad FR4, and a pretty extensive tutorial on making your own lasercuttable jigs, to boot.

Continue reading “USB Host On RP2040 – With PIO”

Giant Spinning POV Christmas Tree

Spinning Holographic POV Christmas Tree Of Death

[Sean Hodgins] really harnessed the holiday spirit to create his very own Giant Spinning Holographic Christmas Tree (of Death). It’s a three-dimensional persistence-of-vision (POV) masterpiece, but as a collection of rapidly spinning metal elements, it’s potentially quite dangerous as well. As [Sean] demonstrates, the system can display other images and animations well beyond the realm of mere holiday trees.

Initial experiments focused on refining the mechanical structure, bearings, and motor. A 1/2 horsepower A.C. motor was selected and then the dimensions of the tree were “trimmed” to optimize a triangular frame that could be rotated at the necessary POV speed by the beefy motor.  A six-wire electrical slip ring allows power and control signaling to be coupled to the tree through its spinning central shaft.

The RGB elements are SK9888 LEDs also know as DotStar LEDs. DotStar LEDs are series-chainable, individually-addressable RGB LEDs similar to NeoPixels. However, with around 50 times the pulse width modulation (PWM) rate, DotStars are more suitable for POV applications than NeoPixels.  The LED chain is driven by a Raspberry Pi 4 single board computer using a clever system for storing image frames.

If deadly rotational velocity is not your cup of tea, consider this slower spinning RGB Christmas tree featuring a DIY slip ring. Or for more POV, may we suggest this minimalist persistence-of-vision display requiring only a few LEDs and an ATtiny CPU.

Continue reading “Spinning Holographic POV Christmas Tree Of Death”

Roll Your Own WiFi Driver For The Pico W

The Raspberry Pi Pico is a handy little microcontroller that has become a widespread addition to many hackers’ workbench. The Pico W has a CYW4342W module (just like the Pi Zero W) to add WiFi capabilities and [Jeremy Bentham] ported his bare-metal WiFi driver to the Pico W.

The CYW43438 is an SDIO interface, so most of the code ported over from his Zerowi project, but there were a few notable tweaks along the way. Given that the Pi Pico SDK has the complete source code to drive the CYW43439 with an open source TCP/IP stack (lwIP) and the datasheets from Infineon are pretty detailed, why create your own driver?

The short answer is…because why not. But a second answer is to tweak it just how you like it. With his own implementation, [Jeremy] can focus on maximizing throughput and making WiFi a little easier to debug. He deeply delves into the hardware, scope traces, and code samples. It’s a tremendous five-part read over lunch. Some highlights include writing some code for the PIO (Programmable I/O) to interface with the SPI interface, bank switching in the WiFi RAM, handling the 140 different events, connecting to a network, and sending pings.

The PicoWi code is available on GitHub. Perhaps it can be integrated with this PCMIA interface to offer outstanding performance to an older laptop.

side by side, showing hardware experiments with capacitor gating through FETs, an initial revision of the modchip board with some fixes, and a newer, final, clean revision.

A Modchip To Root Starlink User Terminals Through Voltage Glitching

A modchip is a small PCB that mounts directly on a larger board, tapping into points on that board to make it do something it wasn’t meant to do. We’ve typically seen modchips used with gaming consoles of yore, bypassing DRM protections in a way that a software hacks couldn’t quite do. As software complexity and therefore attack surface increased on newer consoles, software hacks have taken the stage. However, on more integrated pieces of hardware, we’ll still want to return to the old methods – and that’s what this modchip-based hack of a Starlink terminal brings us.

[Lennert Wouters]’ team has been poking and prodding at the Starlink User Terminal, trying to get root access, and needed to bypass the ARM Trusted Firmware boot-time integrity checks. The terminal’s PCB is satellite-dish-sized, so things like laser fault injection are hard to set up – hence, they went the voltage injection route. Much poking and prodding later, they developed a way to reliably glitch the CPU into verifying a faulty firmware, and got to a root shell – the journey described in a BlackHat talk embedded below. Continue reading “A Modchip To Root Starlink User Terminals Through Voltage Glitching”

A two picture montage of the blackout logger, the left picture being the front e-ink display of the data logger in a black case and the second picture of the back of the data logger, with the raspberry pi pico show attached to an e-ink display, both sitting on a wooden table.

Blackout Logger Keeps Track Of Power Outages

[Dmytro Panin] lives in Kyiv, Ukraine where there have been rolling blackouts to stabilize the power grid. To help keep track of when the blackouts might happen, be they planned or emergency, and to get more information on how long the blackouts last, [Dmytro] has created a blackout logger.

The build consists of a Raspberry Pi Pico that connects to a DS3231 real time clock (RTC) with a Waveshare 3.7 inch eInk display which [Dmytro] puts into a custom 3D printed case. The RTC has it’s own small power supply, often times from a coin cell battery attached to the module, allowing it to keep time when the module and other devices attached to it are powered off.

The Raspberry Pi Pico is programmed to “poll” every 30 seconds, writing the current time to a file. Should the unit lose power, the last time, within a 30 second window, is available when power is restored and the unit wakes up again. Since the RTC has kept the current time, there is enough information to display the duration of the blackout. The eInk screen ensures that the information is readily available, even when there is no power.

War is not the only reason blackouts can occur and we’ve covered some issues with blackouts in Texas and California in the US.

A display with the magic mirror webpage shown running on it

Magic Mirror – On A Low CPU Budget

For quite a few hackers out there, it’s still hard to find a decently powerful Raspberry Pi for a non-eye-watering price. [Rupin Chheda] wanted to build a magic mirror with a web-based frontend, and a modern enough Raspberry Pi would’ve worked just fine. Sadly, all he could get was single-1 GHz-core 512MB-RAM Zero W boards, which he found unable to run Chromium well enough given the stock Raspbian Desktop install, let alone a webserver alongside it. Not to give up, [Rupin] gives us a step-by-step breakdown on creating a low-footprint Raspbian install showing a single webpage.

Starting with Raspbian Lite, a distribution that doesn’t ship with any desktop features by default, he shows how to equip it with a minimal GUI – no desktop environment needed, just an X server with the OpenBox window manager, as you don’t need more for a kiosk mode application. In place of Chromium, you can install Midori, which is a lean browser that works quite well in single-website mode, and [Rupin] shows you how to make it autostart, as well as the little quirks that make sure your display doesn’t go to sleep. The webserver runs in Heroku cloud, but we wager that, with such a minimal install, it could as well run on the device itself.

With these instructions, you can easily build a low-power single-page browser when all you have is a fairly basic Raspberry Pi board. Of course, magic mirrors are a well-researched topic by now, but you can always put a new spin on an old topic, like in this this retro-tv-based build. You don’t have to build a magic mirror to make use of this hack, either – build a recipe kiosk!

Pie Stop For Emergency DNS Needs

The war on Internet ads rages on, as the arms race between ad blockers and ad creators continues to escalate. To make a modern Internet experience even remotely palatable, plenty of people are turning to DNS-level filters to stop the ads from coming into the network at all. This solution isn’t without its collateral damage though, as the black lists available sometimes filter out something that should have made it to the user. For those emergencies, [Kristopher] created the Pie Stop, a physical button to enact a temporary passthrough on his Pi-Hole.

While [Kristopher] is capable of recognizing a problem and creating the appropriate white list for any of these incidents, others in his household do not find this task as straighforward. When he isn’t around to fix the problems, this emergency stop can be pressed by anyone to temporarily halt the DNS filtering and allow all traffic to pass through the network. It’s based on the ESP-01S, a smaller ESP8266 board with only two GPIO pins. When pressed, it sends a custom command to the Pi-Hole to disable the ad blocking. A battery inside the case allows it to be placed conveniently anywhere near anyone who might need it.

With this button deployed, network snafus can be effectively prevented even with the most aggressive of DNS-level ad blocking. If you haven’t thought about deploying one of these on your own network, they’re hard to live without once you see how powerful they are. Take a look at this one which also catches spam.