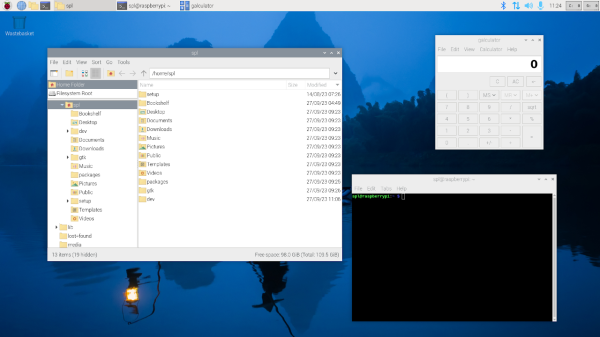
A 3D printed cat treat dispenser on a table with a laptop in the background and with a treat in it's tray and a cat on the left about to eat the treat.

Local IOT Cat Treat Dispenser

[MostElectronics], like many of us, loves cats, and so wanted to make an internet connected treat dispenser for their most beloved. The result is an ingenious 3D printed mechanism connected to a Raspberry Pi that’s able to serve treats through a locally run web application.

The inside of a 3d printed cat treat dispenser, showing the different compartments, shaft and wires running out the back.

From the software side, the Raspberry Pi uses a RESTful API that one can connect to through a static IP. The API is implemented as a Python Flask application running under a stand alone web server Python script. The web application itself keeps track of the number of treats left and provides a simple interface to dispense treats at the operators leisure. The RpiMotorLib Python library is used to control a 28BYJ-48 stepper motor through its ULN2003 controller module, which is used to rotate the inside shaft of the treat dispenser.

The mechanism to dispense treats is a stacked, compartmentalized drum, with two drum layers for food compartments that turn to drop treats. The bottom drum dispenses treats through a chute connected to the tray for the cat, leaving an empty compartment that the top drum can replenish by dropping its treats into through a staggered opening. Each compartmentalized treat drum layer provides 11 treats, allowing for a total of 22 treats with two layers stacked on top of each other. One could imagine extending the treat dispenser to include more drum layers by adding even more layers.

Source code is available on GitHub and the STL files for the dispenser are available on Thingiverse. We’ve seen cat electronic feeders before, sometimes with escalating consequences that shake us to our core and leave us questioning our superiority.

Video after the break!

Continue reading “Local IOT Cat Treat Dispenser”

a 3d printed case, sitting on a table with cactuses in the background, with a 3d rendered holo assistant reflected in a cone of polycarbonate sheets from a flat HDMI display pointed up

Anime Inspired Holographic Virtual Assistant

[Jessp] has created a very cute and endearing DIY virtual assistant called Maria. The build combines a 3D printed housing that uses a modern take on the “Pepper’s Ghost” illusion to render a virtual, three-dimensional anime inspired assistant that can take commands to get information about the weather, play music or set timers.

The hub houses a Raspberry Pi 4B and a 3.2 inch LCD HDMI screen mounted flat on its back to render the perspective corrected “Maria” character using a technique borrowed from the Pepper’s Cone project. Polycarbonate sheets are formed into a cone, allowing for the 3D effect of rendering the virtual assistant model. A consumer grade mini USB microphone is used to receive voice commands along with a consumer grade USB speaker for audio feedback. The virtual assistant offloads the text to speech services to Google Cloud, along with using a weather API and Spotify developer account to for its musical options.

All source code is available on [Jessp]’s GitHub page, including build instructions and STL files for the housing. We’ve featured open source voice assistants in the past, including Mycroft and a even a HAL-9000 virtual assistant (running Kalliope) but it’s nice to see further experimentation in this space.

Continue reading “Anime Inspired Holographic Virtual Assistant”

A smartphone-sized PCB is in a person's hand. A large blue chip package houses a 486 and the board has a SoundBlaster card and a 40 PIN Raspberry Pi Connector along one edge for attaching a Raspberry Pi Zero.

TinyLlama Is A 486 In Your Pocket

We love retrocomputing and tiny computers here at Hackaday, so it’s always nice to see projects that combine the two. [Eivind]’s TinyLlama lets you play DOS games on a board that fits in your hand.

Using the 486 SOM from the 86Duino, the TinyLlama adds an integrated Crystal Semiconductor audio chip for AdLib and SoundBlaster support. If you populate the 40 PIN Raspberry Pi connector, you can also use a Pi Zero 2 to give the system MIDI capabilities when coupled with a GY-PCM5102 I²S DAC module.

Audio has been one of the trickier things to get running on these small 486s, so its nice to see a simple, integrated solution available. [Eivind] shows the machine running DOOM (in the video below the break) and starts up Monkey Island at the end. There is a breakout board for serial and PS/2 mouse/keyboard, but he says that USB peripherals work well if you don’t want to drag your Model M out of the closet.

Looking for more projects using the 86Duino? Checkout ISA Sound Cards on 86Duino or Using an 86Duino with a Graphics Card.

Continue reading “TinyLlama Is A 486 In Your Pocket”

Is This The Smallest CP/M Machine Ever?

If you had an office word processor in the late 1970s, the chances are it ran Digital Research’s CP/M operating system. IBM went for Microsoft in the 1980s and the once-dominant player fell on hard times, but it survives today as a popular choice on retrocomputer platforms. Even the more compact Z80 systems are a little large for 2022, so when [Kian Ryan] needed the ultimate in CP/M portability it fell on a more modern piece of silicon. Hence he’s put it on a tiny RP2040-based board from Pimoroni alongside an Adafruit micro SD card breakout.

The tiny hardware is neat of course, but the real star of the show is the software. Non-CP/M aficionados will be interested to learn about RunCPM, and for this project, RunCPM 2040. This provides an emulated environment on a host microcontroller to run CP/M, allowing the operating system to be hosted on easier hardware than some of the original machines.

All this makes for a tiny development machine, but perhaps of more interest would be a machine that’s all-in-one with a display and perhaps a keyboard. The RP2040 is interesting in this case because of those programmable state machines. Could it be made to run a video display alongside RunCPM? We hope someone has a go at writing it.

Sprig Is An Open Source Handheld Game Console

[Hack Club] is a group that aims to teach teenagers about tech by involving them in open-source projects. One of the group’s latest efforts is Sprig, an open-source handheld game console, and [Hack Club] has even been giving them away!

The console is based around a Raspberry Pi Pico, paired up with a TFT7735 screen. There’s also a MAX98357A audio amp on board to provide sound. Other than that, there’s a full ten buttons for control, some LEDs for feedback, and it’s all assembled on a custom PCB designed for easy soldering.

Plenty of work has been done to make Sprig an accessible platform for first-time developers. Games can be created for Sprig and run either on the device, or in an online web-based editor. [Hack Club] is even running a program that will give Sprig hardware away to kids and teens worldwide who write a game for the platform and submit it to the online gallery.

If you’re eager to get into game development while understanding both the hardware and software side of things, Sprig might be just what you’re looking for. With today’s microcontrollers being so cheap and so powerful, we’ve seen some other great handheld designs recently, too!

An RP2040 Powered Pick And Place

Pick and place machines are a wonder to behold, as they delicately and accurately place part after part. Unfortunately, they have to have a similarly wondrous price tag. Luckily, they aren’t too difficult to make yourself as they share many properties of a 3D printer with some extra constraints. [Stargirl Flowers] released Starfish, an open-source pick-and-place control board based around an RP2040 to help people make their own.

She purchased a LumenPnP, and the itch to tinker became too much to ignore. The STM32 on the stock controller also happened to get fried, leaving an obvious opening to create a custom board. [Stargirl] chose Trinamic TMC2209 motor controllers to drive the three stepper motors. The power circuit is impressively overbuilt with a 3A fuse, a TVS diode for shunting voltage spikes, a P-channel MOSFET for reverse polarity protection, a low-pass filter for AC ripple, and a large 100μF capacitor.

The RP2040 is a good choice since it’s easy to get and has plenty of digital I/O. USB connects the board to the outside work and includes ESD TVS diodes to protect the board when connecting and disconnecting the USB port. Motors for vacuums are controlled by a 74HC2G34 buffer that drives enable lines to two MOSFETs. Solenoids are similar but with a high current peak and a much smaller current to keep them open. The DRV120 fits the bill as it is a single-channel relay with current regulation. I2C vacuum sensors are the same ones on the Lumen motherboard; they just required an I2C multiplexer.

It’s an extremely well-documented project explaining why each part was chosen and why. If you want to create an RP2040 project that needs to last, we consider this a guiding star. It’s all up on GitHub for you to take a look at.

This isn’t the first time we’ve seen RP2040 as part of a motor controller, and we suspect we’ll see more.

A Pi Pico Oscilloscope

At the budget end of the oscilloscope range lie the so-called pocket ‘scopes. About the size of a deck of cards, they combine a microcontroller and an LCD screen to make an instrument with a bandwidth in the tens of kilohertz and a not-too-sparkling performance. They’re something of a toy, but then again, if all that’s needed is a simple ‘scope for audio frequencies, they make a passable choice in a small package. Now [jgpeiro] has made one which is light years ahead of the toy kits, using a Raspberry Pi Pico, a 100 MHz ADC, and an effort to design a better input circuit.

At its simplest this could be a straightforward op-amp and ADC circuit feeding the Pico, but instead it has multiple stages carefully designed to offer the full bandwidth, and with gain, offset, and trigger settings being set by a series of DAC chips under software control. This and the decent bandwidth make this a much more viable oscilloscope, and one we’d like to see further developed.

By comparison, we took a look at the best of the competition a few years ago.