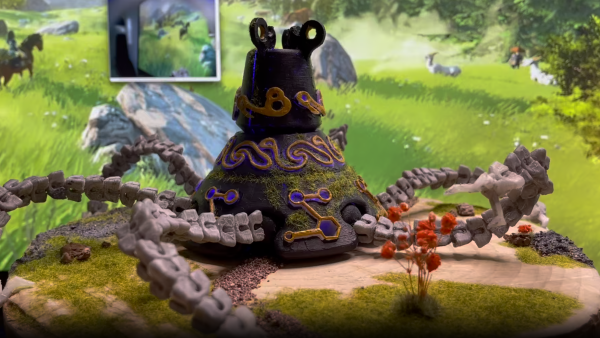
Chonky Palmtop Will Slide Into Your Heart

You probably know what a cyberdeck is by now, but you’ll find that people’s definitions differ. Some use the term rather loosely, applying it to things that are luggable at best. But we think you’ll agree that the “Chonky Palmtop” created by [Daniel Norris] AKA [a8ksh4] is without a doubt, quite cyberdeckian.

One of the hallmarks of a cyberdeck is that it folds up, often like a laptop in the screen-over-keyboard sense. Not only does chonky palmtop do that, but the split keyboard (more on that later) has this impressive pivot geometry and really satisfying slider mechanism thing going on. The whole thing folds up into a little brick, which [Daniel] says is about the size of an old Asus EEE laptop. (Remember those bad boys? Those were the days.)

Inside the brick is some stuff you might expect, like a Raspberry Pi 4 and a 7″ touchscreen. [a8ksh4] also packed in an AmpRipper 3000 LiPo charger, which is especially good for high voltage projects. Speaking of, there is a voltage button to check the battery level, which is then displayed on a trio of 7-segment displays that are smack dab in the middle below the screen.

Now about that split keyboard — that’s a Corne, which is kind of a happy medium between a lot of keys and too few, and 42 is probably enough keys for most people. Considering the overall size, we think that is a great amount of keys.

Not that you can tell by the keycaps on those Chocs, but [a8ksh4] is rocking the Miryoku layout and firmware. Slide past the break to watch chonky palmtop unfurl, boot into Ubuntu, and close back up in a brief demo video.

Continue reading “Chonky Palmtop Will Slide Into Your Heart”

A Real GPU On The Raspberry Pi — Barely.

[Jeff Geerling] saw the Raspberry Pi Compute Module 4 and its exposed PCI-Express 1x connection, and just naturally wondered whether he could plug a GPU into that slot and get it to work. It didn’t. There were a few reasons why, such as the limited Base Address Register space, and drivers that just weren’t written for ARM hardware. A bit of help from the Raspberry Pi software engineers and other Linux kernel hackers and those issues were fixed, albeit with a big hurdle in the CPU. The Broadcom chip in the Pi 4, the BCM2711, has a broken PCIe implementation.

There has finally been a breakthrough — Thanks to the dedicated community that has sprung up around this topic, a set of kernel patches manage to work around the hardware issues. It’s now possible to run a Radeon HD 5000/6000/7000 card on the Raspberry Pi 4 Compute Module. There are still glitches, and the Kernel patches to make this work will likely never land upstream. That said, It’s possible to run a desktop environment on the Radeon GPU on a Pi, and even a few simple benchmarks. The results… aren’t particularly inspiring, but that wasn’t really ever the point. You may be asking what real-world use is for a full-size GPU on the Pi. Sure, maybe crypto-mining or emulation, or being able to run more monitors for digital signage. More than that, it might help ensure the next Pi has a working PCIe implementation. But like many things we cover here, the real reason is that it’s a challenge that a group of enthusiasts couldn’t leave alone.

Continue reading “A Real GPU On The Raspberry Pi — Barely.”

Lofipi Keeps The Chill Beats Coming

These days, many people love having some lo-fi beats on when they chill and study. This has led to a cottage industry dedicated to producing said beats, and the format continues to grow in popularity. [Nicholas Sherlock] decided to build a custom audio device solely for the delivery of these comfortable tunes.

As seen on Reddit, the build relies on a Raspberry Pi 3B, paired with an X400 audio amplifier board and hooked up to a nicely-sized mid-range speaker. The hardware is assembled inside a case printed out of wood-effect PLA filament, giving it a nice old-school home audio aesthetic. As a bonus, the layer lines line up in such a way as to boost the woodgrain effect. Plug it in, and you will be immediately rewarded with lo-fi beats from boot.

Originally, the system ran a port of the code from lofigenerator.com, which algorithmically creates lo-fi beats from scratch. However, [Nicholas] could not in good conscience share the ported code, and has retooled the system to stream YouTube playlists using command line media player mpv instead. It’s set to stream typical lo-fi playlists, though could be repurposed to target anything on the platform.

It’s a nice build that really suits the lo-fi beats ideal. When you’re trying to study or focus, you don’t want to be mucking around with a YouTube tab open serving as a distraction. Instead, you can simply flick on the Lofipi, and vibe out.

The Raspberry Pi’s cheap price and great internet and media capabilities make it very popular for builds like these. They go some way to recreating the idea of receiving a broadcast, rather than forcing us into choice as per today’s modern on-demand media paradigm. If you’ve got thoughts on this, drop them in the comments, and if you’ve got your own great projects, do drop us a line.

Meet The RouterPi, A Compute Module 4 Based GbE Router

[Zak Kemble] likes to build things, and for several years has been pining over various Raspberry Pi products with an eye on putting them into service as a router. Sadly, none of them so far provided what he was looking for with regard to the raw throughput of the Gigabit Ethernet ports. His hopes were renewed when the Compute Module 4 came on scene, and [Zak] set out to turn the CM4 module into a full Gigabit Ethernet router. The project is documented on his excellent website, and sources are provided via a link to GitHub.

A view underneath shows off the RTC, power supply, and more.

Of course the Compute Module 4 is just a module- it’s designed to be built into another product, and this is one of the many things differentiating it from a traditional Raspberry Pi. [Zak] designed a simple two layer PCB that breaks out the CM4’s main features. But a router with just one Ethernet port, even if it’s GbE, isn’t really a router. [Zak] added a Realtek RTL8111HS GbE controller to the PCIe bus, ensuring that he’d be able to get the full bandwidth of the device.

The list of fancy addons is fairly long, but it includes such neat hacks as the ability to power other network devices by passing through the 12 V power supply, having a poweroff button and a hard reset button, and even including an environmental sensor (although he doesn’t go into why… but why not, right?).

Testing the RouterPi uncovered some performance bottlenecks that were solved with some clever tweaks to the software that assigned different ports an tasks to different CPU cores. Overall, it’s a great looking device and has been successfully server [Zak] as a router, a DNS resolver, and more- what more can you ask for from an experimental project?

This CM4 based project is a wonderful contrast to Cisco’s first network product, which in itself was innovative at the the time, but definitely didn’t have Gigabit Ethernet. Thanks to [Adrian] for the tip!

Bare Metal Gives This Pi Some Classic Synths

We’re used to seeing the Raspberry Pi crop up in a wide range of the projects we show you here, but it’s fair to say that they usually feature some sort of operating system. There’s another way to use a Pi, more akin to using a microcontroller such as the Arduino: by programming it directly, so-called bare-metal programming. MiniDexed is an example, and it copies a classic Yamaha professional synthesiser of the 1980s, by emulating the equivalent of eight of the company’s famous DX7 synthesisers in one unit. It takes almost any Pi, and with the addition of an audio board, a rotary encoder, and an LCD display, makes a ready-to-go unit. Below the break is a video of it in operation.

It’s fair to say that we’re not experts in Raspberry Pi bare metal programming, but it’s worth a diversion into the world of 1980s synthesisers to explore the DX7. This instrument was a staple of popular music throughout the 1980s and was a major commercial success for Yamaha as an affordable FM synthesiser. This was a process patented at Stanford University in the 1970s and subsequently licensed by the company, unlike other synths of the day it generated sound entirely digitally. It’s difficult to overestimate the influence of the DX7 as its sound can be heard everywhere, and it’s not impossible that you own a Yamaha FM synth even today if you have in your possession a sound card.

Curious about the DX7? Master chip-reverse-engineer [Ken Shirriff] exposed its secrets late last year.

Continue reading “Bare Metal Gives This Pi Some Classic Synths”

PiSquare Lets You Run Multiple HATs On A Raspberry Pi

The Raspberry Pi’s venerable 40-pin header and associated HAT ecosystem for upgrades has been a boon for the platform. It’s easy to stack extra hardware on to a Pi, even multiple times in some cases. However, if you want to run multiple HATs, and wirelessly at that, the PiSquare might just be the thing for you.

The PiSquare consists of a board featuring both RP2040 and ESP-12E microcontrollers. It interfaces with Raspberry Pi HATs and even lets you run multiple of the same HAT on a single Raspberry Pi, as it’s not actually directly using the UART, SPI, or I2C interfaces on the host Pi itself. Instead, the PiSquare communicates wirelessly with the Pi, handling the IO with the HAT itself.

It’s unclear how this works on a software level. Simply using existing software tools and libraries for a given Raspberry Pi HAT probably won’t work with the wireless PiSquare setup. However, for advanced users, it could serve a useful purpose, allowing one Raspberry Pi to command multiple HATs without the fuss of having to run more single-board computers where just one will do. Boards will be available on Kickstarter for those interested in the device.

We’ve seen other creative things done with the Raspberry Pi and the HAT system, too. If you’ve been cooking up your own neat hacks for the platform, drop us a line!

Camera held in hand

Review: Vizy Linux-Powered AI Camera

Vizy is a Linux-based “AI camera” based on the Raspberry Pi 4 that uses machine learning and machine vision to pull off some neat tricks, and has a design centered around hackability. I found it ridiculously simple to get up and running, and it was just as easy to make changes of my own, and start getting ideas.

Person and cat with machine-generated tags identifying them
Out of the box, Vizy is only a couple lines of Python away from being a functional Cat Detector project.

I was running pre-installed examples written in Python within minutes, and editing that very same code in about 30 seconds more. Even better, I did it all without installing a development environment, or even leaving my web browser, for that matter. I have to say, it made for a very hacker-friendly experience.

Vizy comes from the folks at Charmed Labs; this isn’t their first stab at smart cameras, and it shows. They also created the Pixy and Pixy 2 cameras, of which I happen to own several. I have always devoured anything that makes machine vision more accessible and easier to integrate into projects, so when Charmed Labs kindly offered to send me one of their newest devices, I was eager to see what was new.

I found Vizy to be a highly-polished platform with a number of truly useful hardware and software features, and a focus on accessibility and ease of use that I really hope to see more of in future embedded products. Let’s take a closer look.

Continue reading “Review: Vizy Linux-Powered AI Camera”