The USB Killer Now Has Commercial Competition

With a proliferation of USB Flash disk drives has come a very straightforward attack vector for a miscreant intent on spreading malware onto an organisation’s computer network. Simply drop a few infected drives in the parking lot, and wait for an unsuspecting staff member to pick one up and plug it into their computer. The drives are so familiar that to a non-tech-savvy user they appear harmless, there is no conscious decision over whether to trust them or not.

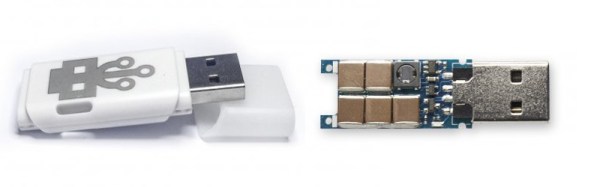
A diabolical variant on the exploit was [Dark Purple]’s USB Killer. Outwardly similar to a USB Flash drive, it contains an inverter that generates several hundred volts from the USB’s 5 volts, and repeatedly discharges it into the data lines of whatever it is plugged into. Computers whose designers have not incorporated some form of protection do not last long when subjected to its shocking ministrations.

Now the original has a commercial competitor, in the form of Hong Kong-based usbkill.com. It’s a bit cheaper than the original, but that it has appeared at all suggests that there is an expanding market for this type of device and that you may be more likely to encounter one in the future. They are also selling a test shield, an isolated USB port add-on that allows the device to be powered up without damaging its host.

From the hardware engineer’s point of view these devices present a special challenge. We are used to protecting USB ports from high voltage electrostatic discharges with TVS diode arrays, but those events have an extremely high impedance and the components are not designed to continuously handle low-impedance high voltages. It’s likely that these USB killers will result in greater sales of protection thermistors and more substantially specified Zener diodes in the world of USB interface designers.

We covered the original USB Killer prototype when it appeared, then its second version, and finally its crowdfunding campaign. This will probably not be the last we’ve heard of these devices and they will inevitably become cheaper, so take care what you pick up in that parking lot.

[via Extremetech]

Wazer: The Waterjet For Your Garage

Most hobbyists don’t have waterjets in their garage, but they would if they could! A Waterjet (or Water Jet Cutter) is a marvelous tool. Simply mount a high-pressure stream of grit and water on an x-y gantry, and the pressure generates enough erosion to cut through just about any thin material. Unfortunately, claiming your own waterjet will erode away a nice big hole in your pocketbook too. Machines up to this point start at about $75K, not to mention that they’d claim the better part of your workspace in a two-car garage.

Most of us everyday hackers that want to play with the benefits of this tool send their parts out to a professional shop. Consequently, we don’t often hear about everyday hackers using waterjets, or waterjet-cut parts all that often, with one exception. Back in 2014, a crew of students from UPENN built a functional waterjet with a parts-list that could make it affordable for about $5000. Now that same team is back. This time, they’ve spun together not just a one-off, but a fully-featured product called Wazer, which just launched its Kickstarter campaign minutes ago and has already nearly quadrupled the $100k goal. How could it do that? The full package starts at modest $3599-$4499. This is crowd-funding, after all, but a 20x undercutting of price is a powerful motivator.

Continue reading “Wazer: The Waterjet For Your Garage”

Take Your PCBs From Good To Great: Toner Transfer

dscf8697
One-offs that I never would have gotten professionally made, but that were infinitely handy during development

A lot of us make circuit boards at home. I find it a useful skill to have in my bag of tricks for intermediate steps along the way to a finished project, even if the finished version is going to be sent out to a PCB fab. When I need a breakout board that meshes with other development tools, for instance, there’s nothing like being able to whip something up that plugs right in. Doing it quickly, and getting on with the rest of the project instead of placing an order and waiting for delivery, helps keep me in the flow.

Toner transfer is by far the fastest way to make a circuit board at home — simply print the circuit out on a laser printer, iron it onto the copper, and etch. When it works, it’s awesome. When it doesn’t, it can be a hair-pulling exercise in figuring out which of myriad factors are misaligned.

For a long time now, I’ve been using a method that’s very reliable and repeatable. Recently, I’ve been tweaking a bit on the performance of the system, and I thought I’d share what I’ve got. At the moment, I’m able to very reliably produce boards with 6 mil (0.15 mm) traces and 8 mil (0.20 mm) spacing. With a little care in post-production, 4 mil / 6 mil is entirely plausible.

Continue reading “Take Your PCBs From Good To Great: Toner Transfer”

Path To Craftsmanship: The Art Of Being Wrong

Every technical person knows, unlike artists and politicians, that they can be provably wrong; at least to a degree. Math tells the truth. Coupled with this knowledge is an ego which is often entirely based on our output. If our mechanism works, we feel good because we are provably good.

A disclaimer.
It didn’t stop Scott Adams from writing four books full of it and it won’t stop me.
from Dilbert: Advice

Unfortunately, unlike the robots we build or the simple minds we spin out of code, we are still human at the end of the day. When we feel the sting of being wrong we often respond poorly. Some of us slip into depression, claiming it all and dredging up a few other mistakes from our past along for the ride. Some of us explode into prideful rages, dropping our metaphorical shorts to show that this one fault is no fault at all compared to a history of personal majesty. Others become sullen and inward. Others ignore it all together. Others yet strike out at those around them leaving unpleasant barbs. The variations are endless, but I do think there is an ideal to be reached.

Despite the risk that the nature of the things I’ve learned will reveal exactly what kind of arrogant sod I am, I’ll give it a go anyway. I’ve made many mistakes, and I have many more to make, but these are some of the things I’ve learned. I’ve learned them all in technical fields, so I’m not sure how broadly the advice applies, but luckily this is Hackaday.

Continue reading “Path To Craftsmanship: The Art Of Being Wrong”

SNES Micro Is A Pi Z Of Art

Clay is a shapeless raw material that’s waiting to be turned into awesomeness by your creativity. So is the Raspberry Pi. [Dorison Hugo] brought the two together in his artfully crafted SNES micro – a tiny retro gaming console sculpted from clay.

Continue reading “SNES Micro Is A Pi Z Of Art”

A 3D Printed Camera (Including The Lens)

Barring the RepRap project, we usually see 3D printers make either replacement parts or small assemblies, not an entire finished product. [Amos] is the exception to this rule with his entirely 3D-printed camera. Everything in this camera is 3D printed, from the shutter to the lightproof box to the lens itself. It’s an amazing piece of engineering, and a testament to how far 3D printing has come in just a few short years.

35mm film is the most common film by far, and the only one that’s still easy to get and have developed at a reasonable price. This 3D-printed camera is based on that standard, making most of the guts extremely similar to the millions of film cameras that have been produced over the years. There’s a film cartridge, a few gears, a film takeup spool, and a lightproof box. So far, this really isn’t a challenge for any 3D printer.

The fun starts with the lens. We’ve seen 3D printers used for lens making before, starting with a 3D print used to create a silicone mold where a lens is cast in clear acrylic, 3D printed tools used to grind glass, and an experiment from FormLabs to 3D print a lens. All of these techniques require some surface finishing, and [Amos]’ lens is no different. He printed a lens on his Form 2 printer, and started polishing with 400 grit sandpaper. After working up to 12000 grit, the image was still a bit blurry, revealing microscopic grooves that wouldn’t polish out. This led him to build a tool to mechanically polish the lens. This tool was, of course, 3D printed. After polishing, the lens was ‘dip polished’ in a vat of uncured resin.

The shutter was the next challenge, and for this [Amos] couldn’t rely on the usual mechanisms found in film cameras. he did find a shutter mechanism from 1885 that didn’t take up a lot of depth, and after modeling the movement in Blender, designed a reasonable shutter system.

Building an entire camera in a 3D printer is a challenge, but how are the pictures? Not bad, actually. There’s a weird vignetting, and everything’s a little bit blurry. It’s hip, trendy, and lomo, and basically amazing that it works at all.

Giant-Scale Physical Pong

At first, we thought we were having deja vu, but then we saw this video embedded below. [Thijs Eerens] is a creative technologist (dare we say, a “hacker”?) who builds giant-scale games for a living. For the Lowlands festival in the Netherlands, he contributed to the build of a huge Pong game that looks as big as a cinema screen.

The paddles appear to be controlled by pulling ropes, and the “ball” is driven around on a system of wires and stepper motors. Code running in the background tracks the player paddles, drives the ball, and keeps score. From the video, there seem to be sound effects involved. It looks like a lot of fun.

Continue reading “Giant-Scale Physical Pong”