Mustachioed Nintendo Virtual Boy Gone Augmented Reality

Some people just want to watch the world burn. Others want to spread peace, joy and mustaches. [Joe Grand] falls into the latter group this time around. His latest creation is Mustache Mayhem, a hack, video game, and art project all rolled into one. This is a bit of a change from deconstructing circuit boards or designing electronic badges, but not completely new for [Joe], who wrote SCSIcide and Ultra SCSIcide for the Atari 2600 back in the early 2000’s.

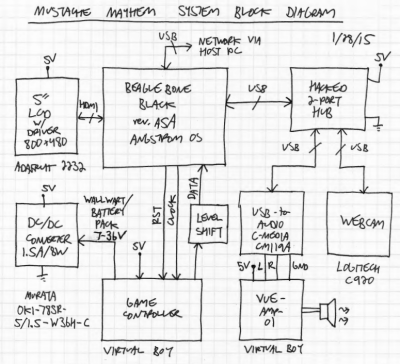
Mustache Mayhem is built into a Nintendo Virtual Boy housing. The Virtual Boy itself was broken, and unfortunately was beyond repair. [Joe] removed most of the stock electronics and added a BeagleBone Black, Logitech C920 webcam, an LCD screen and some custom electronics. He kept the original audio amplifier, speakers, and controller connector. Angstrom Linux boots into [Joe’s] software, which uses OpenCV to detect faces and overlay mustaches. Gameplay is simple: Point the console at one or more faces. If you see a mustache, press the A button on the controller! The more faces and mustaches on-screen at once, the more points, or “mojo” the player gets. The code is up on Github, and can be built with Xcode targeted to the Mac, or directly on the BeagleBone Black.

[Joe’s] goal for the project was to make a ridiculous game that looks like it could have come out in the 90’s. He also used Mustache Mayhem as a fun way to learn some new skills which will come in handy for more serious projects in the future.

We caught up with [Joe] for a quick interview about his new creation.

How did you come up with the idea for Mustache Mayhem?
blockI was selling a bunch of my video game collection at PRGE (Portland Retro Gaming Expo) a few years ago and had a broken Virtual Boy that no one bought. A friend of mine was at the table and said I had to do something with it. I thought “People wear cosplay and walk around at conventions, so what if I could do something with the Virtual Boy that you could walk around with?” That was the seed.

A few months later, Texas Instruments sent me the original production release of the BeagleBone Black (rev. A5A). Eighteen months after that I actually started the project. The catalyst was to do something for an upcoming Portland, OR art show (Byte Me 4.0), which is an annual event that shows off interactive technology-based artwork. I wrote up a little description and got accepted. I had less than 2 months to actually get things working and it ended up taking about a month of full-time work. It was much more work than I expected for such a silly project. I originally was going to do something along the lines of walking around in a Doom-like perspective and shooting people when their faces were detected.

That would be pretty darn cool. How did you get from Doom to Mustaches? 

I saw a TI BeagleBoard demo called “boothstache” which drew mustaches on faces and tweeted the pictures. I thought that doing something non-violent with mustaches would be more suitable (and funny) to actually show my kids. I also secretly wanted to use this project as a way to experiment with Linux, write some code, and learn about face detection and image processing with OpenCV, which I plan to use for some actual computer security research in the future. Mustache Mayhem turned out to be a super cool project and I’m really happy with it. I sort of feel guilty spending so much time on it, since it’s basically just a one-off prototype, but I just got so obsessed with making it exactly as I wanted.

You mentioned on your website that Mustache was “designed to challenge the paradigms of personal privacy and entertainment.” What exactly did you mean there?

Continue reading “Mustachioed Nintendo Virtual Boy Gone Augmented Reality”
Playing Space Invaders With Real Fire And Lasers

Making a Space Invaders game is up there on the list of most unconventional things you could do with a laser cutter. In watching the tiny little ships burst into flames, [Martin Raynsford’s] modification has got to be one of the more dangerous looking ones we’ve seen as well.

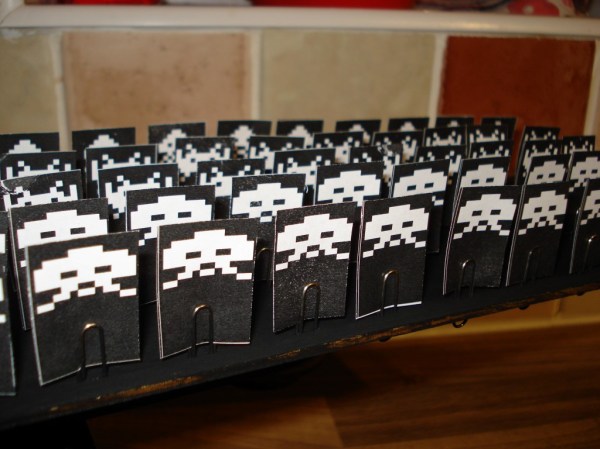
[Martin] always had the desire to make a tangible version of the classic game. Since his Whitetooth A1 laser cutter already contained the bulk of the moving hardware needed, not to mention an actual high powered laser to “pew pew” with, he decided it was the perfect starting point for such a project. The game is played looking down into the cutter since the laser of course fires in that direction, however a basic webcam is mounted to the laser assembly so that you can view the game on a computer screen at the proper perspective. An Arduino Mini is responsible for stepper control, allowing the player to jog back and forth and fire with a keyboard. [Martin] added an extra gear to the z-axis bed-leveler so that it could drive rows of paper invaders left and right across the bottom. Paperclips wedged into slots along a modified backboard hold each of the paper slips in place. This works ideally since they can be reloaded easily and won’t be maimed during use.

Due to the heat of the laser, landing a well positioned shot will likely nuke all of the nearby invaders as well, making for a theatrical inferno and easy win. Now to step up the difficulty level and figure out how to make them fire back…

Continue reading “Playing Space Invaders With Real Fire And Lasers”

3D Spectrum Analyzer Uses 1280 LEDs

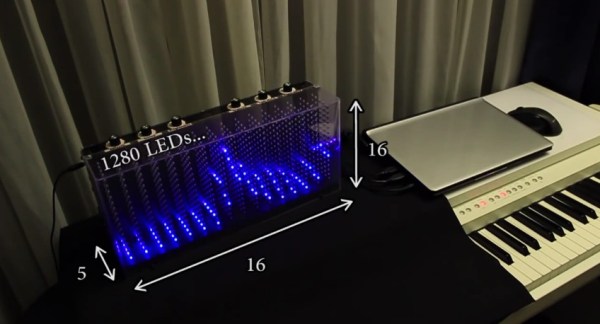
One of [Dooievriend]’s friends recently pressed him into service to write software for a 3d spectrum analyzer/VU that he made. The VU is a fairly complex build: it’s made up of 1280 LEDs in a 16x16x5 matrix controlled by a PIC32 clocked at 80MHz. [Dooievriend] wrote some firmware for the PIC that uses a variation on a discrete Fourier transform to create a 3D VU effect.

j6v2i When [Dooievriend] set out to design the audio analyzing portion of the firmware, his mind jumped to the discrete Fourier transform. This transform calculates the amplitude in a series of frequency bins in the audio—seemingly perfect for a VU. However, after some more research, [Dooievriend] decided to implement a constant Q transform. This transform is very similar to a Fourier transform, but it takes into account the logarithmic way that the human ear interprets sound.

[Dooievriend] started implementing the constant Q transform using an interrupt-based sampler, but he quickly ran into issues with slow floating-point math on his PIC32 (which doesn’t have a hardware floating-point unit). Thankfully he rewrote his code using fixed-point math, and the transform runs nearly real-time. Check out the video after the break to see the VU in action, and a second video that gives some details on the hardware build.

Continue reading “3D Spectrum Analyzer Uses 1280 LEDs”

MRRF: (not Quite) Chocolate Clock

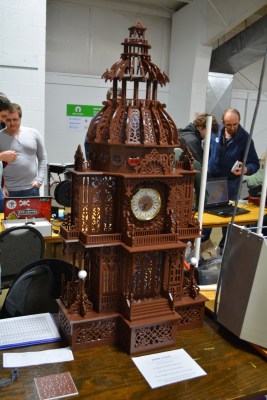
[Jason] is a woodworker. At least, he was until he saw his first 3D printer. While he may still work in wood, he particularly likes adapting scroll saw patterns for 3D printing. His clock started as a woodworking pattern for use on a scroll saw. To adapt it for 3D printing, [Jason] scanned the plotter-sized pattern pieces into Inkscape, where he was able to do things like add bevels before sending the pieces to OpenSCAD.

tall chococlockAs you might imagine, a great deal of work went into this build, beginning with the scanning. [Jason] starting scanning last October and finished in January. Printing started January 9th, and he told me the final pieces were printed early this morning. We know you want all the details, so here goes: this build took just over six rolls of PLA at 20% infill. It’s 48″ tall and about 24″ wide. It was printed on what [Jason] referred to as his “very modified” Replicator 2. He glued the pieces together with Testor’s, and that took about 30 hours. All through the project, he kept meticulous notes in a spreadsheet of print times and filament used.


We were honored to be among the first to see [Jason]’s incredible clock build at this year’s Midwest RepRap Festival. He would like to take it on tour this year to the nearby Maker Faires. If he can figure out how transport it safely, he’d like to show it at World Maker Faire in NYC.

How To Directly Program An Inexpensive ESP8266 WiFi Module

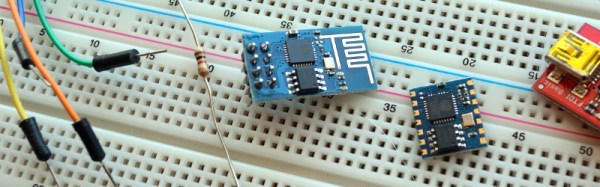
The ESP8266 is the answer to “I want something with Wifi.” Surprisingly, there are a number of engineers and hobbyists who have not heard of this chip or have heard of it but don’t really understand what it is. It’s basically the answer to everything IoT to so many engineering problems that have plagued the hobbyist and commercial world alike.

The chip is a processor with integrated RAM, some ROM, and a WiFi radio, and the only external components you will need are 4 capacitors, a crystal and an external flash! It’s CHEAP, like $4/ea cheap! Or $5 if you want it on a nice, convenient carrier board that includes all these components. The power consumption is reasonable (~200mA)1, the range is insane ~300m2 without directional equipment, and a PCB trace antenna and ~4km if you want to be ridiculous.

One place thing that more people need to know about is how to program directly for this chip. Too many times projects use it as a crutch via the AT commands. Read on and find out how to hello world with just this chip.

Continue reading “How To Directly Program An Inexpensive ESP8266 WiFi Module”

Instrumentation Amplifiers with Bil Herd

Instrumentation Amplifiers And How To Measure Miniscule Change

These days there a large number of sensors and analog circuits that are “controller friendly” meaning that their output signal is easily interfaced to the built-in Analog to Digital Convertors (ADCs) often found in today’s micro-controllers. This means that the signals typically are already amplified, often filtered, and corrected for offset and linearity. But when faced with very low level signals, or signals buried in a larger signal an Instrumentation Amplifier may be what’s needed. The qualities of an Instrumentation Amplifier include:

  • A differential amplifier with high impedance and low bias current on both inputs.
  • Low noise and low drift when amplifying very small signals.
  • The ability to reject a voltage that is present on both inputs, referred to as Common Mode Rejection Ratio (CMRR)

Continue reading “Instrumentation Amplifiers And How To Measure Miniscule Change”

Creative DRAM Abuse With Rowhammer

Project Zero, Google’s security analyst unit, has proved that rowhammer can be used as an exploit to gain superuser privileges on some computers. Row Hammer, or rowhammer is a method of flipping bits in DRAM by hammering rows with fast read accesses. [Mark Seaborn] and the rest of the Project Zero team learned of rowhammer by reading [Yoongu Kim’s] 2014 paper “Flipping Bits in Memory Without Accessing Them:
An Experimental Study of DRAM Disturbance Errors” (PDF link). According to [Kim], the memory industry has known about the issue since at least 2012, when Intel began filing patents for mitigation techniques.

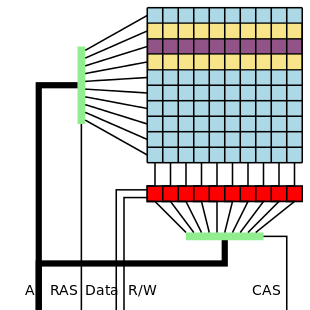
Row hammer” by DsimicOwn work. Licensed under CC BY-SA 4.0 via Wikimedia Commons.

The technique is deceptively simple. Dynamic RAM is organized into a matrix of rows and columns. By performing fast reads on addresses in the same row, bits in adjacent rows can be flipped. In the example image to the left, fast reads on the purple row can cause bit flips in either of the yellow rows. The Project Zero team discovered an even more aggressive technique they call “double-sided hammering”. In this case, fast reads are performed on both yellow rows. The team found that double-sided hammering can cause more than 25 bits to flip in a single row on a particularly vulnerable computer.

Why does this happen? The answer lies within the internal structure of DRAM, and a bit of semiconductor physics. A DRAM memory bit is essentially a transistor and a capacitor. Data is stored by charging up the capacitor, which immediately begins to leak. DRAM must be refreshed before all the charge leaks away. Typically this refresh happens every 64ms. Higher density RAM chips have forced these capacitors to be closer together than ever before. So close in fact, that they can interact. Repeated reads of one row will cause the capacitors in adjacent rows to leak charge faster than normal. If enough charge leaks away before a refresh, the bit stored by that capacitor will flip.

Cache is not the answer

If you’re thinking that memory subsystems shouldn’t work this way due to cache, you’re right. Under normal circumstances, repeated data reads would be stored in the processor’s data cache and never touch RAM. Cache can be flushed though, which is exactly what the Project Zero team is doing. The X86 CLFLUSH opcode ensures that each read will go out to physical RAM.

Wanton bit flipping is all fine and good, but the Project Zero team’s goal was to use the technique as an exploit. To pull that off, they had to figure out which bits they were flipping, and flip them in such a way as to give elevated access to a user level process. The Project Zero team eventually came up with two working exploits. One works to escape Google’s Native Client (NaCL) sandbox. The other exploit works as a userspace program on x86-64 Linux boxes.

Native Client sandbox escape exploit

Google defines Native Client (NaCL) as ” a sandbox for running compiled C and C++ code in the browser efficiently and securely, independent of the user’s operating system.”  It was designed specifically as a way to run code in the browser, without the risk of it escaping to the host system.  Let that sink in for a moment. Now consider the fact that rowhammer is able to escape the walled garden and access physical memory. The exploit works by allocating 250MB of memory, and rowhammering on random addresses, and checking for bit flips. Once bit flips are detected, the real fun starts. The exploit hides unsafe instructions inside immediate arguments of “safe” institutions. In an example from the paper:

20EA0: 48 b8 0f 05 EB 0C F4 F4 F4 F4 movabs $0xF4F4F4F40CEB050F,%rax 

Viewed from memory address 0x20EA0, this is an absolute move of a 64 bit value to register rax. However, if we move off alignment and read the instruction from address 0x20EA02, now it’s a SYSCALL – (0F 05).  The NaCL escape exploit does exactly this, running shell commands which were hidden inside instructions that appeared to be safe.

Linux kernel privilege escalation exploit

The Project Zero team used rowhammer to give a Linux process access to all of physical memory. The process is more complex than the NaCL exploit, but the basic idea revolves around page table entries (PTE). Since the underlying structure of Linux’s page table is well known, rowhammer can be used to modify the bits which are used to translate virtual to physical addresses. By carefully controlling which bits are flipped, the attacking process can relocate its own pages anywhere in RAM. The team used this technique to redirect /bin/ping to their own shell code. Since Ping normally runs with superuser privileges, the shell code can do anything it wants.

The TL;DR

Rowhammer is a nasty vulnerability, but the sky isn’t falling just yet. Google has already patched NaCL by removing access to the CLFLUSH opcode, so NaCL is safe from any currently known rowhammer attacks. Project Zero didn’t run an exhaustive test to find out which computer and RAM manufacturers are vulnerable to rowhammer. In fact, they were only able to flip bits on laptops. The desktop machines they tried used ECC RAM, which may have corrected the bit flips as they happened. ECC RAM will help, but doesn’t guarantee protection from rowhammer – especially when multiple bit flips occur. The best protection is a new machine – New RAM technologies include mitigation techniques. The LPDDR4 standard includes “Targeted Row Refresh” (TRR) and “Maximum Activate Count” (MAC), both methods to avoid rowhammer vulnerability. That’s a good excuse to buy a new laptop if we ever heard one!

If you want to play along at home, the Project Zero team have a rowhammer test up on GitHub.