Improved Perfboard For Surface Mount Parts

Look through the last two decades of electronics project built on perfboard, and you’ll notice a trend. Perfboard is designed for through-hole parts, but ever more frequently, the parts we need are only available as surface mount devices. What does this mean for the future of all those protoboard, veroboard, and tagboard designs? It’s not good, but fortunately, there may be an answer. It’s perfboard designed for mounting SOICs, SOTs, and other surface mount devices.

Perfboard is an extremely simple concept. Most through-hole electronic components are built around 0.1″ or 2.54 mm spacing between pins. Yes, there are exceptions, but you can always bend the middle pin of a transistor and put it in a hole. SMT devices are different. You can’t really bend the pins, and the pin pitch is too small for the 0.1″ holes in traditional perfboard.

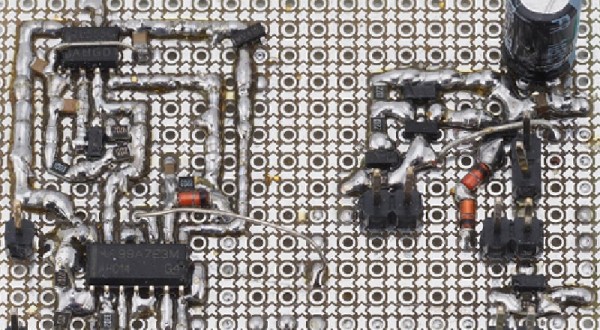
[electronic_eel] is changing that game up with his own design for perfboard. This perfboard has the traditional 0.1″ holes, but there are SMD pads sprinkled about between these holes. The result is being able to solder SOIC, SOT23-6, SOT23 and SOT363 devices directly to a board alongside 0603 and 0805 devices. Connect everything with a few beads of solder and you have a functional circuit made out of surface mount devices on something that’s still compatible with the old protoboard designs.

This isn’t the first time we’ve seen a new type of protoboard make it into production. A few years ago, Perf+, a bizarre ‘bus-based’ protoboard solution came onto the scene, although that wasn’t really designed for SMD parts. While [electronic_eel] doesn’t have any plans to sell his protoboard, the files are available, and you can easily design your own small piece of perfboard.

PCB Production On The Sienci Mill One

A complete start to finish electronics prototyping workshop is nirvana for many of us: being able to go from design on the computer to real hardware without having to get up from your rolling chair. The falling prices of 3D printers have helped make at least part of this a reality: $200 USD is enough to get you a printer that can churn out decent looking enclosures. But there’s more to producing your own hardware than creating slick looking project boxes; at some point you’ll need to put some electronics in there.

For [Chuck Hellebuyck] at least, the last piece of the puzzle has just fallen into place. He’s recently put up a YouTube video describing how he converted his $399 Sienci Mill One into a capable PCB mill. With a 3D printer and this new PCB mill, he’s happy to say he can now go from concept to production all on the same workbench.

The Sienci Mill One is a solid enough mill in its own right but did need some modification to attain the accuracy necessary for cutting at a depth of only .9 mm. First, a block of wood was cut to the same size as the original plastic bed of the Sienci, and then the mill itself was used to drill holes through the wood block and plastic bed. The wood was attached to the bed using a nut and bolt in each corner, being sure to torque it down enough that the head of the bolt is pulled down flush with the surface of the wood.

Pulling the head of the bolts flush wasn’t just to keep the surface free of any snags, [Chuck] uses them in conjunction with a probe in the mill’s chuck as a simple way of adjusting the Z height. With a continuity meter attached between the two, he could lower the probe down until they were touching just enough to make a circuit.

Click through the break for the rest of the story!

Continue reading “PCB Production On The Sienci Mill One”

Automatic Dust Collection For The Whole Shop

If you’ve got a woodworking area, or even if you’ve just got something that really churns out dust like a belt sander or table saw, there’s an excellent chance you hate sawdust with a passion. It gets all over your clothes, jams up everything mechanical, and as a fun little bonus can be explosive if not handled properly. Thankfully newer tools tend to come with their own dust collection bags (back in the old days, you weren’t really a man unless you were coughing up wood fibers), but if you’ve got a half a dozen tools with half a dozen different dust bags you’ve got to empty, that can get pretty annoying.

Especially if you take woodworking as seriously as [Brad Wright] does. Over on his YouTube channel [DIY Builds], he quickly runs through the construction of a whole-shop dust collection system with some very neat features. Not everyone needs a system this intricate, but the tips and tricks he shows off during the build are great and can certainly be adapted to less grandiose setups.

Dust collection connector with closeable gate
One of the scratch-built gates.

[Brad] goes into a bit more detail in this gallery, revealing that the heart of the build is a Harbor Freight dust collection system that he modified into a cyclone separator. Big chunks fall down into the 55 gallon bucket, and what’s left gets blown out of the shop via a louvered vent through an exterior wall. An intricate system of 4 inch PVC pipe is then used to connect up each individual machine’s dust collection port. Even individual hand sanders get into the act via a three way manifold. His table saw lacked a dust port, so he enclosed the motor with a piece of plywood and made his own.

One of the most interesting aspects of the build is the scratch-built blast gates. These are essentially valves which open and close the different sections of the PVC where they mate to the individual stations. This prevents the dust collection system from wasting suction by trying to pull from all the stations at once when only one is in use at any given time. [Brad] even wired up the blast gates with switches that will turn the dust collection system on when the gate is open, and off when it’s closed.

This isn’t the first time we’ve covered the lengths people will go to rid their shop of dust. Cyclone dust separators are an especially popular build, using everything from sheet metal to 3D printed parts.

Continue reading “Automatic Dust Collection For The Whole Shop”

Spite, Thrift, And The Virtues Of An Affordable Logic Analyzer

[Larry Wall], the father of Perl, lists the three great virtues of all programmers: Laziness, Impatience, and Hubris. After seeing that Saleae jacked up the prices on their popular logic analyzers to ludicrous levels, [CNLohr] added a fourth virtue: Spite. And since his tests with a Cypress FX3 over the last few days may lead to a dirt-cheap DIY logic analyzer, we may soon be able to add another virtue: Thrift.

The story begins a year or two ago when [CNLohr] got a Cypress FX3 development board for $45. The board sat unused for want of a Windows machine, but after seeing our recent article on a minimalist logic analyzer based on an FX2, he started playing with the board to see if it could fan the flames of his Saleae hatred. The FX3 is a neat little chip that has a 100-MHz General Programmable Interface (GPIF) bus that basically lets it act like an easy to use FPGA.

Prepared to spend months on the project, he was surprised to make significant progress on his mission of spiteful thrift within a few days, reading 16 bits off the GPIF at over 200 megabytes per second and dumping it over the USB 3.0 port. [Charles]’ libraries for the FX3 lay the foundation for a lot of cool stuff, from logic analyzers to SDRs and beyond — now someone just has to build them.

The search for a cheap but capable logic analyzer is nothing new, of course. Last year, both [Jenny List] and [Bil Herd] looked at the $22 iCEstick as a potential Saleae beater.

Continue reading “Spite, Thrift, And The Virtues Of An Affordable Logic Analyzer”

Print A Sacrificial Magnet Square

Here’s your quick and dirty hack for the day. Sometimes you just need something that will work for what you’re trying to do, and you don’t want to go through the motions of doing what’s prescribed. When this happens, it’s a cheap, disposable tool that fits the bill. No, we’re not talking about Harbor Freight—we mean those need-driven tools you make yourself that get the job done without fuss. If you’re really lucky, you can use them a couple of times before they break.

This is one of those tools. [Jake’s Workshop] wanted to be able to quickly tack a corner weld without getting out the clamps, so he thought, why not print some magnet squares? [Jake] hollowed out the triangle to save filament, but this also gives it a nice advantage over store-bought magnet squares: instead of grasping and pulling it off,  you can hook your finger through it and then hang it on the pegboard for next time.

[Jake] got lucky with the pocket sizes and was able to press fit the magnets in place, but it would be worth it to add a drop of CA glue to help with strain. He seems to have forgotten to upload the files for his various styles, but a hollow triangle with chamfers and magnet pockets should be easy enough to replicate in OpenSCAD or  SolidWorks, which he used in the video below.

There’s something special about a cheap tool you make yourself. Even though you know it won’t last forever, it’s just more meaningful than some cheap, rage-inducing tchotchke or assemblage from a place where the air is ~85% offgasses. We love necessity-driven self-built tools around here so much that we gave them their own Hacklet.

Continue reading “Print A Sacrificial Magnet Square”

44 Layers Of Katharine Burr Blodgett

Whether you realize it or not, Katharine Burr Blodgett has made your life better. If you’ve ever looked through a viewfinder, a telescope, or the windshield of a car, you’ve been face to face with her greatest achievement, non-reflective glass.

Katharine was a surface chemist for General Electric and a visionary engineer who discovered a way to make ordinary glass 99% transparent. Her invention enabled the low-cost production of nearly invisible panes and lenses for everything from picture frames and projectors to eyeglasses and spyglasses.

Katharine’s education and ingenuity along with her place in the zeitgeist led her into other fields throughout her career. When World War II erupted, GE shifted their focus to military applications. Katharine rolled up her sleeves and got down in the scientific trenches with the men of the Research Lab. She invented a method for de-icing airplane wings, engineered better gas masks, and created a more economical oil-based smokescreen. She was a versatile, insightful scientist who gave humanity a clearer view of the universe.

Continue reading “44 Layers Of Katharine Burr Blodgett”

Watch Video On A Oscilloscope With An ESP32

[bitluni] got a brand new scope, and he couldn’t be happier. No, really — check the video below; he’s really happy. And to celebrate, he turned his scope into a vector display using an ESP32.

Using a scope in X-Y mode is nothing new, of course. The technique is used to display everything from Lissajous patterns from an SDR to bouncing balls from an analog computer. Taken on as more of an exercise to learn how to use his new tool than a practical project, [bitluni]’s project starts by using two DACs on an ESP32 to create simple Lissajous patterns to learn about the scope’s controls. Next he built some code to display 3D point clouds, but learned that the native DAC code wasn’t up to the job. A little hacking improved the speed 27-fold, which was enough for great 3D images and live video from an I²S camera module. The latter was accomplished by grabbing frames from the camera and rendering them pixel by pixel, CRT style. The results are pretty clean, and there’s a lot to be learned about both using scopes as X-Y displays and tweaking the ESP32 for maximum performance.

Need more background on the ESP32? Start by checking out these ESP32 tutorials.


Continue reading “Watch Video On A Oscilloscope With An ESP32”