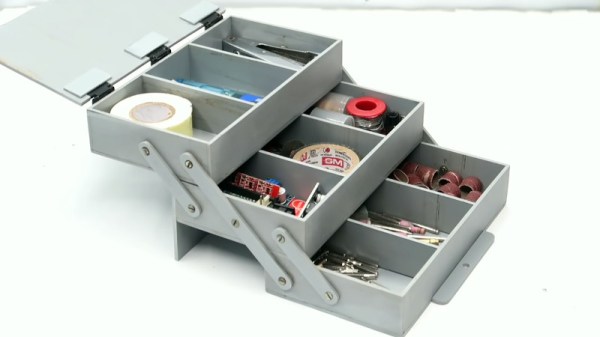
CO2 laser cutting ceramic sheet under water film

Water Is The Secret Ingredient When Laser Cutting Ceramics To Make Circuits

[Ben Krasnow] over at Applied Science was experimenting with cutting inexpensive ceramic sheets with his cheap CO2 laser cutter when he found that (just as expected) the thermal shock of the CO2 beam would cause cracking and breaking of the workpiece. After much experimentation, he stumbled upon a simple solution: submersion under a thin layer of water was sufficient to remove excess heat, keeping thermal shock at bay, and eventually cutting the material. Some prior art was uncovered, which we believe is this PHD thesis (PDF) from Manchester University in the UK. This is a great read for anyone wanting to dig into this technique a little deeper.

The CO2 laser cutter is a very versatile tool, capable of cutting and etching a wide range of materials, many of natural origin, such as cardboard, leather and wood, as well as certain plastics and other synthetic materials. But, there are also materials that are generally a no-go, such as metals, ceramics and anything that does not absorb the laser wavelength adequately or is too reflective, so having another string in one’s bow is a good thing. After all, not everyone has access to a fibre laser.

After dispensing with the problem of how to cut ceramic, it got even more interesting. He proceeded to deposit conductive traces sufficiently robust to solder to. A mask was made from vinyl sheet and a squeegee used to deposit a thick layer of silver and glass particles 1 um or less in size. This was then sintered in a small kiln, which was controlled with a Raspberry Pi running PicoReFlow, and after a little bit of scrubbing, the surface resistance was a very usable 2 mΩ/square. Holes cut with the laser, together with some silver material being pushed through with the squeegee formed through holes with no additional effort. That’s pretty neat!

Some solder paste and parts were added to the demo board, and with an added flare for no real reason other than he could, reflowed by simply applying power direct to the board. A heater trace had been applied to the bottom surface, rendering the board capable of self-reflowing. Now that is cool!

Continue reading “Water Is The Secret Ingredient When Laser Cutting Ceramics To Make Circuits”

Photo of Pixel Pump Pick & Place Machine

Pixel Pump Pick & Place Positions Parts Precisely

You’ve finally decided to take the plunge and build a board with surface-mount parts. After carefully dispensing the solder paste with a syringe, it’s time to place the parts. You take up your trusty tweezers and reach to grab a SOIC-14 logic IC—only there’s not a great way to grab it. The IC is too long to grab one way and has leads obstructing the other. You work around the leads, drop the IC into place, and then pick up an 0402 resistor. You gently set the resistor into your perfectly dispensed solder paste, pull the tweezers away, and the resistor has stuck to your slightly magnetic tweezers. [Robin Reiter] realized that hobbyists and small manufacturers needed a better way to assemble their surface-mount designs, so he’s building the Pixel Pump Pick & Place, an open-source vacuum assembly tool.

Vacuum assembly tools use a blunt-tipped needle and suction to pick up surface-mount parts. Pressing an attached foot pedal disables the vacuum, allowing the part to be gently released. [Robin] thought to include a few thoughtful features to make the Pixel Pump even more useful. It has adjustable suction presets and a self-cleaning feature to blow out any solder paste you accidentally suck up. Most of the non-electronic parts are 3D printed, and [Robin] intends to make the entire design open-source.

[Robin] has a long history of designing tools to make surface-mount assembly easier—you may remember his 3D-printed magazines for dispensing surface-mount parts. If you want to take your PCB assembly setup to the next level, check out the PnPAssist, which shines a laser crosshair right where you should put each part.

Modern Tube Tester Uses Arduino

There was a time when people like us might own a tube tester and even if you didn’t, you probably knew which drug store had a tube testing machine you could use for free. We aren’t sure that’s a testament to capitalistic ingenuity or an inditement of tube reliability — maybe both. As [Usagi] has been working on some tube-based projects, he decided he needed a tester so he built one. You can see the results in the video, below.

The tester only uses 24V, but for the projects he’s building, that’s close to the operation in the real circuits. He does have a traditional tube tester, but it uses 100s of volts which is a different operating regime.

Continue reading “Modern Tube Tester Uses Arduino”

A weld bead laid down with homemade CO2

Cooking Up A Batch Of Homebrew Welding Gas

You know the feeling — you’re making good progress on a weekend project, you’re really in the groove, things are going right. Right up until you run out of That One Thing™ that you can’t do without, the only store that sells it is closed, and you get a sudden case of whiplash as your progress hits a virtual brick wall.

Of course, every challenge holds the opportunity to hack your way around it, which is how [Lucas] ended up building this carbon dioxide generator. The “IG” in MIG welding stands for the “inert gas” that floods the weld pool and keeps the melted metal — the “M” in MIG — from rapidly oxidizing and ruining the weld. Welders often use either straight CO2 or a mix of CO2 and argon as a MIG shielding gas, which they normally get from a commercial gas supplier, generally on non-weekend days.

[Lucas] turned to grade-school chemistry for his CO2 generator, using the vigorous reaction of baking soda and vinegar to produce the gas. Version one was sketchy as all get-out; the second iteration still had some sketch factor thanks to the use of ABS pipe, but the inclusion of a relief valve should prevent the worst from happening. After some fiddling with how to get the reagents together in a controlled fashion, [Lucas] was able to generate enough CO2 to put down a decent bead — a short one, to be sure, but the video below shows that it worked.

Could this be scaled up to something for practical use? Probably not. But it’s cool to see what’s possible, and something to file away for a rainy day. And maybe [Lucas] can use this method to produce CO2 for his homemade laser tube. But again, probably not.

Continue reading “Cooking Up A Batch Of Homebrew Welding Gas”

Robert Murray Smith Discusses Rivets and Riveting

Old School Fastener Tutorial Is Riveting

Whether you’re making, repairing, or hacking something together, we all need fastners. Screws, nuts and bolts, and pop rivets are handy sometimes. Various resins and even hot glue are equally useful. In some cases however the right fastener for the job eludes us, and we need another trick up our sleeve.

[Robert Murray Smith] found himself in such a position. His goal was to join two pieces of aluminum that need a nice finish on both sides. Neither glue, pop rivets, screws, nuts or bolts would have been appropriate.  [Robert] is always flush with ideas both new and old, and he resorted to using an old school fastener as explained as explained in his video “How To Make And Use Rivets“.

In the video below the break, [Robert] goes into great detail about making a simple rivet die from a 5mm (3/16”) piece of flat steel, creating the rivet from a brass rod, and then using the flush rivet to join two pieces of aluminum. The simple tooling he uses makes the technique available to anybody with a propane torch, a vise, some basic tools, and a simple claw hammer. We also appreciate [Robert]’s discussion of cold riveting, hot riveting, and annealing the rivets as needed.

Not only is riveting a technique thousands of years old, its advancement and application during the Industrial Revolution enabled technologies that couldn’t have existed otherwise. Hackaday’s own [Jenny List] did a wonderful write up about rivets in 2018 that you won’t want to miss!

Continue reading “Old School Fastener Tutorial Is Riveting”

Drill press modded with a treadmill motor, speed controller, lights, and a tachometer.

Drill Press Runs Faster On A Treadmill Motor

Are you tired of the same old video style from your favorite content creators? We can’t say that we were, exactly. But nevertheless, we appreciate this creative departure from [Eric Strebel]’s regular fare as he soups up his drill press with an old treadmill motor and a few extra features.

First off, that commentator in the video is right — 2.6 horsepower is a crazy amount for a drill press. Fortunately, [Eric] also added a variable speed controller and a digital tachometer to keep things in check. As an added bonus, he no longer has to get under the hood and mess with the belts.

We like what [Eric] brings to the drill press motor mod, which is already well-documented on YouTube. We love the re-use of an office chair bracket as a new motor mount. It’s probably our favorite bit aside from the 2-color forward/reverse switch plate idea: print it in whatever letter color you want with proud lettering, paint the whole thing black, and sand off the letters so the color shows. Check it out after the break.

There are many ways to make your own drill press, and one of the easiest is to mount a hand drill.

Did you miss the Industrial Design Hack Chat with [Eric]? It’s okay, you can read the transcript over on IO.

Continue reading “Drill Press Runs Faster On A Treadmill Motor”

Highly Configurable Open Source Microscope Cooked Up In FreeCAD

What do you get when you cross a day job as a Medical Histopathologist with an interest in 3D printing and programming? You get a fully-baked Open Source microscope, specifically the Portable Upgradeable Modular Affordable (or PUMA), that’s what. And this is no toy microscope. By combining a sprinkle of off-the-shelf electronics available from pretty much anywhere, a pound or two of filament, and a dash of high quality optical parts, PUMA cooks up quite possibly one of the best open source microscopy experiences we’ve ever tasted.

GitHub user [TadPath] works as a medical pathologist and clearly knows a thing or two about what makes a great instrument, so it is a genuine joy for us to see this tasty project laid out in such a complete fashion. Many a time we’ve looked into an high-profile project, only to find a pile of STL files and some hard to source special parts. But not here. This is deliberately designed to be buildable by practically anyone with access to a 3D printer and an eBay account.

The project is not currently certified for medical diagnostics use, but that is likely only a matter of money and time. The value for education and research (especially in developing nations) cannot really be overstated.

A small selection of the fixed and active aperture choices

The modularity allows a wide range of configurations from simple ambient light illumination, with a single objective, great for using out in the field without electricity, right up to a trinocular setup with TFT-based spatial light modulator enabling advanced methods such as Schlieren phase contrast (which allows visualisation of fluid flow inside a live cell, for example) and a heads-up display for making measurements from the sample. Add into the mix that PUMA is specifically designed to be quickly and easily broken down in the field, that helps busy researchers on the go, out in the sticks.

The GitHub repo has all the details you could need to build your own configuration and appropriate add-ons, everything from CAD files (FreeCAD source, so you can remix it to your heart’s content) and a detailed Bill-of-Materials for sourcing parts.

We covered fluorescence microscopy before, as well as many many other microscope related stories over the years, because quite simply, microscopes are a very important topic. Heck, this humble scribe has a binocular and a trinocular microscope on the bench next to him, and doesn’t even consider that unusual. If you’re hungry for an easily hackable, extendable and cost-effective scope, then this may be just the dish you were looking for.

Continue reading “Highly Configurable Open Source Microscope Cooked Up In FreeCAD”