Adobe research scientist [Christine Dierk] showed off an interesting new project at the Adobe Max conference: Project Primrose, a dress covered with a series of liquid crystal panels that could react to movement, changing the design of the dress. Now, Adobe has released a paper showing some of the technical details of the process.
The paper is from the User Interface & Software (UIST) conference in 2022, so the examples it uses are older: it discusses a canvas and handbag. The dress uses the same technology, though, draped over a scientist rather than a frame. If you can’t access the version from UIST, [Dierk] has a free version here.
The dress uses Polymer-dispersed Liquid Crystal (PDLC) panels from the wonderfully named Shanghai HO HO Industry Co and is designed for use in windows and doors for privacy. It uses an Indium Tin oxide-coated PET film that is opaque by default but becomes transparent when a voltage difference is applied across the material.
These panels are shaped to a hexagonal shape, then wired together with flexible PCBs in a daisy chain. Interestingly, [Dierk] found that the smaller the panels were made, the lower the voltage was required to trigger them. For their canvas example, they dropped the voltage to a much safer -15V to 15V levels to trigger the two states, which is much safer for a wearable device.
The panels are also not completely transparent when triggered: the paper describes them as having a “soft ivory” look when they are overlaying a reflective material. Greyscales can also be made using Pulse Coded Modulation (PCM) to vary the panel’s transparency. Driving the panels at 3.2KHz, they created 64 shades of grey.
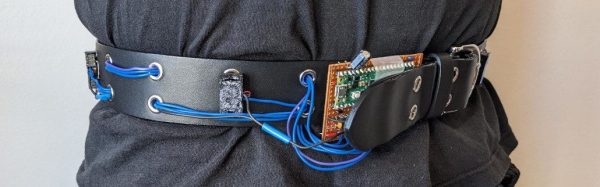
The main controller is a custom PCB with a Teensy 4.1 and a BlueFruit LE SPI module. The power comes from two 14.8V LiPo batteries, with converters to power the chips and switch modules so the Teensy can switch the -15 and +15V levels for the panels directly from each battery.
The array is made from modules, each with four panels connected to a controller PCB, which has several Analog Signal Device (ASD) ADG1414 chips. These receive the signals from the bus with switch registers to switch the panels individually.
Rather cleverly, [Dierk] uses the bus that daisy chains the modules together to deliver both power and the bus signal that controls the panels, using the -15 and +15V levels modulated with a 50Hz square wave to create the bus signal and power the panels at the same time. That’s a neat hack that reduces the complexity of the modules significantly.
The Teensy 4.1 controls the whole system and can use its IMU to sense movement and change the pattern accordingly. You don’t get to see the system’s electronics in the dress video, but they claim that the canvas example took just 0.58 Watts to drive, so the dress probably only needs a few watts.
It is a fascinating build (and a rather cute dress), and has a lot of potential. What would you do with this?
Continue reading “Adobe Scientist Cuts A Dash With LCD Shifting Dress” →