Much of mining involves digging and drilling holes in the ground. Often, these holes need inspecting, but [Dean Harty] found that existing borehole inspection solutions weren’t up to snuff. Resolution was poor, and often live-view devices made recording footage a pain. Instead, he set about the development of the Sneaky Peaky, going through several revisions in the process.
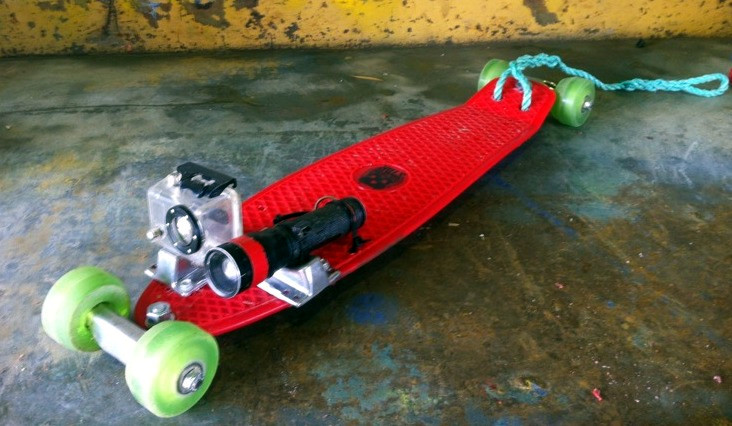
The first revision was nothing more than a GoPro strapped to a small penny board, paired with a bright flashlight. The 4K resolution of the GoPro provided useful footage, and the assembly could be lowered into boreholes on a rope and retrieved easily. Rugged and water resistant, the gear worked well, and was remarkably cheap compared to more obscure mining industry hardware.
Later revisions ditched the skateboard, replacing it with a pipe-style housing instead. Key to the design was that the device could readily be destroyed and flushed out of a borehole with an air blast in the event it got stuck.
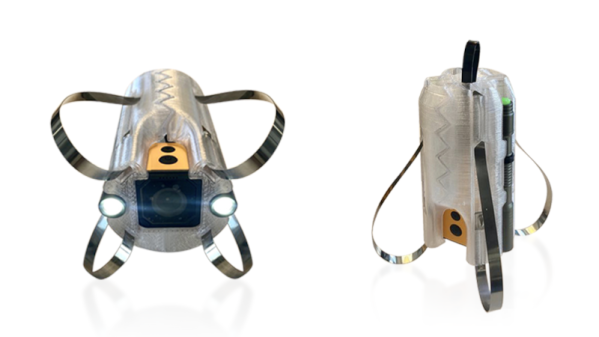
Eventually, mining outfit Metrologi got involved, having worked with [Dean] on several borehole backfill operations. A 3D-printed chassis was developed to hold an action camera and twin torches, held together with plastic zip ties. These are attached to the pull rope, and if the camera becomes jammed, a sharp pull will snap the ties and cause the device to fall apart. Steel cable ties are then used to create flexible guides to center the assembly in a variety of pipe diameters.
It’s a great example of people on the ground hacking together the tools they need, combined with iterative design to integrate improvements over time. We don’t talk about boreholes much around here, but they can be musical if properly employed, as it turns out. If you’ve got your own great mining hacks, however, do drop us a line!