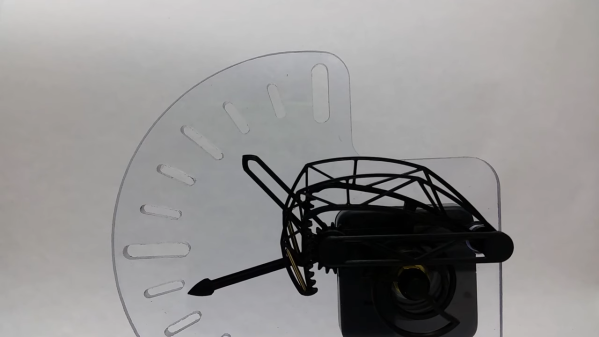
Sound And Light Play Off Acrylic And Wire In This Engaging Circuit Sculpture

It’s no secret that we really like circuit sculptures around here, and we never tire of seeing what creative ways people come up with to celebrate the components used to make a project, rather than locking them away in an enclosure. And a circuit sculpture that incorporates sound and light in its design is always a real treat to discover.

Called “cwymriad” by its designer, [Eirik Brandal], this sound sculpture incorporates all kinds of beautiful elements. The framework is made from thick pieces of acrylic, set at interesting angles to each other and in contrasting colors. The sound-generating circuit, which uses square wave outputs from an ESP32 to provide carrier and modulation signals for a dual ring modulator, is built on a framework of tinned wires. The sounds the sculpture makes have a lovely resonance to them, like random bells and chimes that fade and mix together. There’s also a matrix of white LEDs that form a sort of digital oscilloscope that displays shifting waveforms in time with the music.

While we like the way this looks and sounds, the real bonus here is the details of construction in the video below. [Eirik]’s careful craftsmanship working with multiple materials is evident throughout; we were especially impressed by the work needed to drill holes for the LED matrix, any one of which slightly out of place would have been painfully obvious in the finished product.

This is far from [Eirik]’s first appearance on these pages. His vacuum tube and silicon “ioalieia” was featured just a few weeks back, and “ddrysfeöd” used the acrylic parts as light pipes in a lovely way.

Continue reading “Sound And Light Play Off Acrylic And Wire In This Engaging Circuit Sculpture”

A man using a homemade vacuum apparatus to climb a wall

Scale Buildings With The Power Of Suction

Walls can’t hold [Elijah Cirioli]. The would-be superhero has been busy scaling the sides of buildings using his self-contained vacuum climbers. (Video embedded after the break.)

After being inspired by the winning project of an Air Force design challenge, our plain-clothed crusader got to work on a pair of prototype vacuum climbers. The wooden prototypes were an unexpected success, so work soon began on the models featured in the video after the break. The main improvements in this second version included using ¼ inch acrylic instead of plywood, as well as an improved gasket for a better seal against the imperfect exterior of many building walls.

While the system would still ultimately struggle with brick walls (and other imperfect surfaces), it performs more than adequately when ascending smoother concrete walls. And while the acrylic was a far better choice than the plywood, one of the acrylic panels still developed a fracture. Even so, the results speak for themselves, and we have to applaud the inventor’s seemingly unconditional trust in his equipment.

We haven’t seen a follow-up from [Elijah Cirioli] recently, so here’s hoping that he’s busy working on version three, and that he’s not stuck up a wall somewhere. In the meantime, check out how someone accomplished similar wall-climbing feats using salvaged microwave transformers.

Continue reading “Scale Buildings With The Power Of Suction”

Minimalist Timer Counts Down With LED Matrix

Looking for something with a bit more style than the traditional kitchen timer, [Martin Jonasson] decided to take the last couple of months to design and build his own take on the idea using a rotary encoder, 16×9 LED matrix, and a Teensy 2.0 microcontroller. Were there better things he could have spent that time on? Possibly. But you probably wouldn’t have been reading it about it here, so we won’t trouble ourselves with such thoughts.

Put together on a piece of perfboard, the handwired circuit also includes an Adafruit PowerBoost 500 Charger, a 3.7 V 2500 mAh LiPo battery, a IS31FL3731 Charlieplexed PWM LED driver, and a piezo buzzer. The top of the rotary encoder has been capped off with a sold metal knob, which combined with the enclosure made of stacked laser cut 3 mm acrylic sheets, really gives the device a very sleek and classy look.

While the hardware is quite nice, it’s the software that really pulls this whole project together. A game developer by trade, [Martin] went all in on the timer’s GPLv3 licensed firmware. From using the toneAC library to play melodies at the end of the countdown, to the custom fonts and the code that pauses the timer while the user is spinning the knob, there’s plenty of little touches that should make the timer a joy to use. We’ve seen some unique kitchen timers over the years, but the attention to detail put into this build really raises the bar.

[Martin] has provided everything you need to create your own version of his timer, including the SVG file for the laser cut case. While not strictly required, coming up with a custom PCB for this project would be a nice touch, should you want to put your own spin on it.

[Thanks to Tom for the tip.]

Cast-in-Concrete Clock Upgraded After Thirteen Years

Proving that an old design cast in concrete can indeed be changed, [Hans Jørgen Grimstad] has revisited his Nixie clock from 2008, cleaned up the electronics and packaging, and turned it into a kit. Not that he has plans to enter the kit-making business, but he just thought it would be fun to learn how to make kits. In the video below the break, he’s a bit embarrassed to reveal the inside of his first Nixie clock design, housed in a cast-concrete electronics enclosure. Although it still works, the internal wiring is a flaky, untidy, and perhaps a bit dangerous.

But [Hans] has improved his game over the years, making a number of different clock designs. The latest incarnation is pleasant to look at, built on a PCB which is visible inside a custom acrylic case. Three versions are available to support different types of tubes. The documentation he prepared for the project and the kit is very thorough. He walks you through the unboxing and assembly process in the videos below. Firmware is in C, and runs on a Raspberry Pi Zero W. If you are interesting in making electronics kits, [Hans]’s project would be a good example to follow.

All the necessary information to build the clock is published on the project’s GitHub repository. If you’re looking for enclosure ideas other than concrete or acrylic sheet, check out this write-up on hand-forging artistic Nixie clock enclosures.

Continue reading “Cast-in-Concrete Clock Upgraded After Thirteen Years”

Small low-cost CNC mill with rotary tool

Minimal Mill: The Minamil

Having a few machine tools at one’s disposal is a luxury that not many of us are afforded, and often an expensive one at that. It is something that a large percentage of us may dream about, though, and with some commonly available tools and inexpensive electronics a few people have put together some very inexpensive CNC machines. The latest is the Minamil, which uses a rotary tool and straps it to an economical frame in order to get a functional CNC mill setup working.

This project boasts impressively low costs at around $15 per axis. Each axis uses readily available parts such as bearings and threaded rods that are readily installed in the mill, and for a cutting head the build is based on a Dremel-like rotary tool that has a similarly low price tag. Let’s not ignore the essentially free counterweight that is used.

For control, an Arduino with a CNC shield powers the three-axis device which is likely the bulk of the cost of this project. [Paul McClay] also points out that a lot of the material he needed for this build can be salvaged from things like old printers, so the $45 price tag is a ceiling, not a floor.

The Minamil has been demonstrated milling a wide variety of materials with excellent precision. Both acrylic and aluminum are able to be worked with this machine, but [Paul] also demonstrates it in its capacity to mill PCBs. It does have some limitations but for the price it seems that this mill can’t be beat, even compared to his previous CNC build which repurposed old CD drives.

Math, Optics, And CNC Combine To Hide Secret Images In Acrylic

Magic mirrors, with an LCD panel hidden behind a partially reflectively mirror, are popular for a reason — they’re a good-looking way to display useful information. A “Magic Window,” however, is an entirely different thing — and from the look of it, a far cooler one.

If you’ve never seen a Magic Window before, don’t worry — it’s partially because you’re not supposed to see it. A Magic Window appears to be a clear piece of glass or plastic, one with a bit of a wave in it that causes some distortion when looking through it. But as [Matt Ferraro] explains, the distortion encodes a hidden image, visible only when light passes through the window. It looks a bit like a lithophane, but it’s projected rather than reflected, and it relies on an optical phenomenon known as caustics. If you’ve ever seen the bright and dark patches cast on the bottom of a swimming pool when sunlight hits the surface, you’ve seen caustics.

As for how to hide an image in a clear window, let’s just say it takes some doing. And some math; Snell’s Law, Fermat’s Theorem, Poisson’s Equation — all these and more are mentioned by [Matt] by way of explanation. The short story is that an image is morphed in software, normalized, and converted into a heightmap that’s used to generate a toolpath for a CNC router. The design is carved into a sheet of acrylic by the router and polished back to clarity with a succession of sandpaper grits. The wavy window is then ready to cast its hidden shadow.

Honestly, the results are amazing, and we marvel at the skills needed to pull this off. Or more correctly, that [Matt] was able to make the process simple enough for anyone to try.

Continue reading “Math, Optics, And CNC Combine To Hide Secret Images In Acrylic”

How To Build With Acrylic Using The Tools You Have

In a perfect world, we’d all have laser cutters and could pop intricate designs out of acrylic sheets with just a few clicks of the mouse. But in reality, most of us have to make do with the pedestrian tools we have at hand. For many, that might even mean everything has to be done by hand. Luckily, [Eric Strebel] has been working on a series of videos that cover how you can make professional looking parts out of acrylic using a wide array of common tools.

Solvent welding hand-cut pieces of acrylic.

The first video demonstrates how a simple cube can be constructed by a band saw, a table saw, and if need be, with hand tools. You might think the two power saws would have similar results, but as [Eric] explains, the table saw ends up being far more accurate and requires less post-processing to get a smooth edge. Ideally you’d run the cut pieces through a router to bevel them, but that’s a tall order for many home gamers.

As for the hand tool approach, scoring and snapping the sheets ends up making a surprisingly clean break that can actually be cleaner than the edge you’d get with a power tool. No matter how you cut them, [Eric] shows the proper way to apply the water-like solvent to your acrylic pieces to create a strong and visually attractive bond.

The next video in the series covers more advanced techniques that can still be pulled off without a top-of-the-line workshop. Sure the water-cooled acrylic bender he has is pretty slick, but if you can’t afford the $100 USD gadget, he shows you how to get similar results with an old toaster oven that you can pick up from the thrift store or even the side of the road. With some hand-made jigs and molds, you can warp and flex the heated plastic into whatever shape your project needs. Combining the tips from both videos, you might be surprised at what can be created with little more than a ruler, some hot air, and the appropriate techniques.

These are just the latest in a long line of fantastic videos that [Eric Strebel] has produced about at-home design and fabrication. Whether its making a two part silicone mold or creating functional prototypes out of foam board, there’s an excellent chance that he’s covered a topic you’ve wanted to learn more about.

Continue reading “How To Build With Acrylic Using The Tools You Have”