Miniature 3D Printed Forklift Is Quite Pallet-able

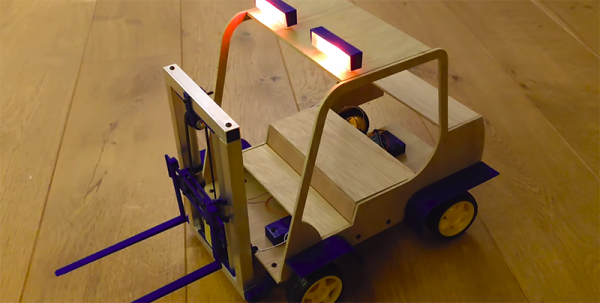
If you have a small logistics problem, we have the solution for you. [Leon] built a tiny little forklift with LED lighting, working forks, and remote control using a combination of 3D printing tech, some CNC work, and fine soldering skills.

The electronics for this build are based around a few servos and a pair of geared DC motors and are driven via an Arduino Mega. Connectivity and remote controllability are what you would expect from an Arduinified project. There’s an HC-05 Bluetooth module on the board and remote control is handled by a custom Android app.

Of note in this project are the forks that actually work, almost like a real forklift. This allows the mini Arduino forklift to pick up mini pallets, drop them somewhere, and have mini DIY enthusiasts come up to build mini-furniture for mini-Etsy, which will be prominently featured in the mini foyer of a mini two-story walkup. No, it’s not mini-gentrification; this mini forklift is helping the mini local economy.

You can check out the entire build video below, filmed in the usual maker demo method of speeding up the entire build process but somehow keeping the no-talking audio. We have a lot to thank [Jimmy DiResta] for, and it’s not just cinematography. All the files for this forklift are up on the Github should you want to build your own.

Continue reading “Miniature 3D Printed Forklift Is Quite Pallet-able”

Bad Apple!! Via The Arduino Mega

The Arduino Mega is a useful tool for the maker. Generally, once one has come up with plans for blinking LEDs that require more IO than is available on the Arduino Uno, one graduates to the Mega and goes for broke. However, it’s not typically what we’d consider as our first choice for video work. [Stephane] begs to differ, and coded this Bad Apple!! demo for the Arduino Mega 2560.

For those unfamiliar, video on the Arduino is actually somewhat of a solved problem – merely requiring a pair of resistors and some nifty code. The real meat of this hack is the video storage itself. It’s been done before, but by streaming data off an SD card or serial link. [Stephane] was determined to store everything on the Arduino itself, and thus the hack begun. Video data is stored as 1 bit per pixel, as it’s a simple black and white video as per the original inspiration. LZ77 compression was used to cram the data down without requiring too much RAM, which is a limited resource on the Mega. It’s video only, as the Mega is tapped out handling 3 minutes and 39 seconds of video storage, but future work may include syncing with a second Arduino to deliver the soundtrack.

It’s a hack that shows off [Stephane]’s ability to get impressive performance out of limited platforms. We’ve seen this before, with his excellent Star Fox port to the Arduboy. Video after the break.

Continue reading “Bad Apple!! Via The Arduino Mega”

Superdeep Borehole Samples Create Non-boring Music

In the 1970s, the Soviet Union decided to dig a hole for science. Not just any hole, the Kola Superdeep Borehole reached a depth of over 12 kilometers, the deepest at the time and the second deepest today by just a few meters. Since this was one of the few holes dug this deep that wasn’t being drilled for oil, the project was eventually abandoned. [Dmitry] was able to find some core samples from the project though, and he headed up to the ruins of the scientific site with his latest project which produces musical sounds from the core samples.

The musical instrument uses punched tape, found at the borehole site, as a sort of “seed” for generating the sounds. Around the outside of the device are five miniature drilling rigs, each holding a piece of a core sample from the hole. The instrument uses the punched tape in order to control the drilling rigs, and the sound that is created is processed by the instrument and amplified, which creates some interesting and rather spooky sounds. The whole thing is controlled by an Arduino Mega.

Not only does the project make interesting sounds from a historically and scientifically significant research station and its findings, but the project has a unique and clean design that really fits its environment at the abandoned facility. The other interesting thing about this project is that, if you want to make the trek, anyone can go explore the building and see the hole for themselves. If you’re wondering about the tools that could be used to make a hole like this, take a look at this boring project.

Continue reading “Superdeep Borehole Samples Create Non-boring Music”

An Arduino Powered Tank Built To Pull Planes

Surely our readers are well aware of all the downsides of owning an airplane. Certainly the cost of fuel is a big one. Birds are a problem, probably. That bill from the traveling propeller sharpener is a killer too…right? Alright fine, we admit it, nobody here at Hackaday owns an airplane. But probably neither do most of you; so don’t look so smug, pal.

But if you did own a plane, or at least work at a small airport, you’d know that moving the things around on the ground is kind of a hassle. Smaller planes can be pulled by hand, but once they get up to a certain size you’ll want some kind of vehicle to help out. [Anthony DiPilato] wanted a way to move around a roughly 5,200 pound Cessna 310, and decided that all the commercial options were too expensive. So he built his own Arduino powered tank to muscle the airplane around the tarmac (if site is down try Google cache), and his journey from idea to finished product is absolutely fascinating to see.

So the idea here is pretty simple. A little metal cart equipped with two beefy motors, an Arduino Mega, a pair of motor controllers, and a HC-08 Bluetooth module so you can control it from your phone. How hard could it be, right? Well, it turns out combining all those raw components into a little machine that’s strong enough to tow a full-scale aircraft takes some trial and error.

It took [Anthony] five iterations before he fine tuned the design to the point it was able to successfully drag the Cessna without crippling under the pressure. The early versions featured wheels, but eventually it was decided that a tracked vehicle would be required to get enough grip on the blacktop. Luckily for us, each failed design is shown along with a brief explanation about what went wrong. Admittedly it’s unlikely any of us will be recreating this particular project, but we always love to see when somebody goes through the trouble of explaining what went wrong. When you include that kind of information, somewhere, somehow, you’re saving another maker a bit of time and aggravation.

Hackers absolutely love machines with tank treads. From massive 3D printed designs to vaguely disturbing humanoid robots, there’s perhaps no sweeter form of locomotion in the hacker arsenal.

Continue reading “An Arduino Powered Tank Built To Pull Planes”

Roll A Black Box For Your Wheels

Telemetric devices for vehicles, better known as black boxes, cracked the consumer scene 25 years ago with the premiere of OnStar. These days, you can get one for free from your insurance company if you want to try your luck at the discounts for safe driving game. But what if you wanted a black box just to mess around with that doesn’t share your driving data with the world? Just make one.

[TheForeignMan]’s DIY telematics box was designed to pull reports of the car’s RPM, speed, and throttle depression angle through the ODBII port. An ODBII-to-Bluetooth module sends the data to an Arduino Mega and logs it on an SD card along with latitude and longitude from a NEO-6M GPS module. Everything is powered by the car’s battery through a cigarette lighter-USB adapter.

He’s got everything tightly wrapped up inside a 3D printed box, which makes it pretty hard to retrieve the SD card. In the future, he’d like to send the data to a server instead to avoid accidentally dislodging a jumper wire.

If this one isn’t DIY enough for you to emulate, start by building your own CAN bus reader.

Nuclear Synchroscope Gets New Life

The Synchroscope is an interesting power plant instrument which doubles up as two devices in one. If the generator frequency is not matched with the grid frequency, the rotation direction of the synchroscope pointer indicates if the frequency (generator speed) needs to be increased or decreased. When it stops rotating, the pointer angle indicates the phase difference between the generator and the grid. When [badjer1] [Chris Muncy] got his hands on an old synchroscope which had seen better days at a nuclear power plant control room, he decided to use it as the enclosure for a long-pending plan to build a Nixie Tube project. The result — an Arduino Nixie Clock and Weather Station — is a retro-modern looking instrument which indicates time, temperature, pressure and humidity and the synchroscope pointer now indicates atmospheric pressure.

Rather than replicating existing designs, he decided to build his project from scratch, learning new techniques and tricks while improving his design as he progressed. [badjer1] is a Fortran old-timer, so kudos to him for taking a plunge into the Arduino ecosystem. Other than the funky enclosure, most of the electronics are assembled from off-the-shelf modules. The synchroscope was not large enough to accommodate the electronics, so [badjer1] had to split it into two halves, and add a clear acrylic box in the middle to house it all. He stuck in a few LEDs inside the enclosure for added visual effect. Probably his biggest challenge, other than the mechanical assembly, was making sure he got the cutouts for the Nixie tubes on the display panel right. One wrong move and he would have ended up with a piece of aluminum junk and a missing face panel.

Being new to Arduino, he was careful with breaking up his code into manageable chunks, and peppering it with lots of comments, for his own, and everyone else’s, benefit. The electronics and hardware assembly are also equally well detailed, should anyone else want to attempt to replicate his build. There is still room for improvement, especially with the sensor mounting, but for now, [badjer1] seems pretty happy with the result. Check out the demo video after the break.

Thanks for the tip, [Chris Muncy].

Continue reading “Nuclear Synchroscope Gets New Life”

We Couldn’t Resist This CNC Batik Bot

Batik is an ancient form of dyeing textiles in which hot wax is applied to a piece of cloth in some design. When the cloth is submerged in a dye bath, the parts covered with wax resist the pigment. After dyeing, the wax is either boiled or scraped away to reveal the design.

[Eugenia Morpurgo] has created a portable, open-source batik bot that rolls along the floor and draws with wax, CNC-style, on a potentially infinite expanse of cloth. The hardware should be familiar: an Arduino Mega and a RAMPS 1.4 board driving NEMA 17 steppers up and down extruded aluminium.

Traditionally, batik wax is applied with a canting, a pen-like object that holds a small amount of hot wax and distributes it through a small opening. The batik bot’s pen combines parts from an electric canting tool with the thermistor, heater block, and heater cartridge from an E3D V6 hot end. [Eugenia] built the Z-axis from scrap and re-used the mechanical endstops from an old plotter. Check out the GitHub for step-by-step instructions with a ton of clear pictures and the project’s site for even more pictures and information. Oh, and don’t resist the chance to see it in action after the break.

We love a good art bot around here, even if the work disappears with the tide.

Continue reading “We Couldn’t Resist This CNC Batik Bot”