Keeping Magnetized Marbles From Stopping The Music

Take a couple of thousand steel balls, add a large wooden gear with neodymium magnets embedded in it, and what do you get? Either the beginnings of a wonderful kinetic music machine, or a mess of balls all stuck together and clogging up the works.

The latter was the case for [Martin], and he needed to find a way to demagnetize steel balls in a continuous process if his “Marble Machine X” were to see the light of day. You may recall [Martin] as a member of the band Wintergatan and the inventor of the original Marble Machine, a remarkable one-man band that makes music by dropping steel balls on various instruments. As fabulous a contraption as the original Marble Machine was, it was strictly a studio instrument, too fragile for touring.

Marble Machine X is a complete reimagining of the original, intended to be robust enough to go on a world tour. [Martin] completely redesigned the lift mechanism, using magnets to grip the balls from the return bin and feed them up to a complicated divider. But during the lift, the balls became magnetized enough to stick together and no longer roll into the divider. The video below shows [Martin]’s solution: a degausser using magnets of alternating polarity spinning slowly under the sticky marbles. As a side note, it’s interesting and entertaining to watch a musician procrastinate while debugging a mechanical problem.

We can’t wait to see Marble Machine X in action, but until it’s done we’ll just settle for [Martin]’s other musical hacks, like his paper-tape programmed music box or this mashup of a synthesizer and a violin.

Continue reading “Keeping Magnetized Marbles From Stopping The Music”

Follow The Bouncing Ball Of Entropy

When [::vtol::] wants to generate random numbers he doesn’t simply type rand() into his Arduino IDE, no, he builds a piece of art. It all starts with a knob, presumably connected to a potentiometer, which sets a frequency. An Arduino UNO takes the reading and generates a tone for an upward-facing speaker. A tiny ball bounces on that speaker where it occasionally collides with a piezoelectric element. The intervals between collisions become our sufficiently random number.

The generated number travels up the Rube Goldberg-esque machine to an LCD mounted at the top where a word, corresponding to our generated number, is displayed. As long as the button is held, a tone will continue to sound and words will be generated so poetry pours forth.

If this take on beat poetry doesn’t suit you, the construction of the Ball-O-Bol has an aesthetic quality that’s eye-catching, whereas projects like his Tape-Head Robot That Listens to the Floor and 8-Bit Digital Photo Gun showed the electronic guts front and center with their own appeal.

Continue reading “Follow The Bouncing Ball Of Entropy”

Making Metal Dominoes

Nearly as versatile as a deck of playing cards, dominoes are a great addition to any rainy-day repertoire of game sets. [Apollo] from the Youtube channel [carbide3d] has manufactured for themselves a custom set of domino tiles replete with brass pips.

Cutting the bar stock to the appropriate size, [Apollo] ran a few test engravings and hole sizes for the brass pips. That done, all they had to do was repeat the engraving and milling process another couple dozen times, as well as all the requisite wet and dry sanding, and buffing. [Apollo] opted to use paint marker to add a little extra style to the tiles, and advises any other makers who want to do the same to set their engraving depth to .01″ so  the paint marker won’t be rubbed off when buffing the pieces.

When it came to installing the brass balls, [Apollo] undersized the holes by .001″-.002″ for a snug press fit — adding that the hole depth is a little greater than half the ball’s diameter. They used 1/8″ balls for the pips, and 3/16 balls for the center of the tiles which also allows the tiles to be spun for a bit of fidgeting fun during play. Check out the build video after the break.

Continue reading “Making Metal Dominoes”

Paul: A Robot And Its Ball

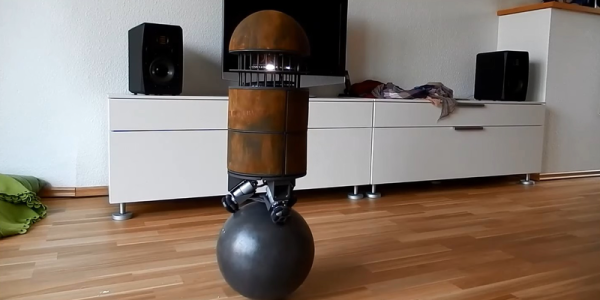
[Jochen Alt]’s Paul is one of the coolest robots of its type, and maybe one of the coolest robots period. Personality? Check. Omniwheels? Check. Gratuitous feats of derring-do? Check. Paul is a ball balancing robot.

Under the hood, Paul isn’t all that strange. He’s got two microcontrollers, one for taking care of the balancing and kinematics, and another that handles the LEDs, speech processor, loudspeaker, remote-control, and other frilly bits. But the mathematics! Paul is a cylinder standing up on top of a bowling ball, so the only way it can roll forwards is to lean forwards. But of course, it can’t lean too much, because it has also got to balance. It’s absolutely the least reasonable means of locomotion. We love it.

[Jochen] was nice enough to put everything up on GitHub, so you can see how it was done, even though it looks like magic. And we dare you to watch the video, embedded below, and not feel at least a pang of sympathy pain when (spoiler alert!) he falls flat on his face. Does he recover? We’d love to know!

Paul is just one of the stellar robots in the 2017 Hackaday Sci-Fi contest, so head on over there if you still don’t have your fill.

Continue reading “Paul: A Robot And Its Ball”

Ping Pong Ball-Juggling Robot

There aren’t too many sports named for the sound that is produced during the game. Even though it’s properly referred to as “table tennis” by serious practitioners, ping pong is probably the most obvious. To that end, [Nekojiru] built a ping pong ball juggling robot that used those very acoustics to pinpoint the location of the ball in relation to the robot. Not satisfied with his efforts there, he moved onto a visual solution and built a new juggling rig that uses computer vision instead of sound to keep a ping pong ball aloft.

The main controller is a Raspberry Pi 2 with a Pi camera module attached. After some mishaps with the planned IR vision system, [Nekojiru] decided to use green light to illuminate the ball. He notes that OpenCV probably wouldn’t have worked for him because it’s not fast enough for the 90 fps that’s required to bounce the ping pong ball. After looking at the incoming data from this system, an algorithm extracts 3D information about the ball and directs the paddle to strike the ball in a particular way.

If you’ve ever wanted to get into real-time object tracking, this is a great project to look over. The control system is well polished and the robot itself looks almost professionally made. Maybe it’s possible to build something similar to test [Nekojiru]’s hypothesis that OpenCV isn’t fast enough for this. If you want to get started in that realm of object tracking, there are some great projects that make use of that piece of software as well.

Pokemon Go Physical Pokeball Catches ‘Em All

There’s something irresistible about throwing Pokeballs at unexpectedly appearing creatures. But wait. When did you actually, physically throw a Pokeball? Swiping over colored pixels wasn’t enough for [Trey Keown], so he built a real, throwable, Pokemon-catching Pokeball for Pokemon Go.

Continue reading “Pokemon Go Physical Pokeball Catches ‘Em All”

DIYing Huge BGA Packages

One day [Andy] was cruising around eBay and spotted something interesting. Forty Virtex-E FPGAs for two quid each. These are the big boys of the FPGA world, with 512 user IO pins, almost 200,000 logic gates, packed into a 676-ball BGA package. These are not chips designed for the hobbyist. These chips are not designed for boards with less than six layers. These chips aren’t even designed for boards with 6/6mil tolerances from the usual suspects in China. By any account, a 676-ball package is not like a big keep out sign for hobbyists. You don’t turn down a £2 class in advanced PCB design, though, leading to one of the most impressive ‘I just bought some crap on eBay’ projects we’ve seen.

halfbuiltThe project [Andy] had in mind for these chips was a generic dev board, which meant breaking out the IO pins and connecting some SRAM, SDRAM, and Flash memory. The first issue with this project is escape routing all the balls. Xilinx published a handy application note that recommends specific design parameters for the traces of copper under the chip. Unfortunately, this was a six-layer board, and the design rules in the application note were for 5/5mil traces. [Andy]’s board house can’t do six-layer boards, and their design rules are for 6/6mil traces. To solve this problem, [Andy] just didn’t route the inner balls, and hoped the 5mil traces would work out.

With 676 tiny little pads on a PCB, the clocks routed, power supply implemented, too many decoupling caps on the back, differential pairs, static RAM, a few LEDs placed just for fun, [Andy] had to solder this thing up. Since the FPGA was oddly one of the less expensive items on the BOM, he soldered that first, just to see if it would work. It did, which meant it was time to place the RAM, Flash, and dozens of decoupling caps. Everything went relatively smoothly – the only problem was the tiny 0402 decoupling caps on the back of the board. This was, by far, the hardest part of the board to solder. [Andy] only managed to get most of the decoupling caps on with a hot air gun. That was good enough to bring the board up, but he’ll have to figure some other way of soldering those caps for the other 30 or so boards.

Continue reading “DIYing Huge BGA Packages”