A couple of weeks ago, [Doug Brown] bought a Ryzen motherboard, advertised as “non-working” and discounted accordingly. He noticed that the seller didn’t test it with any CPUs old enough to be supported by the board’s stock BIOS revision, and decided to take a gamble with upgrading it.
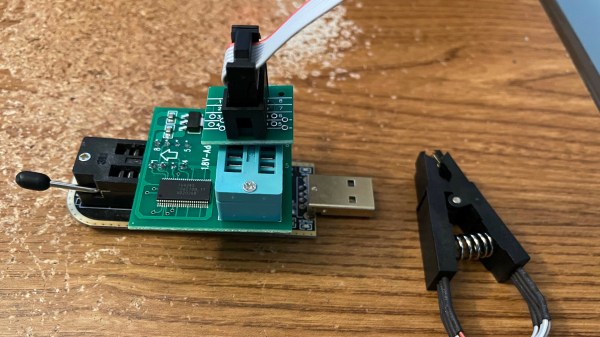
Not having a supported CPU in hand either, he decided to go the “external programmer” route, which succeeded and gave this board a new life. This is not why we’re writing this up, however. The reason this article caught our eye is because [Doug]’s research leaves no stone unturned, and it’s all there to learn from. Whether through careful observation or thorough research, this article covers all the important points and more, serving as an example to follow for anyone looking to program their BIOS.
For instance, [Doug] correctly points out a design issue with these common programmers resulting in 5 V getting onto the 3.3 V data lines, and fixes it by rewiring the board. Going through all the letters in the ICs part number, something that many of us would dismiss, [Doug] notices that the flash chip is 1.8 V-only and procures a 1.8 V adapter to avoid the possibility of frying his motherboard. After finding out that the 1.8 V adapters don’t work for some people, he reverse-engineers the adapter’s schematics and confirms that it, indeed, ought to work with the specific parts on adapter he received.
Noting another letter in the part number implying the flash chip might be configured for quad-SPI operation, he adds series resistors to make sure there’s no chance of the programmer damaging the BIOS chip with its hardwired pinout. This is just an example of the insights in [Doug]’s article, there’s way more that we can’t mention for brevity, and we encourage you to check it out for yourself.
With this level of care put into the process, it’s no surprise that the modification was successful. The kind of inquisitiveness shared here is worth aspiring to, and writeups like this often surpass general-purpose tutorials in their insights and usefulness. What’s your “successfully making use of something sold as non-working” story?
If you’re looking for other insightful BIOS stories, we’ve covered someone reverse-engineering their BIOS to remove miniPCIe card whitelisting. We’ve typically covered BIOS modification stories in laptops, since there’s more incentives to modify these, but a lot of laptop BIOS articles will apply to desktop motherboards too, such as this supervisor password removal story or this LibreBoot installation journey by our own [Tom Nardi].
Thank you [Sidney] for sharing this with us!