Arduino Gets Command Line Interface Tools That Let You Skip The IDE

Arduino now has an officially supported command-line interface. The project, called arduino-cli, is the first time that the official toolchain has departed from the Java-based editor known as the Arduino IDE. You can see the official announcement video below.

Obviously this isn’t a new idea. Platform IO and other command-line driven tools exist. But official support means even if you don’t want to use the command line yourself, this should open up a path to integrate the Arduino build process to other IDEs more easily.

The code is open source, but they do mention in their official announcement that you can license it for commercial use. We assume that would mean if you wanted to build it into a product, not just provide an interface to it. This seems like something Arduino expects, because a lot of the command line tools can produce json which is a fair way to send information to another application for parsing.

The command line interface doesn’t just build a sketch. You can do things like install and manage libraries. For example, to create a new sketch:

Continue reading “Arduino Gets Command Line Interface Tools That Let You Skip The IDE”

More Suspension Than Necessary

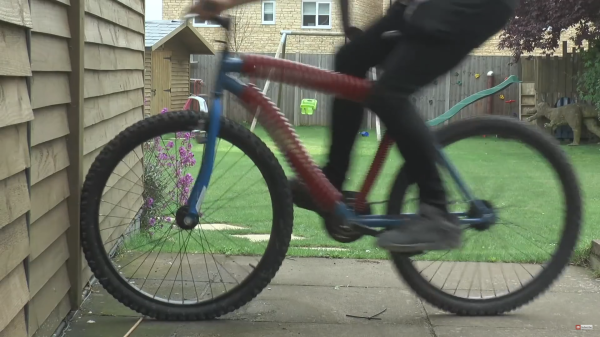
The triangular frame of a traditional mountain bike needs to be the most rigid structure, and a triangle can be a very sturdy shape. So [Colin Furze] throws a spanner in the works, or, in this case, a bunch of springs. The video is below the break, but please try to imagine you are at a party, eyeballing some delicious salsa, yet instead of a tortilla chip, someone hands you a slab of gelatin dessert. The bike is kind of like that.

Anyone who has purchased springs knows there are a lot of options and terminology, such as Newton meters of force, extension, compression, and buckling. There is a learning curve to springs so a simple statement, for example “I want to make a bicycle of springs,” doesn’t have any easy answers. It is a lot like saying, “I want to make a microprocessor out of transistors“. This project starts with springs roughly the diameter of the old bike tubes, and it is a colossal failure. Try using cooked spaghetti noodles to make a bridge.

The first set of custom springs are not up to the task, but the third round produces something rideable. The result seems to be a ridiculous way to exercise your abs and is approximately a training unicycle mated with a boat anchor.

What makes this a hack? The video is as entertaining as anything [Colin] has made, but that does not make it a hack by itself. The hack is that someone asked a ridiculous question, possibly within reach of alcohol, and the answer came by building the stupid thing. A spring-bicycle could have been simulated six ways from Sunday on an old Android phone, but the adventure extracted was worth the cost of doing it in real life.

Continue reading “More Suspension Than Necessary”

High End PC Gets A Rustic Woodworking Piece Of Art For A Case

As [Matt] from [DIY Perks] was about to assemble a new PC, he decided to take a unique direction when it came to building a case. Despite the appearance of a woodworking piece with weird industrial radiators, there is actually a full-fledged, high-end PC hidden inside.

Those radiators are a pair of almost-the-biggest-you-can-buy heatsinks — one of which has been modified to fit the graphics card. Separating the graphics card’s stock cooling fan unit cut down significantly on noise and works with the stringent space requirements of the build. Those fans however keep other components on the card cool, so [Matt] cut pieces of copper plate to affix to these areas and joined them to the heatsink with a heat pipe, bent to shape. The elm wood case then began to take shape around the graphics card — cut into pieces to accommodate the heat pipes, and sealed with black tack to dampen the ‘coil whine’ of the GPU; it turns out the likely culprit are the MOSFETs, but close enough.

Continue reading “High End PC Gets A Rustic Woodworking Piece Of Art For A Case”

Hackerspace Takes Fume Extraction Seriously

At first we laughed at the ridiculously over-the-top fume extraction system this hackerspace built for itself. Then we thought about seriously questionable donation rolls of solder some of the members managed to find and bring in. The kind of roll where the local greybeard assures you that a Californian State Trooper has permission to shoot you if you try to take it into the state, but damn does it solder well. They may be onto something is all we’re saying. But on a serious note, for a communal space like this one, a great air quality plan makes the place a lot more pleasant, if not safer at the same time.

The build uses a regular boost fan for its main suction and pulls the fumes out to a place the members aren’t. Knowing hackerspaces that could be anything from an empty alley to vents on the building’s roof. It’s actually an interesting challenge to solve in a rented space (please share your own solutions for “daylighting” to the outside in the comments).

The frame is made from ducting and dryer hose. Since there aren’t really fittings for this. Most of the joints were designed in OpenSCAD and 3D printed. At each end of the tube a computer fan provides another little boost of airflow. We like the stands to position each end of the hose at the fume source. All of it is powered by a distribution box of their own making with the juice being fed with repurposed Ethernet cables to the fans at the ends of the hose.

It’s a nice build and likely extended the life of a few of the more electronically active members in the space. Especially if the retired radio enthusiasts decide to do their fifty year anniversary garage cleaning and gift upon the space their findings.

The Best Gingery Lathe Video Series To Date

[Makercise] has been working on a Gingery Lathe since September last year. His videos on the process are by far the most detailed, clearly shot, and complete series on making a Gingery lathe we’ve come across.

For those who aren’t familiar, the Gingery series of books describe how to build an entire machine shop’s worth of bench top tools using only the hardware store, dumpster dives, charcoal, and simple skills. The series of books start out with the charcoal foundry. [Makercise] has built a nice oil fired foundry already so it’s off to the next book, Gingery 2,  is the metal lathe.

The Gingery books and, really, most DIY books from that era are: not well laid out, well written, or even complete. All but the most recent prints of the series still looked like photocopies of typewritten documents with photos glued on. The series provided just enough detail, drawings, and advice to allow the hobbyist to fill in the rest. So it’s really nice to see someone work through the methods described in the book visually. Seeing someone using a scraper made from an old file on aluminum to true the surface is much more useful than Gingery’s paragraph or two dedicated to the subject.

[Makercise] is fast approaching the end of his lathe build. We’re not certain if he’ll move onto the Shaper, mill, drill press, brake, etc. after finishing the lathe, but we’re hopeful. The playlist is viewable after the break.

Continue reading “The Best Gingery Lathe Video Series To Date”

Voja’s EEPROM Emulator From 1991

We’re glad we’re not the only hacker-packrats out there! [Voja Antonic] recently stumbled on an EPROM emulator that he’d made way back in 1991. It’s a sweet build, so take your mind back 25 years if you can. Put on “Nevermind” and dig into a nicely done retro project.

The emulator is basically a PIC 16C54 microcontroller and some memory, with some buffers for input and output. On one side, it’s a plug-in replacement for an EPROM — the flash memory of a bygone era. On the other side, it connects via serial port to a PC. Instead of going through the tedious process of pulling the EPROM, erasing and reprogramming it, this device uploads new code in a jiffy.

722351466362213815

No need to emulate ancient EPROMS? You should still check out this build — the mechanics are great! We love the serial-port backplane that is soldered on at a 90° angle. The joint is a card-edge connector electrically, but also into a nice little box, reminiscent of [Voja]’s other FR4 fabrication tricks. The drilled hole with the LED poking out is classy. We’re never going to make an EPROM emulator, but we’re absolutely going to steal some of the fabrication techniques.

[Voja] is a Hackaday contributor, badge-designer, mad hacker, inspired clock-builder, and developer of (then) Yugoslavia’s first DIY PC.