How To Reverse Engineer Mechanical Designs For 3D Modeling

If you’re interested in 3D printing or CNC milling — or really any kind of fabrication — then duplicating or interfacing with an existing part is probably on your to-do list. The ability to print replacement parts when something breaks is often one of the top selling points of 3D printing. Want some proof? Just take a look at what people made for our Repairs You Can Print contest.

Of course, to do that you need to be able to make an accurate 3D model of the replacement part. That’s fairly straightforward if the part has simple geometry made up of a primitive solid or two. But, what about the more complicated parts you’re likely to come across?

In this article, I’m going to teach you how to reverse engineer and model those parts. Years ago, I worked for a medical device company where the business model was to duplicate out-of-patent medical products. That meant that my entire job was reverse engineering complex precision-made devices as accurately as possible. The goal was to reproduce products that were indistinguishable from the original, and because they were used for things like trauma reconstruction, it was critical that I got it right.

Continue reading “How To Reverse Engineer Mechanical Designs For 3D Modeling”

Gamecube Dock For Switch Mods Nintendo With More Nintendo

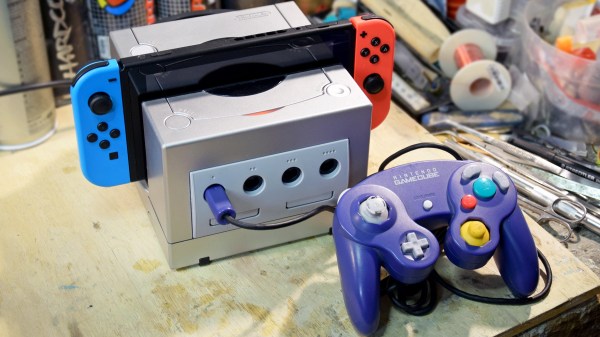
[Dorison Hugo] let us know about a project he just completed that not only mods Nintendo with more Nintendo, but highlights some of the challenges that come from having to work with and around existing hardware. The project is a Gamecube Dock for the Nintendo Switch, complete with working Gamecube controller ports. It looks like a Gamecube with a big slice out of it, into which the Nintendo Switch docks seamlessly. Not only that, but thanks to an embedded adapter, original Gamecube controllers can plug into the ports and work with the Switch. The original orange LED on the top of the Gamecube even lights up when the Switch is docked. It was made mostly with parts left over from other mods.

The interesting parts of this project are not just the attention to detail in the whole build, but the process [Dorison] used to get everything just right. Integrating existing hardware means accepting design constraints that are out of one’s control, such as the size and shape of circuit boards, length of wires, and often inconvenient locations of plugs and connectors. On top of it all, [Dorison] wanted this mod to be non-destructive and reversible with regards to the Nintendo Switch dock itself.

To accomplish that, the dock was modeled in CAD and 3D printed. The rest of the mods were all done using the 3D printed dock as a stand-in for the real unit. Since the finished unit won’t be painted or post-processed in any way, any scratches on both the expensive dock and the Gamecube case must be avoided. There’s a lot of under-cutting and patient sanding to get the cuts right as a result. The video (embedded below) steps through every part of the process. The final screws holding everything together had to go in at an odd angle, but in the end everything fit.

Continue reading “Gamecube Dock For Switch Mods Nintendo With More Nintendo”

3D Printed Desk Harnesses The Power Of Fusion 360 And McMaster-Carr

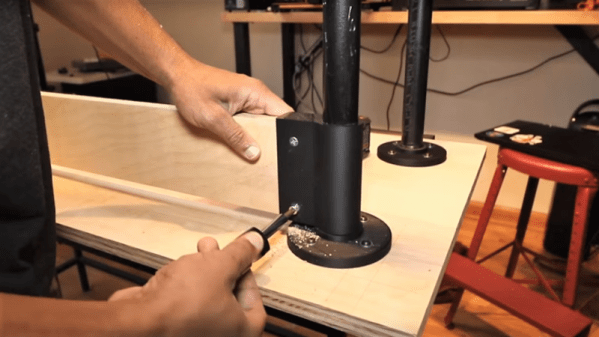
Black pipe furniture is all the rage now, and for good reason — it has a nice industrial aesthetic, it’s sturdy, and the threaded fittings make it a snap to put together. But if you’ve priced out the fittings lately, you know that it’s far from cheap, so being able to 3D-print your own black pipe fittings can make desks and tables a lot more affordable.

Cheapness comes at a price, of course, and [Vladimir Mariano] takes pains to point out that his desk is a light-duty piece that would likely not stand up to heavy use. But since the flange fittings used to connect the plywood top to the legs and as feet would cost about $64 all by themselves from the local home center, printing them made sense. Together with custom pieces to mount stretchers between the legs, the 3D-printed parts made for a decently sturdy base.

But the end product isn’t the main point of the video below. Thanks to the ability to browse the McMaster-Carr catalog from within Fusion 360, [Mariano] was able to seamlessly import the CAD model of a suitable iron flange and quickly modify it to his needs. The power of this feature is hard to overstate; you can literally browse through a catalog of engineered parts and print usable replicas instantly. Sure, it’s not made of metal, but it’s a huge boon to designers to be able to see how the final product would look, especially in the prototyping phase of a project.

Not familiar with McMaster-Carr? It’s an engineer’s online playground, and we covered the ins and outs of doing business with McMaster a while back.

Continue reading “3D Printed Desk Harnesses The Power Of Fusion 360 And McMaster-Carr”

LEGO Prototyping With Tinkercad’s Brick Mode

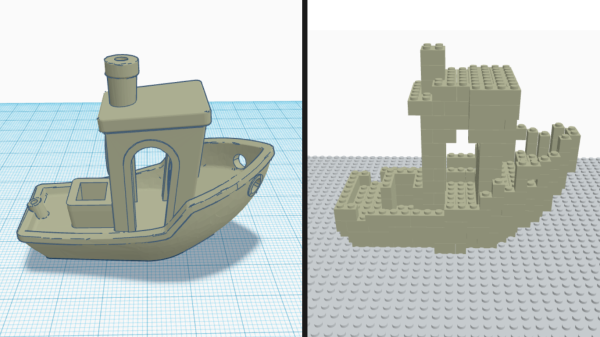
[Andrew Sink] made a brief video demonstrating how he imported an STL of the well-known 3D Benchy tugboat model, and instead of sending it to a 3D printer used the Brick Mode feature to make a physical copy out of LEGO bricks in an eye-aching kaleidoscope of colors.

For those of you who haven’t used Tinkercad lately, Brick Mode allows you to represent a model as LEGO bricks at various scales. You model something as usual (or import a model) and by pushing a single button, render it in LEGO as accurately as can be done with standard bricks.

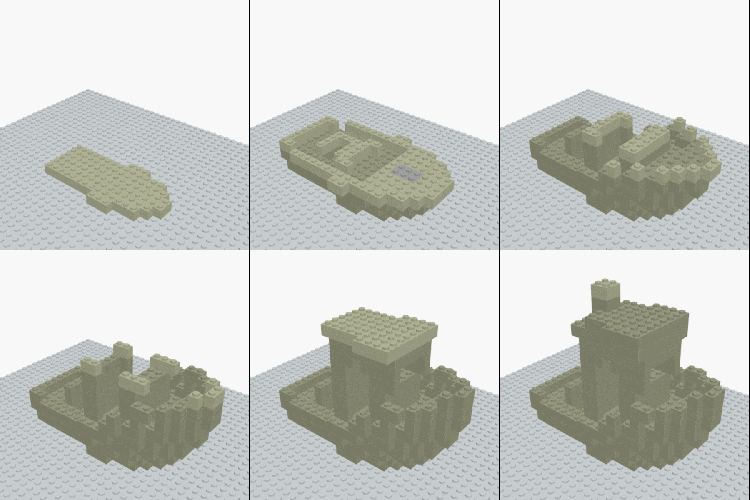
In addition, [Andrew] shows how the “Layers” feature can be used as a makeshift assembly guide for the model, albeit with a couple of quirks that he explains in the video embedded below.

Continue reading “LEGO Prototyping With Tinkercad’s Brick Mode”

InstantCAD Promises Faster Iterative Design

The design process for any product is necessarily an iterative one. Often, a prototype is modelled or built, and changes are made to overcome problems and improve the design. This can be a tedious process, and it’s one that MIT’s CSAIL has sought to speed up with InstantCAD.

The basic idea is integrating analysis tools as a plugin within already existing CAD software. A design can be created, and then parametrically modified, while the analysis updates on screen in a near-live fashion. Imagine modelling a spanner, and then dragging sliders to change things like length and width while watching the stress concentrations change in real time. The tool appears to primarily be using some sort of finite element analysis, though the paper also shows examples of analyzing fluid flows as well.

The software is impressive, however there are caveats. Like any computer analysis, serious verification work must be undertaken to ensure its validity. We suspect that there may be issues with more complex geometries that lead to inaccurate simulation. It’s not the sort of tool you’d use for anything that puts life and limb at risk, but we can see it having great uses for designing basic objects when you want to quickly gain an idea of what sort of effect certain parameter changes will have.

The other main disappointment is that while this tool looks great, it doesn’t appear to be publicly available in any form. Whether this is due to universities and complicated IP requirements or the potential for future commercialization is anyone’s guess. Regardless, you can read the conference paper here or check out the video below. Or you could read up on the applications of finite element analysis to 3D printer slicers, too.

Continue reading “InstantCAD Promises Faster Iterative Design”

DIY Shortcut Keyboard

Working with CAD programs involves focusing on the task at hand and keyboard shortcuts can be very handy. Most software packages allow the user to customize these shortcuts but eventually, certain complex key combination can become a distraction.

[awende] over at Sparkfun has created a Cherry MX Keyboard which incorporates all of the Autodesk Eagle Shortcuts to a single 4×4 matrix. The project exploits the Arduino Pro Mini’s ability to mimic an HID device over USB thereby enabling the DIY keyboard. Pushbuttons connected to the GPIOs are read by the Arduino and corresponding shortcut key presses are sent to the host machine.

Additional functionality is implemented using two rotary encoders and the Teensy encoder library. The first knob functions as a volume control with the push-button working as a mute button. The encoder is used to control the grid spacing and the embedded button is used to switch between imperial and metric units. The entire code, as well as the schematic, is available on GitHub for your hacking pleasure. It’s a polished project just ready for you to adapt.

The project can be extended to be used with other computer software such as Gimp and the keys may be replaced by capacitive touch sensors making it more sturdy. Bluetooth can be added to make things wireless and you can check out the Double Action Keyboard to extend functionality further. Continue reading “DIY Shortcut Keyboard”

Practical Enclosure Design, Optimized For 3D Printing

[3D Hubs] have shared a handy guide on designing practical and 3D printing-friendly enclosures. The guide walks through the design of a two shell, two button remote control enclosure. It allows for a PCB mounted inside, exposes a USB port, and is optimized for 3D printing without painting itself into a corner in the process. [3D Hubs] uses Fusion 360 (free to hobbyists and startups) in their examples, but the design principles are easily implemented with any tool.

One of the tips is to design parts with wall thicknesses that are a multiple of the printer’s nozzle diameter. For example, a 2.4 mm wall thickness may sound a bit arbitrary at first, but it divides easily by the typical FDM nozzle diameter of 0.4 mm which makes slicing results more consistent and reliable. Most of us have at some point encountered a model where the slicer can’t quite decide how to handle a thin feature, delivering either a void between perimeters or an awkward attempt at infill, and this practice helps reduce that. Another tip is to minimize the number of sharp edges in the design, because rounded corners print more efficiently and with smoother motions from the print head.

The road to enclosures has many paths, including enclosures made from FR4 (aka PCB material) all the way down to scrap wood with toner transfer labeling, and certainly desktop 3D printing has been a boon to anyone who’s had to joylessly drill and saw away at a featureless plastic box.