Motorcycle Regulator By Popular Demand

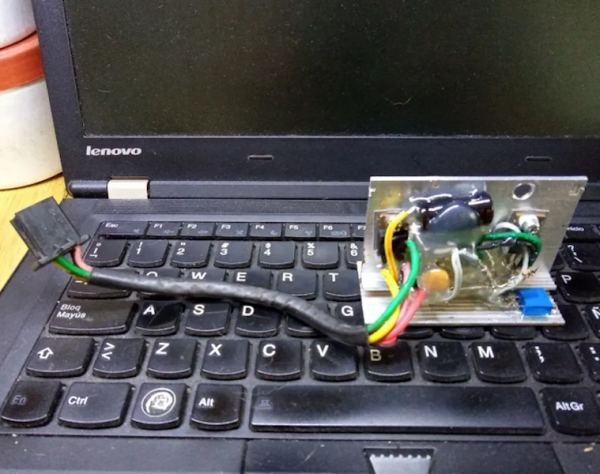
A few weeks ago we posted a build of an avid motorcycle enthusiast named [fvfilippetti] who created a voltage regulator essentially from the ground up. While this was a popular build, the regulator only works for a small subset of motorcycles. This had a large number of readers clamoring for a more common three-phase regulator as well. Normally we wouldn’t expect someone to drop everything they’re doing and start working on a brand new project based on the comments here, but that’s exactly what he’s done.

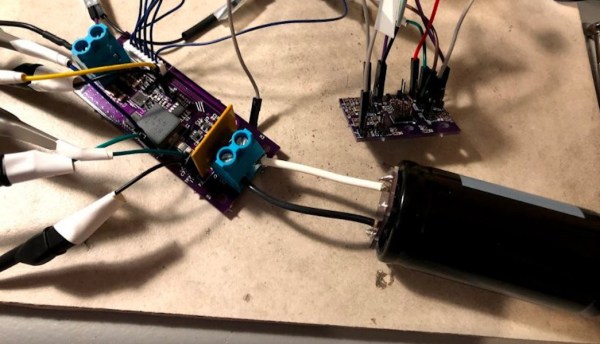
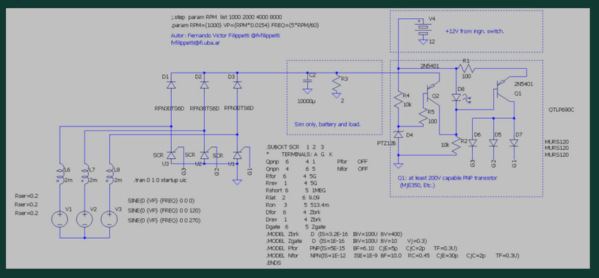
It’s important to note that the solutions he has developed are currently only in the simulation phase, but they show promise in SPICE models. There are actually two schematics available for those who would like to continue his open-source project. Compared to shunt-type regulators, these have some advantages. Besides being open-source, they do not load the engine when the battery is fully charged, which improves efficiency. The only downside is that they have have added complexity as they can’t open this circuit except under specific situations, which requires a specific type of switch.

All in all, this is an excellent step on the way to a true prototype and eventual replacement of the often lackluster regulators found on motorcycles from Aprilia to Zero. We hope to see it further developed for all of the motorcycle riders out there who have been sidelined by this seemingly simple part. And if you missed it the first time around, here is the working regulator for his Bajaj NS200.

DIY Metal Detector Gives You The Mettle To Find Some Medals

Hurricane season is rapidly approaching those of us who live in the northern hemisphere. While that does come with a good deal of stress for any homeowners who live in the potential paths of storms it also comes with some opportunities for treasure hunting. Storms tend to wash up all kinds of things from the sea, and if you are equipped with this DIY metal detector you could be unearthing all kinds of interesting tchotchkes from the depths this year.

The metal detector comes to us from [mircemk] who is known for building simple yet effective metal detectors. Unlike his previous builds, this one uses only a single integrated circuit, the TL804 operational amplifier. It also works on the principle of beat-balance which is an amalgamation of two unique methods of detecting metal.  When the wire coils detect a piece of metal in the ground, the information is fed to an earpiece through an audio jack which rounds out this straightforward build.

[mircemk] reports that this metal detector can detect small objects like coins up to 15 cm deep, and larger metal objects up to 50 cm. Of course, to build this you will also need the support components, wire, and time to tune the circuit. All things considered, though it’s a great entryway into the hobby.

Want to learn more about metal detecting? Check out this similar-looking build which works on the induction balance principle.

Continue reading “DIY Metal Detector Gives You The Mettle To Find Some Medals”

Motorcycle Voltage Regulator Uses MOSFETs

For how common motorcycles are, the designs and parts used in them tend to vary much more wildly than in cars and trucks. Sometimes this is to the rider’s advantage, like Honda experimenting with airbags or automatic transmissions. Sometimes it’s a little more questionable, like certain American brands holding on to pushrod engine designs from the ’40s. And sometimes it’s just annoying, like the use of cheap voltage regulators that fail often and perform poorly. [fvfilippetti] was tired of dealing with this on his motorcycle, so he built a custom voltage regulator using MOSFETs instead.

Unlike a modern car alternator, which can generate usable voltage even at idle, smaller or older motorcycle alternators often can’t. Instead they rely on a simpler but less reliable regulator that is typically no more than a series of diodes, but which can only deliver energy to the electrical system while the motor is running at higher speeds. Hoping to improve on this design, [fvfilippetti] designed a switched regulator from scratch out of MOSFETs with some interesting design considerations. It is capable of taking an input voltage between 20V and 250V, and improves the ability of the motorcycle to use modern, higher-power lights and to charge devices like phones as well.

In the video below, an LED was added in the circuit to give a visual indication that the regulator is operating properly. It’s certainly a welcome build for anyone who has ever dealt with rectifier- or diode-style regulators on older bikes before. Vehicle alternators are interesting beasts in their own right, too, and they can be used for much more than running your motorcycle’s electrical system.

Continue reading “Motorcycle Voltage Regulator Uses MOSFETs”

555 Timer On Its Own In Electronic Dice

One of the most common clichés around here is that a piece of equipment chosen for a project is always too advanced. If a Raspberry Pi was used, someone will say they should have used an Arduino. If they use an Arduino, it should have been an ATtiny. And of course, if an ATtiny was used, there should have simply been a 555 timer. This time, however, [Tim] decided to actually show how this can be done by removing some of the integrated circuits from an electronic dice and relying entirely on the 555 timer for his build.

The electronic dice that [Tim] has on hand makes use of two main ICs: a NE555 and a CD4017 which is a decade counter/divider used for cycling through states. In order to bring the 555 to the forefront of this build, he scraps the CD4017 and adds an array of 555 timers. These are used to generate the clock signals necessary for this build but can also be arranged to form logic circuits. This comes at a great cost, however. The 555 chips take up an unnecessarily large area on the PCB (even though these are small surface-mount chips), consume an incredible amount of power, and are very slow. That’s fine for an electronic dice-rolling machine like this one, but that’s probably where [Tim] will leave this idea.

The 555 timer is a surprisingly versatile chip, and this project shows that there is some element of truth to the folks claiming that projects need naught but a few 555s. We’ve seen entire CPUs built using nothing but 555s, and even a classic project that uses a 555 timer to balance a robot.

A Lot Of Effort For A Pi Laptop

Building a Raspberry Pi laptop is not that uncommon. In fact, just a few clicks from any of the major electronics suppliers will have the parts needed for such a project speeding on their way to your house in no time at all. But [joekutz] holds the uncontroversial belief that the value in these parts has somewhat diminishing returns, so he struck out to build his own Pi laptop with a €4 DVD player screen and a whole lot of circuit wizardry to make his parts bin laptop work.

The major hurdle that he needed to overcome was how to power both the display and the Pi with the two small battery banks he had on hand. Getting 5V for the Pi was easy enough, but the display requires 8V so he added one lithium ion battery in series (with its own fuse) in order to reach the required voltage. This does make charging slightly difficult but he also has a unique four-pole break-before-make switch on hand which doesn’t exactly simplify things, but it does make the project function without the risk of short-circuiting any of the batteries he used.

The project also makes use of an interesting custom circuit which provides low voltage protection for that one lonely lithium battery as well. All in all it’s a master course in using some quality circuit-building skills and electrical theory to make do with on-hand parts (and some 3D printing) rather than simply buying one’s way out of a problem. And the end result is something that’s great for anything from watching movies to playing some retro games.

Continue reading “A Lot Of Effort For A Pi Laptop”

Circuit Impedance Calculations Without Cumbersome Simulations

Using circuit simulating software like SPICE can be a powerful tool for modeling the behavior of a circuit in the real world. On the other hand, it’s not always necessary to have all of the features of SPICE available all the time, and these programs tend to be quite expensive as well. To that end, [Wes Hileman] noticed an opportunity for a specific, quick method for performing impedance calculations using python without bulky, expensive software and came up with a program which he calls fastZ.

The software works on any network of passive components (resistors, capacitors, and inductors) and the user can specify parallel and series connections using special operators. Not only can the program calculate the combined impedance but it can perform frequency analysis at a specified frequency or graph the frequency response over a wide range of frequencies. It’s also running in python which makes it as simple as importing any other python package, and is also easy to implement in any other python program compared to building a simulation and hoping for the best.

If you find yourself regularly drawing Bode plots or trying to cobble together a circuit simulation to work with your python code, this sort of solution is a great way to save a lot of headache. It is possible to get the a piece of software like SPICE to to work together with other python programs though, often with some pretty interesting results.

Rapid Charging Supercapacitors

Battery technology is the talk of the town right now, as it’s the main bottleneck holding up progress on many facets of renewable energy. There are other technologies available for energy storage, though, and while they might seem like drop-in replacements for batteries they can have some peculiar behaviors. Supercapacitors, for example, have a completely different set of requirements for charging compared to batteries, and behave in peculiar ways compared to batteries.

This project from [sciencedude1990] shows off some of the quirks of supercapacitors by showing one method of rapidly charging one. One of the most critical differences between batteries and supercapacitors is that supercapacitors’ charge state can be easily related to voltage, and they will discharge effectively all the way to zero volts without damage. This behavior has to be accounted for in the charging circuit. The charging circuit here uses an ATtiny13A and a MP18021 half-bridge gate driver to charge the capacitor, and also is programmed in a way that allows for three steps for charging the capacitor. This helps mitigate the its peculiar behavior compared to a battery, and also allows the 450 farad capacitor to charge from 0.7V to 2.8V in about three minutes.

If you haven’t used a supercapacitor like this in place of a lithium battery, it’s definitely worth trying out in some situations. Capacitors tolerate temperature extremes better than batteries, and provided you have good DC regulation can often provide power more reliably than batteries in some situations. You can also combine supercapacitors with batteries to get the benefits of both types of energy storage devices.