Not So Simple LED Upgrade For Microscope

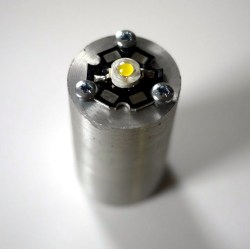
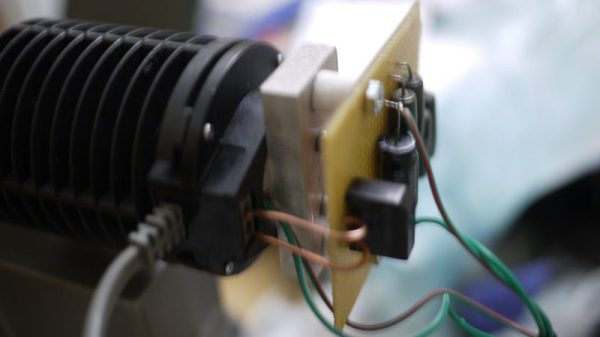
[Amen] obtained a microscope whose light source was an incandescent bulb, but the light from it seemed awfully dim even at its brightest setting. Rather than hunt down a replacement, he decided to replace the bulb with a 1W LED mounted on a metal cylinder. The retrofit was successful, but there were numerous constraints on his work that complicated things. The original bulb and the LED replacement differed not just in shape and size, but also in electrical requirements. The bulb was also part of an assembly that used a two-pronged plug off to the side for power. In the end, [Amen] used 3D printing, a bit of metal work, and a bridge rectifier on some stripboard to successfully replace his microscope’s incandescent bulb assembly with an LED. He even used a lathe to make connector pins that mated properly with the microscope’s proprietary power connector, so that the LED unit could be a drop-in module.

Working on existing equipment always puts constraints on one’s work, usually due to space limitations, but sometimes also proprietary signals. For example, a common issue when refitting a projector with an LED is to discover that the projector expects a stock bulb, and refuses to boot up without one. Happily, the microscope didn’t care much about the bulb itself, and with the LED positioned in roughly the same position as the original bulb’s filament [Amen] obtained smooth and even lighting across the field of view with no changes made to the microscope itself.

Ergonomic Keyboard Designed From The Ground Up

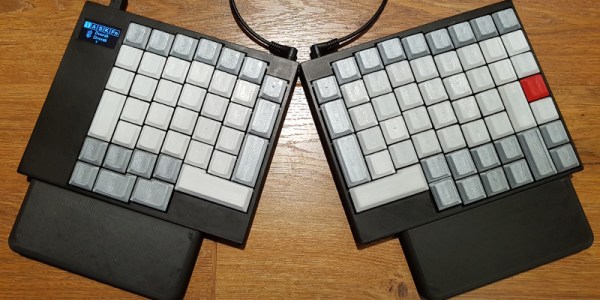
In 2011, [Fabio] had been working behind a keyboard for about a decade when he started noticing wrist pain. This is a common long-term injury for people at desk jobs, but rather than buy an ergonomic keyboard he decided that none of the commercial offerings had all of the features he needed. Instead, he set out on a five-year journey to build the perfect ergonomic keyboard.

Part of the problem with other solutions was that no keyboards could be left in Dvorak (a keyboard layout [Fabio] finds improves his typing speed) after rebooting the computer, and Arduino-based solutions would not make themselves available to the computer’s BIOS. Luckily he found the LUFA keyboard library, and then was able to salvage a PCB from another keyboard. From there, he programmed everything on a Teensy microcontroller, added an OLED screen, and soldered it all together (including a set of Cherry MX switches).

Of course, the build wasn’t truly complete until recently, when a custom two-part case was 3D printed. The build quality and attention to detail in this project is impressive, and if you want to roll out your own [Fabio] has made all of the CAD files and software available. Should you wish to incorporate some of his designs into other types of specialized keyboards, there are some ideas floating around that will surely improve your typing or workflow.

SimpleSumo Bots Teach More Than Fighting

[MechEngineerMike] wrote in to share the enthusiasm over SimpleSumo, a series of open source, customizable robots he designed for mini-sumo battling and much more. For the unfamiliar, mini-sumo is a sport where two robots try to push each other out of a ring. [Mike]’s bots are simplified versions designed for education.

[Mike] was inspired by a video of some kids building mini-sumo bots who were doing anything and everything to personalize them. He vowed to make his own affordable, easy-to-build bots with education firmly in mind. His other major requirement? They had to be as easily customizable as that one potato-based toy that eventually came with a bucket of parts. As of this writing, there are 34 interchangeable accessories.

[Mike]’s first idea was to build the bots out of custom 3D-printed building blocks. He soon found it was too much work to print consistent blocks and switched to a modular cube-like design instead. SimpleSumo bots can do much more than just fight each other. [Mike] has written programs to make them flee from objects, follow lines, find objects and push them out of the ring, and beep with increasing frequency when an object is detected.

The bots are completely open source, but [Mike] sells kits for people who can’t print the parts themselves. He’s made a wealth of information available on his website including links to outside resources about mini-sumo, Arduino, programming, and 3D design. How about a complete series of assembly videos? First one is after the break.  Don’t know how to build a battle ring? He’s got that covered, too.

For a sumo bot that’s more brains than brawn, check out Zumo Red, the smart sumo.

Continue reading “SimpleSumo Bots Teach More Than Fighting”

A Lightsaber, With Rave Mode

How often after being exposed to Star Wars did you dream of having your own working lightsaber? These days — well, we don’t quite have the technology to build crystal-based weapons, but tailor-made lightsabers like redditor [interweber]’s are very much real.

Piggybacking off the Korbanth Graflex 2.0 kit — a sort of bare-bones lightsaber ready to personalize — [interweber] is using a Teensy 3.5 to handle things under the hilt. Instead of taking the easy route and cramming everything into said handle, a 3D printed a cradle for the electronics and speaker keep things secure. The blade is made up of two meters of APA102 LEDs.

As well as all the sound effects appropriate to ‘an elegant weapon for a more civilized age’, a cluster of buttons handle the various functions; , playing and cycling through music(more on that in a second), changing the color of the lightsaber — Jedi today, Sith tomorrow — enabling a flickering effect that mimics Kylo Ren’s lightsaber, color cycling, and a…. rave mode?

Continue reading “A Lightsaber, With Rave Mode”

Finishing A Mini PS One: SLA Vs Extruded

One of the biggest lessons learned by first time 3D printer users is that not everything can be replicated and a printer is a machine and not a miracle worker. It has limitations in terms of what it can print as well as the quality of the output. For teeny tiny objects, the 0.8 mm nozzle will just not do and with resin printers on the rise, the question is, ‘are extruder printers obsolete?’

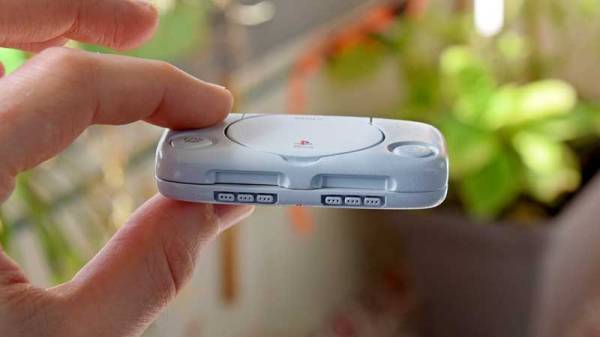
[Dorison Hugo] has made a mini version of the PS One using a Raspberry Pi which you can play games one. The kicker is that in his video, he does a comparison of an SLA printer and a cheaper extruder one for his enclosure. He goes through a laundry-list of steps to print, file, fill, repair, sand paint, sand, paint etc to try to get a good model replica of the original PS One. He then proceeds to print one with an SLA printer and finishes it to compare with the first model. The decals are printed on an inkjet for those who are wondering, and there is a custom cut heatsink in there as well that was salvaged from an old PC.

Spoiler alert! The SLA wins but in our view, just slightly. The idea is that with enough elbow grease and patience, you can get pretty close to making mini models with a cheaper machine. The SLA print needs work too but it is relatively less and for detailed models, it is a much better choice. We really enjoyed watching the process from start to finish including the Dremel work, since it is something that is forgotten when we see a 3D print. Creating something of beauty takes time and effort which stems from a passion to make.

Take a look at the video below of the time lapse and for  SLA printer fans, have a look at the DIY SLA printer which is a Hackaday Prize Entry this year. Continue reading “Finishing A Mini PS One: SLA Vs Extruded”

Bespoke Processors Might Soon Power Your Artisanal Devices

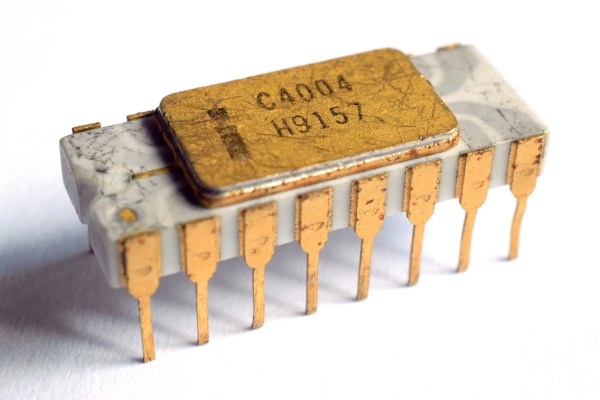
Modern microprocessors are a marvel of technological progress and engineering. At less than a dollar per unit, even the cheapest microprocessors on the market are orders of magnitude more powerful than their ancestors. The first commercially available single-chip processor, the Intel 4004, cost roughly $25 (in today’s dollars) when it was introduced in 1971.

The 4-bit 4004 clocked in at 740 kHz — paltry by today’s standards, but quite impressive at the time. However, what was remarkable about the 4004 was the way it shifted computer design architecture practically overnight. Previously, multiple chips were used for processing and were selected to just meet the needs of the application. Considering the cost of components at the time, it would have been impractical to use more than was needed.

That all changed with the new era ushered in by general purpose processors like the 4004. Suddenly it was more cost-effective to just grab a processor of the shelf than to design and manufacture a custom one – even if that processor was overpowered for the task. That trend has continued (and has been amplified) to this day. Your microwave probably only uses a fraction of its processing power, because using a $0.50 processor is cheaper than designing (and manufacturing) one tailored to the microwave’s actual needs.

Anyone who has ever worked in manufacturing, or who has dealt with manufacturers, knows this comes down to unit cost. Because companies like Texas Instruments makes millions of processors, they’re very inexpensive per unit. Mass production is the primary driving force in affordability. But, what if it didn’t have to be?

Professors [Rakesh Kumar] and [John Sartori], along with their students, are experimenting with bespoke processor designs that aim to cut out the unused portions of modern processors. They’ve found that in many applications, less than half the logic gates of the processor are actually being used. Removing these reduces the size and power consumption of the processor, and therefore the final size and power requirements of the device itself.

Of course, that question of cost comes back into play. Is a smaller and more efficient processor worth it if it ends up costing more? For most manufacturers of devices today, the answer is almost certainly no. There aren’t many times when those factors are more important than cost. But, with modern techniques for printing electronics, they think it might be feasible in the near future. Soon, we might be looking at custom processors that resemble the early days of computer design.


How To Do Beautiful Enclosures With Custom Fiberglass

There are times when I feel the need to really make a mess. When I think of making messes with a degree of permanency, I think of fiberglass. I also really like the smell, reminds me of a simpler time in 8th grade shop class. But the whole process, including the mess, is worth it for the amazing shapes you can produce for speaker pods and custom enclosures.

Utilizing fiberglass for something like a custom speaker pod for a car is not difficult, but it does tend to be tedious when it comes to the finishing stages. If you have ever done bodywork on a car you know what kind of mess and effort I am talking about. In the video below, I make a simple speaker pod meant for mounting a speaker to the surface of something like a car door.

You can also use a combination of wood and fiberglass to make subwoofer cabinets that are molded to the area around them. You can even replace your entire door panel with a slick custom shaped one with built in speakers  if you’re feeling adventuresome.

Continue reading “How To Do Beautiful Enclosures With Custom Fiberglass”