Hinges Live Inside 3D Prints

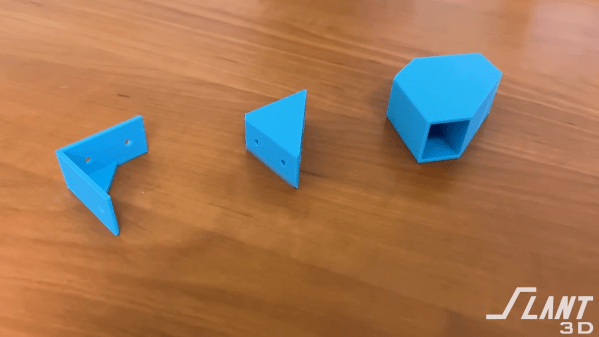
Since desktop 3D printers have become more common, we’ve seen dramatic shifts in all kinds of areas such as rapid prototyping, antique restoration, mass production of consumer goods, or even household repairs that might not have been possible otherwise. There are a lot of unique manufacturing methods that can be explored in depth with a 3D printer as well, and [Slant 3D] demonstrates how one such method known as the living hinge can be created with this revolutionary new tool.

Living hinges, unlike a metal hinge you might pick up at a hardware store, are integrated into the design of the part and made of the same material. Typically found in plastic containers, they allow for flexibility while keeping parts count and cost low. The major downside is that they create stresses in the materials when used, so their lifespan is finite. But there are a number of ways to extend their life, albeit with a few trade-offs.

The first note is to make sure that you’re using the right kind of plastic, but after that’s taken care of [Slant 3D] builds a few flexible parts starting with longer circular-shaped living hinge which allows greater range of motion and distributes the forces across a wider area, at a cost of greater used space and increased complexity. A few other types of living hinges are shown to use less space in some areas, but make the hinges only suitable for use in other narrower applications.

One of the more interesting living hinges he demonstrates is one that’s more commonly seen in woodworking, known there as a kerf bend. By removing strips of material from a sheet, the entire sheet can be rotated around the cuts. In woodworking this is often done by subtracting material with a CNC machine or a laser cutter, but in 3D printing the voids can simply be designed into the part.

Continue reading “Hinges Live Inside 3D Prints”

The BSides: More Curious Uses Of Off-the-shelf Parts

Off-the-shelf stock parts are the blocks from which we build mechanical projects. And while plenty of parts have dedicated uses, I enjoy reusing them in ways that challenge what they were originally meant for while respecting the constraints of their construction. Building off of my piece from last time, I’d like to add to your mechanical hacking palette with four more ways we can re-use some familiar off-the-shelf parts. Continue reading “The BSides: More Curious Uses Of Off-the-shelf Parts”

It’s Opposite Day For This Novel Wankel Engine

The Wankel engine seems to pop up in surprising places every so often, only to disappear into the ether before someone ultimately resurrects it for a new application and swears to get it right this time. Ultimately they come across the same problems that other Wankels suffered from, namely poor fuel efficiency and issues with reliability. They do have a surprising power-to-weight ratio and a low parts count, though, which is why people keep returning to this well, although this time it seems like most of the problems might have been solved simply by turning the entire design inside out.

A traditional Wankel engine has a triangular-shaped rotor that rotates around a central shaft inside an oval-shaped housing. This creates three chambers which continually revolve around inside the engine as the rotor spins. The seals that separate the chambers are notoriously difficult to lubricate and maintain. Instead of using a rotor inside of a chamber, this design called the X-Engine essentially uses a chamber inside of a rotor, meaning that the combustion chamber and the seals stay in fixed locations instead of spinning around. This allows for much better lubrication of the engine and also much higher efficiency. By flipping the design on its head it is able to maintain a low moving parts count, high compression ratio, and small power-to-weight ratio all while improving reliability and performance and adding the ability to directly inject fuel rather than rely on carburetion or other less-ideal methods of fuel delivery that other Wankels require.

Astute internal combustion aficionados will note that this engine is still of a two-stroke design, and thus not likely to fully eliminate the emissions problems with Wankels in a way that is satisfactory to regulators of passenger vehicles. Instead, the company is focusing on military, commercial, and aerospace applications where weight is a key driver of design. We’ve seen time and time again how the Wankel fails to live up to its promises though, and we hope that finally someone has cracked the code on one that solves its key issues.

Opening Up ASIC Design

The odds are that if you’ve heard about application-specific integrated circuits (ASICs) at all, it’s in the context of cryptocurrency mining. For some currencies, the only way to efficiently mine them anymore is to build computers so single-purposed they can’t do anything else. But an ASIC is a handy tool to develop for plenty of embedded applications where efficiency is a key design goal. Building integrated circuits isn’t particularly straightforward or open, though, so you’ll need some tools to develop them such as OpenRAM.

Designing the working memory of a purpose-built computing system is a surprisingly complex task which OpenRAM seeks to demystify a bit. Built in Python, it can help a designer handle routing models, power modeling, timing, and plenty of other considerations when building static RAM modules within integrated circuits. Other tools for taking care of this step of IC design are proprietary, so this is one step on the way to a completely open toolchain that anyone can use to start building their own ASIC.

This tool is relatively new and while we mentioned it briefly in an article back in February, it’s worth taking a look at for anyone who needs more than something like an FPGA might offer and who also wants to use an open-source tool. Be sure to take a look at the project’s GitHub page for more detailed information as well. There are open-source toolchains if you plan on sticking with your FPGA of choice, though.

Tiny Tapeout 3

Tiny Tapeout 3: Get Your Own Chip Design To A Fab

Custom semiconductor chips are generally big projects made by big companies with big budgets. Thanks to Tiny Tapeout, students, hobbyists, or anyone else can quickly get their designs onto an actual fabricated chip. [Matt Venn] has announced the opening of a third round of the Tiny Tapeout project for March 2023.

In 2022, Tiny Tapeout 1 piloted fabrication of user designs onto custom chips referred to as application-specific integrated circuits or ASICs. Following success of the pilot round, Tiny Tapeout 2 became the first paid version delivering guaranteed silicon. For Tiny Tapeout 2, there were 165 submissions. Most submissions were designed using a hardware description language such as Verilog or Amaranth, but ASICs can also be designed in the visual schematic capture tool Wokwi.

Each submitted design must fit within 150 by 170 microns. That footprint can accommodate around one thousand standard cells, which is certainly enough to explore a digital system of real interest.  Examples from Tiny Tapeout 2 include digital neurons, FPGAs, and RISC-V processor cores.

Once the 250 designs are submitted, they’ll be combined into a large grid along with a controller. The controller will receive input signals and pump the inputs via a scan chain through the entire grid to each design. The results from each design continue through the scan chain to be output from the grid. Since all 250 designs will be combined on to one chip, each designer will receive everybody else’s design along with their own. This shared process opens a huge opportunity for experimentation.

To get started on your own ASIC design right away, visit Tiny Tapeout. Also check out the talk [Matt] gave at Supercon 2022: Bringing Chip Design to the Masses along with his Zero to ASIC videos. And we’re not saying anything official, but he’ll probably be giving a workshop at Hackaday Berlin.

Continue reading “Tiny Tapeout 3: Get Your Own Chip Design To A Fab”

Mechanical Keyboard Is Also A Mouse

The mechanical keyboard community is a vibrant, if not fanatical, group of enthusiasts determined to find as many possible ways of assembling, building, and using as many high-quality keyboards as possible. With so many dedicated participants, most things that can be done with a keyboard already have been done. So when something as unique as this split keyboard that also doubles as a mouse pops up, we take notice.

The keyboard is a custom build from [Taliyah Huang] which uses a pair of Arduinos, one in each half of the keyboard, to communicate key and mouse information to a third Arduino which is plugged in to her laptop. The right-hand half of the keyboard also includes the circuitry from an optical mouse, which gets powered up when the caps lock button is held down. When activated, this allows the keyboard to be used as a mouse directly. It also includes support for most Mac gestures as well, making it just as useful as a trackpad.

While there were some problems with the design, including being slightly too tall to be ergonomic and taking nearly 24 hours of soldering to complete, the prototype device is an interesting one especially since it allows for full control of a computer without needing a dedicated mouse. For other unique mechanical keyboard concepts, we recently featured this build which takes design and functionality cues from the Commodore 64.

Continue reading “Mechanical Keyboard Is Also A Mouse”

A simple wooden chair with mint metallic connectors at the corners sits next to a pile of wooden pieces wrapped in leather and straps to form a backpack.

A Nomadic Chair

There’s no shortage of different types of folding or portable chairs, but designer [Jorge Penadés] built a backpack chair that will go the long haul.

Furniture that assembles without screws or glue is always intriguing, and this chair fits the bill. Using simple metal connectors and joinery, it can be setup and taken down in about two minutes without the flimsy feeling of a bag chair. With a natural finish on the wood, the connectors give a nice pop of color without feeling overwhelming. There are even some pictures of a couch version if you follow the link.

In backpack mode, the pieces are held together by leather patches and ratchet straps. [Penadés] was focused on portability over comfort with this piece, but we think this connection method could be used in the future for more comfortable furniture that is still portable.

If you’re looking for more interesting furniture, checkout this Tambour Table with a Puzzling Secret or these CNC-able Seats.

Continue reading “A Nomadic Chair”