Plywood Steals The Show From Upcycled Broken Glass Art Lamps

You can tell from looking around his workshop that [Paul Jackman] likes plywood even more than we do. And for the bases of these lamps, he sandwiches enough of the stuff together that it becomes a distinct part of the piece’s visuals. Some work with a router and some finishing, and they look great! You can watch the work, and the results, in his video embedded below.

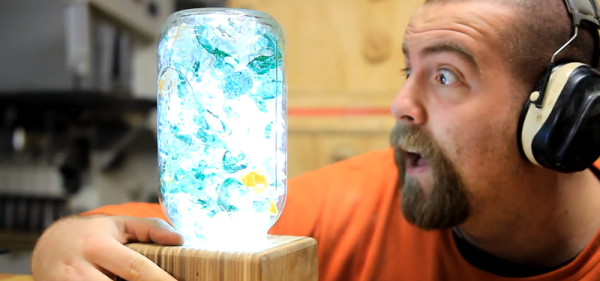
The plywood bases also hide the electronics: a transformer and some LEDs. To make space for them in the otherwise solid blocks of wood, he tosses them in the CNC router and hollows them out. A little epoxy for the caps of the jars and the bases were finished. Fill the jars with colored glass, and a transparent tube to allow light all the way to the top, and they’re done.

Continue reading “Plywood Steals The Show From Upcycled Broken Glass Art Lamps”

No-Etch: The Proof In The Bluetooth Pudding

In a previous episode of Hackaday, [Rich Olson] came up with a new no-etch circuit board fabrication method. And now, he’s put it to the test: building an nRF52 Bluetooth reference design, complete with video, embedded below.

The quick overview of [Rich]’s method: print out the circuit with a laser printer, bake a silver-containing glue onto the surface, repeat a few times to get thick traces, glue the paper to a substrate, and use low-temperature solder to put parts together. A potential drawback is the non-negligible resistance for the traces, but a lot of the time that doesn’t matter and the nRF52 reference design proves it.

The one problem here may be the trace antenna. [Rich] reports that it sends out a weaker-than-expected signal. Any RF design folks want to speculate wildly about the cause?

Continue reading “No-Etch: The Proof In The Bluetooth Pudding”

Cheap DIY FPV Micro-Drone

FPV drones are a fun but often costly hobby for beginners. Opting for a smaller drone will reduce the chance of damaging the drone when one invariably crashes and the smaller props are also a lot safer if there are any innocent bystanders. YouTuber and Instructables user [Constructed] wanted a cheap FPV capable drone that they could comfortably fly in-and-out of doors, so of course they built their own.

Once the drone’s frame was 3D printed, the most complex part about soldering four small-yet-powerful 8.5 mm motors to the Micro Scisky control board is ensuring that you attach them in the correct configuration and triple-checking them. A quick reshuffling of the battery connections and mounting the FPV camera all but completed the hardware side of the build.

Before plugging your flight controller into your PC to program, [Constructed] warns that the battery must be disconnected unless you want to fry your board. Otherwise, flashing the board and programming it simply requires patience and a lot of saving your work. Once that’s done and you’ve paired everything together, the sky — or ceiling — is the limit!

Continue reading “Cheap DIY FPV Micro-Drone”

Ultrasuede Bench Power Supply Got Style

From the look of it sitting on his bench, you’d never guess that [3nz01]’s power supply was actually a couple of el-cheapo modules from eBay, but now we all know the dirty truth.

Re-using or re-purposing an enclosure can be a great way to get a project done faster and get on to the next one. In [3nz01]’s case (tee-hee!), it was an old clock with a broken and annoying buzzer that needed to go. The clock was a nice piece of wood, but that Plexiglas front panel just wasn’t cutting it. That’s why it’s good to have a tailor for a father — a suitable piece of ultrasuede wrapped around the plexi makes the build look swank.

Continue reading “Ultrasuede Bench Power Supply Got Style”

Voltmeter Speaks MQTT Without Libraries

[Emilio Ficara] [built himself an Internet-connected MQTT multimeter](http://ficara.altervista.org/) (translated from Italian by robots). Or maybe we should say that [Emilio Ficara] undertook a long string of cool hacks that ended up in a WiFi-enabled multimeter, because the destination isn’t nearly as interesting as the voyage.

debugtool-sch

The multimeter, a DT-4000ZC, has a serial output but instead of transferring the data directly, it sends which cells on the LCD screen need to be activated. For testing along the way, [Emilio] used his own USB-serial-to-ESP01 dongle, which sounds like a useful tool to have around if you’re debugging an AT command session. He made a cute AVR SPI-port debugging aid with a reset button and diagnostic LEDs that we’re going to copy right now. Other home-made tools, like a 3.7V Li-ion battery manager and a serial data snooper make this project worth a look.

Continue reading “Voltmeter Speaks MQTT Without Libraries”

Revealed: Homebrew Controller Working In Steam VR

[Florian] has been putting a lot of work into VR controllers that can be used without interfering with a regular mouse + keyboard combination, and his most recent work has opened the door to successfully emulating a Vive VR controller in Steam VR. He uses Arduino-based custom hardware on the hand, a Leap Motion controller, and fuses the data in software.

We’ve seen [Florian]’s work before in successfully combining a Leap Motion with additional hardware sensors. The idea is to compensate for the fact that the Leap Motion sensor is not very good at detecting some types of movement, such as tilting a fist towards or away from yourself — a movement similar to aiming a gun up or down. At the same time, an important goal is for any added hardware to leave fingers and hands free.

Continue reading “Revealed: Homebrew Controller Working In Steam VR”

Hybrid Raspberry Pi + PIC32 = Oscilloscope And Function Generator

The PicBerry is a student final project by [Advitya], [Jeff], and [Danna] that takes a hybrid approach to creating a portable (and affordable) combination digital oscilloscope and function generator. It’s based on the Raspberry Pi, features an intuitive Python GUI, and can generate and measure simultaneously.

But wait! The Raspberry Pi is a capable little Linux machine, but meeting real-time deadlines isn’t its strong suit. That’s where the hybrid approach comes in. The Pi takes care of the user interface and other goodies, and a PIC32 over SPI is used for 1 MHz sampling and running a DAC at 500 kHz. The idea of combining them into PicBerry is to get the best of both worlds, with the Pi and PIC32 each doing what they are best at. The readings are sent in batches from the PIC32 to the Pi, where the plot is updated every 30 ms so that user does not perceive any visible lag.

The project documentation notes that improvements can be made, the speeds are a far cry from regular bench equipment, and the software lacks some typical features such as triggering, but overall not bad at all for under $50 of parts. In fact, there are hardly any components at all beyond the Raspberry Pi, the PIC32, and a MCP4822 digital-to-analog converter. A short demo video is embedded below.

Continue reading “Hybrid Raspberry Pi + PIC32 = Oscilloscope And Function Generator”