Global Status Board Keeps Eye On COVID-19 Situation

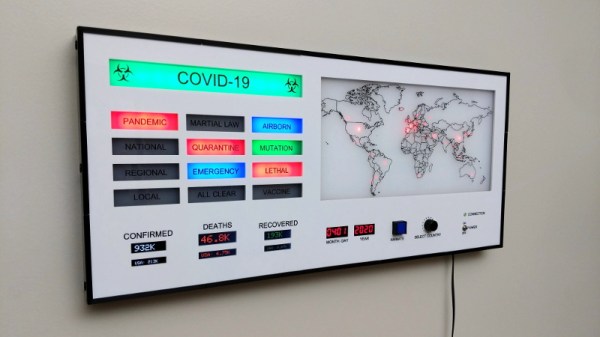
When it comes to keeping abreast of the COVID-19 pandemic, there are basically two schools of thought. Some people would rather not hear the number of confirmed cases or deaths, and just want to focus on those who recovered. That’s fair enough. But others want to have all of the available data at their disposal so they can form their own conclusions about what’s happening with this virus on a global scale. Looking at this incredible COVID-19 status board, we’ll give you one guess which category [Reuben] falls into.

Note the laser engraved component labels

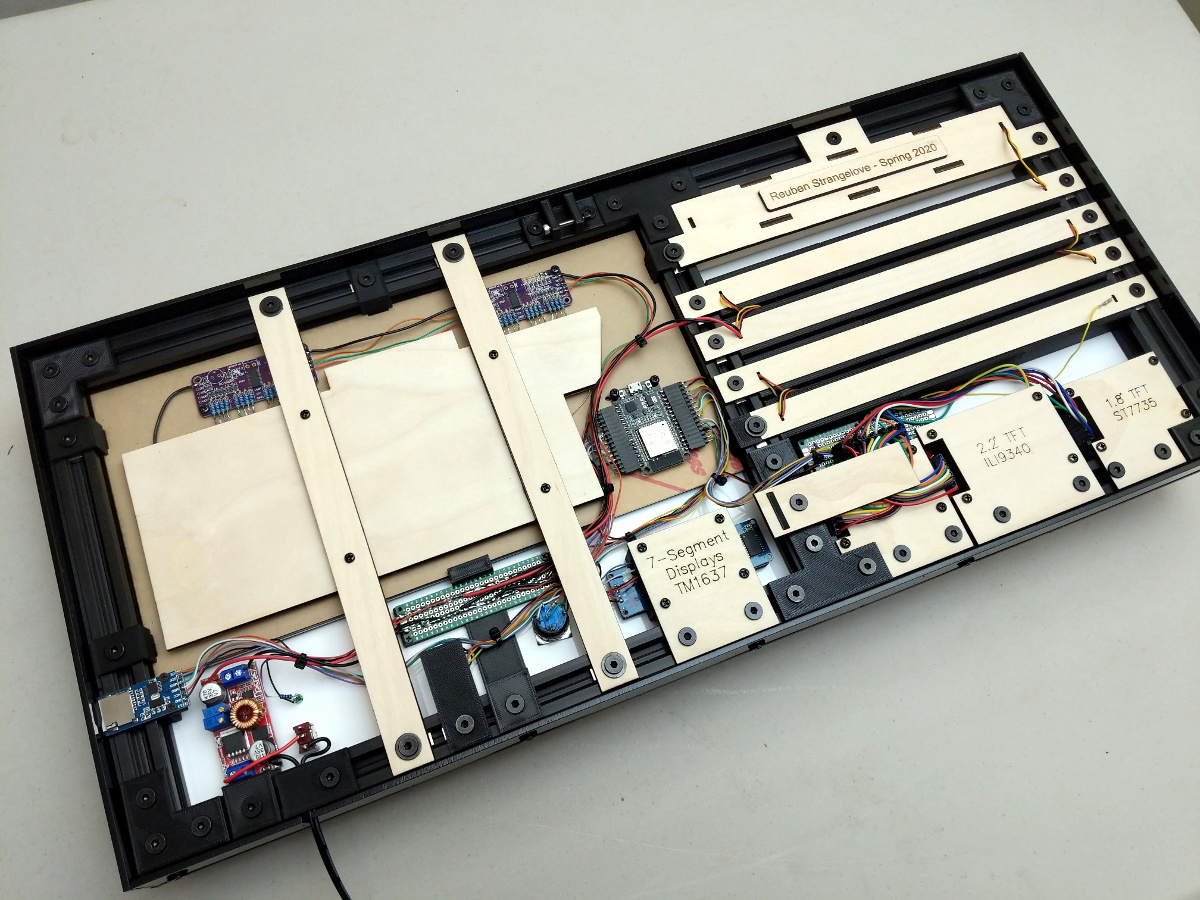
Constructed out of 2020 extrusion with both 3D printed and laser cut parts, this wall-mounted display is built to last. Clearly [Reuben] believes we’re in this one for the long haul, and taking a peek at the plethora of data points this device can show at once, it’s not hard to see why.

Stats are pulled down every hour from a JSON API by an ESP32 and stored on an SD card. A running total of confirmed cases, deaths, and recoveries are shown on several TFT displays located behind the face of the display. On the right, the relative severity of the infection in 32 different countries is visualized with LEDs of varying brightness.

Perhaps the most visually striking element of the display is the large annunciator panel on the left side, which lights up to show various conditions all over the world. We appreciate that [Reuben] has thought ahead and added a light that can be used once a vaccine is deployed for COVID-19, but the inclusion of a “MARTIAL LAW” indicator certainly doesn’t help us shake the feeling we’ve all found ourselves in a proper dystopia.

For those who’d would rather get their information from the source rather than have it filtered through the media, we’ve recently covered a few APIs that will allow you to pull your own up-to-date COVID-19 stats. Whether you’re looking to build something as elaborate as this display, or just want to echo it out to the terminal, making sure you’re seeing accurate data is key to identifying the turning point.

Continue reading “Global Status Board Keeps Eye On COVID-19 Situation”

DIY ESP32 Alarm System Leverages 433 MHz Sensors

There’s a huge market for 433 MHz alarm system hardware out there, from PIR motion detectors to door and window sensors. If you want to put them to work, all you need is a receiver, a network-enabled microcontroller, and some code. In his latest video, [Aaron Christophel] shows how easy it can be.

In essence, you connect a common 433 MHz receiver module to an ESP32 or ESP8266 microcontroller, and have it wait until a specific device squawks out. From there, the code on the ESP can fire off using whatever API works for your purposes. In this case [Aaron] is using the Telegram API to send out messages that will pop up with a notification on his phone when a door or window is opened. But you could just as easily use something like MQTT, or if you want to go old-school, have it toggle a relay hooked up to a loud siren.

Even if you aren’t looking to make your own makeshift alarm system, the code and video after the break are a great example to follow if you want to get started with 433 MHz hardware. Specifically, [Aaron] walks the viewer through the process of scanning for new 433 MHz devices and adding their unique IDs to the list the code will listen out for. If you ever wondered how quickly you could get up and running with this stuff, now you’ve got your answer.

In the past we’ve seen the Raspberry Pi fill in as an RF to WiFi gateway for these type of sensors, as well as projects that pulled them all together into a complete home automation system on the cheap.

Continue reading “DIY ESP32 Alarm System Leverages 433 MHz Sensors”

Using The Steam Controller With LEGO Motors

While Valve’s Steam Controller was ultimately a commercial failure, there’s no denying it’s an interesting piece of hardware. With dual trackpads, a wealth of buttons, and Bluetooth capability, it could be the ideal way to control your next build. Thanks to a recent project by [geggo], now you’ve even got an example you can follow.

A custom PCB holding an ESP32 and DRV8833 dual H-bridge motor controller is used to interface with standard LEGO motors using their stock block-like connectors. That means the board is a drop-in upgrade for whatever motorized creation you’ve already built.

Since the ESP32 obviously has WiFi in addition to Bluetooth, that also means this little board could be used to control LEGO projects over the local network or even Internet with some changes to the firmware.

Interestingly, while Valve officially enabled Bluetooth on the Steam Controller back in 2018, it sounds like some undocumented poking and reverse engineering was necessary to get it working here. That’s great for those of us who like a good hack, but if you’re more interested in just getting things working, [geggo] has been good enough to release the source code to get you started.

If you’re not interested in Bluetooth but want to get your creation up and moving, we’ve recently covered how one hacker used the ESP8266 to bring his LEGO train to life by integrating it into his smart home.

Continue reading “Using The Steam Controller With LEGO Motors”

Reverse Engineering A Ceiling Fan Remote

In the quest to automate everything in your home, you no doubt have things that aren’t made with home automation in mind. Perhaps your window AC unit, or the dimmer in your dining room. [Seb] has several ceiling fans that are controlled by remotes and wanted to connect them to his home automation system. In doing so, [Seb] gives a good overview of how to tackle this problem and how to design a PCB so he doesn’t have a breadboard lying around connected to the guts of his remote control.

There are several things [Seb] needs to figure out in order to connect his fans to Home Assistant, the home automation system he uses: He needs to determine if the circuit in the remote can be powered by 5 or 3.3 V, he needs to connect the circuit to an ESP32 board, and he needs to figure out if he can create a custom PCB that combines the circuit and the ESP32 into one. The video goes through each of these steps and shows the development of each along the way.

There’s a lot of info in the video, so it might need to be slowed down a bit to see all the details. There are some other reverse engineering of home automation gear on the site, here, or, you might want to build your own remote to control your automated devices.

Continue reading “Reverse Engineering A Ceiling Fan Remote”

ESP32-S2 Samples Show Up

The ESP8266 is about six years old now and the ESP32 is getting more mainstream every day. Unsurprisingly, Espressif is developing even newer product and the ESP32-S2 was in the hands of some beta testers last year. Now it is finally landing as “final silicon” samples in people’s hands. [Unexpected Maker] got a few and a prototype development board for the chip and shared his findings in a recent video.

The ESP32-S2 has a single core LX7 running at 240 MHz along with a RISC-V-based coprocessor. Onboard is 320K of RAM and 128K of ROM. You might notice this is less than the ESP32. However, the device can support up to 128MB of external RAM and up to 1GB of external flash. It also supports USB, although the prototype module appears to have an external USB chip on it.

Continue reading “ESP32-S2 Samples Show Up”

How Constant Is Your Choice Of Lights?

The move from incandescent filament lamps to fluorescent, and then LED lighting over the last couple of decades has delivered immense benefits in terms of energy saving, but had brought with it problems for people sensitive to flicker or to too much of a particular set of wavelengths. It’s not always easy to quantify the propensity of a particular light for flickering. So [kk99] has produced an instrument returning a visual indication of its quality.

At its heart is an M5Stick ESP32 development platform, and a TSL250R light sensor hooked up to one of the ESP’s internal ADCs. The flicker waveform is displayed on the screen as a simple oscillograph, and a Fourier transform is performed to extract its frequency. The result is an extremely accessible and compact instrument, showing the suitability of the M5Stick form factor for such designs. So far we’ve only brought you an M5Stick in a password keeper, but we look forward to seeing more projects featuring it.

You can see the light flicker meter in action in the video below the break.

Continue reading “How Constant Is Your Choice Of Lights?”

Keep The Family At Bay While Working From Home With This WiFi Do Not Disturb Dongle

Those who have been suddenly introduced to the wonderful world of working from home over the last couple of weeks may have experienced a bit of culture shock. Even with today’s open floorplan workspaces and less-formal expectations, work isn’t home. That’s especially true with young children in the house, who’ll probably respond to seeing mommy or daddy working from home much differently than [Bob] from accounting would at the office.

To smooth out the rough spots of transitioning to a full-time work-from-home setup, [Brian Lough] threw together this web-enabled “do not disturb” beacon for his office door. The original idea was to simply provide a red light and a green light to let the rest of the family know when [Brian] would be in a meeting, but in an example of scope creep that turned out to be useful, [Mrs. Lough] rewrote the spec to include a button on the family-facing side so that she could alert him that his presence is requested.

[Brian] went through a couple of prototype using both an ESP32 and an ESP8266. We were rooting for the ESP32, which [Brian] was leveraging for its built-in capacitive touch input. That would have eliminated a physical button, but alas, the ESP8266 made it into the final build, along with lots and lots of Blu-Tack. The video below details the build and the code, and features an adorable Irish lesson as a bonus.

Yes, a simple text message would probably have satisfied the specs, but where’s the sport in that? Then again, as [Brian] points out, this build seemed oddly familiar for a good reason.

Continue reading “Keep The Family At Bay While Working From Home With This WiFi Do Not Disturb Dongle”