Handheld GPS Tracks All The Things

With a GPS on every smartphone, one would be forgiven for forgetting that handheld GPS units still exist. Seeking to keep accurate data on a few upcoming trips, [_Traveler] took on a custom-build that resulted in this GPS data logger.
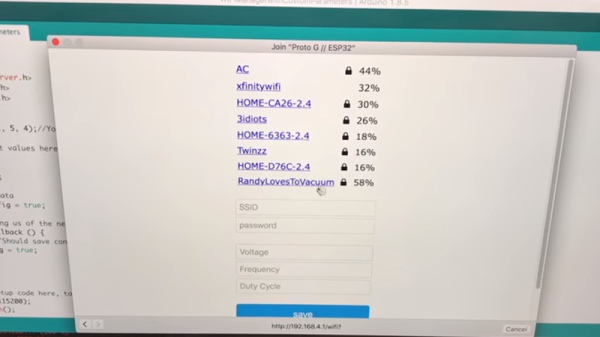
Keeping tabs on [_Traveler] is a Ublox M8N GPS which is on full-time, logging data every 30 seconds, for up  to 2.5 days. All data is saved to an SD card, with an ESP32 to act as a brain and make downloading the info more accessible via WiFi . While tracking the obvious — like position, speed, and time — this data logger also displays temperature, elevation, dawn and dusk, on an ePaper screen which is a great choice for conserving battery.

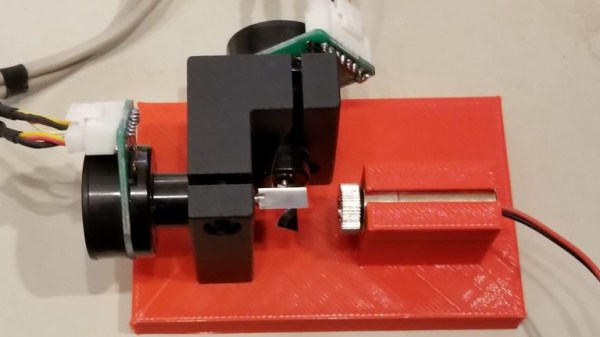
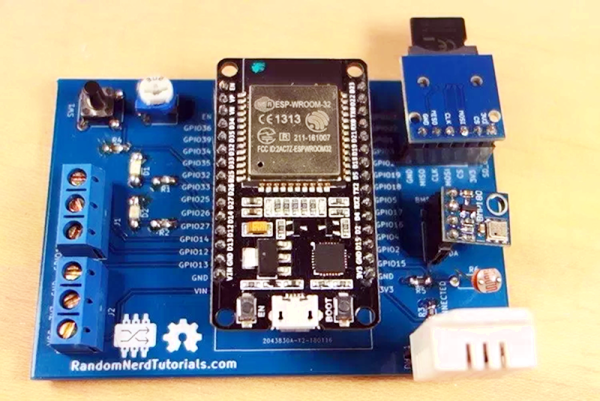
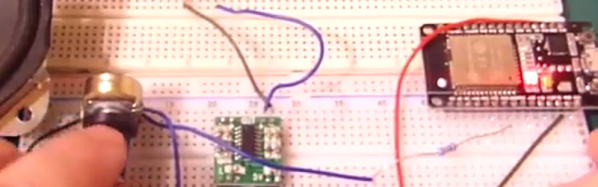
The prototyping process is neat on this one. The first complete build used point-to-point soldering on a protoboard to link several breakout modules together. After that, a PCB design embraces the same modules, with a footprint for the ESP’s castellated edges and header footprints for USB charing board, SD card board, ePaper, etc. All of this finds a hope in a 3D printed enclosure. After a fair chunk of time coding in the Arduino IDE the logger is ready for [_Traveler]’s next excursion!

As far as power consumption in the field, [_Traveler] says the GPS takes a few moments to get a proper location — with the ESP chewing through battery life all the while — and plans to tinker with it in shorter order.

Not all GPS trackers are created equal: sometimes all you need is a stripped-down tracker for your jog, or to know exactly where every pothole is along your route.

[Via /r/electronics]

Laser Galvo Control Via Microcontroller’s DAC

Mirror galvanometers (‘galvos’ for short) are the worky bits in a laser projector; they are capable of twisting a mirror extremely quickly and accurately. With two of them, a laser beam may be steered in X and Y to form patterns. [bdring] had purchased some laser galvos and decided to roll his own control system with the goal of driving the galvos with the DAC (digital to analog) output of a microcontroller. After that, all that was needed to make it draw some shapes was a laser and a 3D printed fixture to hold everything in the right alignment.

The galvos came with drivers to take care of the low-level interfacing, and [bdring]’s job was to make an interface to translate the 0 V – 5 V output range of his microcontroller’s DAC into the 10 V differential range the driver expects. He succeeded, and a brief video of some test patterns is embedded below.

Continue reading “Laser Galvo Control Via Microcontroller’s DAC”

Hands On With The Smallest Game Boy Ever Made

The PocketSprite is the tiniest fully-functional Game Boy Color and Sega Master System emulator. Not only is it small enough to fit in your pocket, it’s small enough to lose in your pocket. It’s now available as a Crowd Supply campaign, and it’s everything you could ever want in a portable, WiFi-enabled, fully hackable video game console. It also plays Witcher 3. And probably Crysis, because of the meme.

This has been a year and a half in the making. The first hardware version of the PocketSprite was revealed at the 2016 Hackaday Superconference by hardware engineer extraordinaire [Sprite_TM]. As [Sprite] has a long list of incredibly impressive hardware hacks like installing Linux on a hard drive and building a Matrix of Tamagotchis, he always has to keep pushing deep into the hardware frontier.

In 2016, [Sprite] showed off the tiniest Game Boy ever, powered by the then brand-spankin’ new ESP32. This was released as Open Source, with the hope that a factory in China would take the files and start pumping out mini Game Boys for everyone to enjoy. Now, a year and a half later, it’s finally happened. In a collaboration with manufacturing wizard [Steve K], [Sprite] is the mastermind behind TeamPocket. The pocket-sized Game Boy-shaped emulator is now real. This is our hands-on review.

Continue reading “Hands On With The Smallest Game Boy Ever Made”

ESP32 Weather Station On A PCB

We see lots of ESP8266 projects, but considerably fewer for the ESP32. So this good-looking weather station on a PCB using an ESP32 caught our eye. The board has a few sockets for common weather gear, but with a little modification, it would be a great carrier for an ESP32. Since the PCB layout is available, you could change things around to suit you. You can see a video from [Rui Santos] about his project and its progress from breadboard to PCB in the video below.

Continue reading “ESP32 Weather Station On A PCB”

ESP32, We Have Ways To Make You Talk

One of our favorite scenes from the [James Bond] franchise is the classic exchange between [Goldfinger] and [Bond]. [Connery] (the One True Bond) says, “You expect me to talk?” And the reply is, “No Mr. Bond, I expect you to die!” When it comes to the ESP32, though, apparently [XTronical] expects it to talk. He posted a library to simplify playing WAV files on the ESP32. There is also a video worth watching, below.

Actually, you might want to back up to his previous post where he connects a speaker via one of the digital to analog converters on the board. In that post, he just pushes out a few simple waveforms, but the hardware is the same setup he uses for playing the WAV files.

Continue reading “ESP32, We Have Ways To Make You Talk”

ESP32 Makes For World’s Worst Radio Station

We can say one thing for [bitluni]: the BOMs for his projects, like this ESP32 AM radio transmitter, are always on the low side. That’s because he leverages software to do jobs traditionally accomplished with hardware, always with instructive results.

In this case, the job at hand is creating an RF oscillator in the broadcast AM band and modulating some audio onto it. From his previous experience using an ESP32 to watch video on an oscilloscope, [bitluni] knew that the microcontroller’s DACs were up to the task of producing an 800-kHz signal, and he managed to produce a more-or-less sine wave carrier with some clever code. His sketch takes data from a header file, modulates it onto the carrier, and sends it out over the ether using a short stub of wire for an antenna. The range is severely limited, but for what it is, it gets the job done and shows the basics. And as a bonus, [bitluni] included a bit of JavaScript that turns an audio file into a header file that’s ready to go out over the airwaves for all your trolling needs.

If you’re looking for a little more range for your low power transmitter and you’re a licensed amateur operator, you might want to explore the world of QRP radio.

Continue reading “ESP32 Makes For World’s Worst Radio Station”

Easier End-User Setup For ESP32 Projects

As hackers, we occasionally forget that not everyone is enamored with the same nerdy minutia that we are. Configuring hardware by changing some lines in the code and compiling a new firmware doesn’t sound like that big of a deal to those of us who’ve been around the block a few times, but might as well be ancient Sanskrit to the average person. As long as your projects are for personal use this isn’t really a concern, but what if you plan on distributing the code for a project or perhaps even selling finished products? Shipping it out with hard-coded variables simply isn’t an option.

Code for loading configuration file from SPIFFS

In a recent video, [Proto G] shows a clever way to use WiFiManager to make configuring your ESP32 project easier for end-users. Not only can you use the captive portal system to configure the ESP32’s WiFi against a nearby access point, but it can allow users to enter in configuration data which can be picked up in your code by using SPI Flash File System (SPIFSS).

With the setup demonstrated in the video below by [Proto G], you don’t need anything more exotic than a web browser to configure the device. The end user simply searches for the device’s WiFi network, connects to it, and is presented with an easy to understand dialog which has them select a WiFi network to configure against along with some fields to enter in custom variables. All this information is then stored to a file on the SPI flash. When the ESP32 reboots, it reads the configuration from the saved file and applies the requested settings.

This is very similar to how many consumer devices are now configured, and even the less technically-inclined recipients of such a device should be able to work through the setup with a bit of hand-holding. If you plan on handing one of your ESP32 projects to John Q. Public, this is the kind of configuration you should be aiming for.

We’ve covered using WiFiManager to make ESP32 projects easier to manage, but the addition of arbitrary variables to the captive portal opens up a lot of possibilities. Just the kind of thing you need when you start considering the leap to commercial product.

Continue reading “Easier End-User Setup For ESP32 Projects”