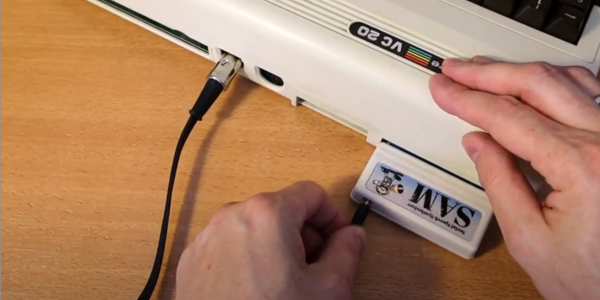
PS/2 wireless dongle

The Wireless PS/2 Keyboard That Never Was

The PS/2-style port was once about as ubiquitous on PCs as USB connectors are today, and more than a few of us accumulated a fair collection of keyboards and mice that sported the 6-pin mini-DIN plug. They’re not nearly as common today, but when you need one, you need one, so if your stockpile of PS/2 keyboards has dwindled to nothing, you might want to look at rolling your own PS/2 remote keyboard dongle.

That backstory on [Remy Sharp]’s build starts with his acquisition of a neptUNO, a 160€ FPGA retrocomputer that gives you access to just about every Z80 and 6502 computer of yesteryear. While the box supports USB keyboards, [Remy] had trouble getting one to work. So out came a Wemos D1 Mini, which was wired up to a stub of PS/2 cable. The microcontroller is powered by the PS/2 port, and connects to the WiFi network on boot-up and starts a WebSocket server. It also served up a page of HTML, which lets him connect with any device and send keystrokes to the neptUNO. He also added a couple of hardware buttons to the dongle, to access menus on the neptUNO directly. The video below shows it in action.

Perhaps unsurprisingly, [Remy] says he took inspiration for this build from [Ben Eater]’s excellent PS/2 deep dive. We’d like to think he saw that here first, but either way, it’s a valuable reference on how keyboards used to work.

Continue reading “The Wireless PS/2 Keyboard That Never Was”

Hack Your Sodastream With A Giant CO2 Canister

Sodastream machines are popular amongst people who like to make their own seltzer water at home. However, replenishing the tiny gas canisters is expensive and wasteful. [Becky] decided to upgrade her machine to avoid this problem, and added some smarts while she was at it. 

The simple part of the hack is using an adapter to connect the Sodastream apparatus to a 50 lb CO2 tank from the welding store. This is easy enough, and just uses a off the shelf adapter. Using welding-grade gas in your drinking water is probably a really bad idea, but [Becky] was willing to take the nisk.

However, safety was given due attention in that a CO2 monitor was installed to make [Becky] aware of any dangerous leaks. The tank is also placed on a custom scale built with load cells and an ESP8266, which allows monitoring of how much gas is left. [Becky] notes that at her rate of drinking one bottle a day, the tank should last her a full 7 years or so.

The project brings costs down to 18 cents per liter of seltzer, versus 38 cents for the Sodastream gas supply. It’s likely that the Sodastream prices could still be beat even if a food-safe CO2 source was used. Plus, there’s no need to regularly buy new bottles!

Overall, it’s a great project and one that recalls us of continuous-ink printer hacks. Video after the break.

Continue reading “Hack Your Sodastream With A Giant CO2 Canister”

Picture of the automatic blind controller and three servo motors, all in their enclosures, displayed on a table.

Automated Window Blinds Using MQTT And Home Assistant

Finnish software engineer [Toni] is on a quest to modernize his 1991 house, and his latest project was to automate the window blinds and control them using Home Assistant. Unless your blinds have built-in motors, most of the effort of such a project centers around how to integrate and attach the motor — and as [Toni] points out, there are tons of different blinds with all kinds of operating mechanisms. But once you solve that issue, half the battle is over.

These particular blinds require less than one turn of the control rod to go from fully open to fully closed, and [Toni] selects a 270-degree range-of-motion, 20 kg*cm torque servo motor to drive them. He really wanted to install the motor inside the window, but it just wouldn’t fit. Instead, each servo motor is mounted in a custom 3D-printed case installed on the window frame just below the operating rod. An ESP8266-based controller box is installed above the window, hidden behind curtains, and operates all three servos.

On the software side of things, the project is coded in C++ and uploaded using the Ardiono IDE. The blinds communicate to [Toni]’s Home Assistant network using MQTT. All the software is available on the project’s GitHub repository, and the 3D-printed case design is posted on Thingiverse. Even though your blinds may be of a completely different design, we think many parts of [Toni]’s project are still useful — do check out this project if you’re thinking about doing something similar. The notion of motorized window blinds has been around for a some time — we covered one project way back in 2013 and another in 2016. If you have added automation to your window blinds, let us know how it went down in the comments section.

Continue reading “Automated Window Blinds Using MQTT And Home Assistant”

Wall of video games

Consoles, Consoles On The Wall, Can Alexa Help Me Play Them All?

If you’ve got a collection of classic game consoles, finding the space to set them all up can be a challenge. But the bigger problem is figuring out how to hook them all up to a TV that, at best, might only have two or three inputs. [odelot] recently wrote in to tell us how he solved both problems with his voice-controlled wall of gaming history.

To mount the systems to the wall, [odelot] designed and printed angled brackets that attach to specially shaped pieces of 3 mm MDF. They do a pretty good job of holding the systems at a visually interesting angle while making themselves scarce, with only the notoriously slick-bottomed Wii needing some extra clips on the front to keep it from sliding off. He also printed up a series of blocks and pipes, no doubt a reference to Mario Bros., to hold the power and video cables for each system.

Prototype version of electronics on breadboardAs to connecting them all up to his TV, [odelot] picked up an eight-device Extron VGA switch that features a serial port for remote control. After getting all the systems adapted over to the appropriate video standard, he then wired an ESP8266 to the switch and wrote some code that ties it into Amazon’s Alexa voice assistant.

By just saying the name of the system he wants to play, the microcontroller will flick the switch over to the appropriate input and turn on a ring of blue LEDs under the appropriate shelf to signify which console has been selected. There’s even an array of solid state relays that will eventually control the mains power going to each system, though [odelot] hasn’t fully implemented it yet. Currently the electronics for this project live on a fairly packed breadboard, but it looks like he’s in the early stages of designing a proper PCB to clean it all up.

Not content to simply control a commercial A/V switch? In the past we’ve seen truly dedicated console collectors design their own custom switches from the ground up, complete with a display to show the currently selected system’s logo.

Continue reading “Consoles, Consoles On The Wall, Can Alexa Help Me Play Them All?”

ESP8266 weather widget with touchscreen display

Nothing Should Cloud The Build Of This Wieldy Weather Widget

Weather is one of those things that seems to be endlessly interesting to hackers. We may decry the notion that weather can be accurately predicted two days out, much less seven, but if there’s an extended forecast available, by gosh we’re gonna take a gander at it.

So why pick up your phone or open a browser tab every time you want to check the temperature? If you’re so into it, you should build a desktop weather widget. [opengreenenergy] has written a great guide to a tidy build of this classic and oh-so-useful project that covers everything from the soldering to obtaining an API key. Inside is an ESP8266 and a 2.8″ touch screen display that shows localized conditions via Open Weather Map. The main screen shows the time, date, current weather, 7-day forecast, and the moon phase for each day, and subsequent screens go into further detail. It’s informative without being busy.

We love the streamlined look of the snap-fit enclosure. This may be a fairly simple project, but the build as designed is challenging due to the space constraints inside. Check out the video after the break, which features the venerable Stickvise.

What? You’ve never heard of the Stickvise? You must be new around here. Allow me to introduce you two.

Continue reading “Nothing Should Cloud The Build Of This Wieldy Weather Widget”

Hacked IKEA Air Quality Sensor Gets Custom PCB

Last month we brought word of the IKEA VINDRIKTNING, a $12 USD air quality sensor that could easily be upgraded to log data over the network with the addition of an ESP8266. It only took a couple of wires soldered to the original PCB, and since there was so much free space inside the enclosure, you didn’t even have to worry about fitting the parasitic microcontroller; just tape it to the inside of the case and button it back up.

Now we’ve got nothing against the quick and dirty method around these parts, but if you’re looking for a slightly more tidy VINDRIKTNING modification, then check out this custom PCB designed by [lond]. This ESP-12F board features a AP2202 voltage regulator, Molex PicoBlade connectors, and a clever design that lets it slip right into a free area inside the sensor’s case. The project description says the finished product looks like it was installed from the factory, and we’re inclined to agree.

Nothing has changed on the software side, in fact, the ESP-12F gets flashed with the same firmware [Sören Beye] wrote for the Wemos D1 Mini used in his original modification. That said [lond] designed the circuit so the MCU can be easily reprogrammed with an FTDI cable, so just because you’re leaving the development board behind doesn’t mean you can’t continue to experiment with different firmware builds.

It’s always gratifying to see this kind of community development, whether or not it was intentionally organized. [lond] saw an interesting idea, found a way to improve its execution, and released the result out into the wild for others to benefit from. It wouldn’t be much of a stretch to say that this is exactly the kind of thing Hackaday is here to promote and facilitate, so if you ever find yourself inspired to take on a project by something you saw on these pages, be sure to drop us a line.

ESP8266 Network Meters Show Off Unique Software

Like the “Three Seashells” in Demolition Man, this trio of bright yellow network monitors created by [David Chatting] might be difficult to wrap your head around at first glance. They don’t have any obvious controls, and their constantly moving indicators are abstract to say the least. But once you understand how to read them, and learn about the unique software libraries he’s developed to make them work, we’re willing to bet you’ll want to add something similar to your own network.

First-time configuration of the monitors is accomplished through the Yo-Yo WiFi Manager library. It’s a captive portal system, not unlike the popular WiFiManager library, but in this case it has the ability to push the network configuration out to multiple devices at once. This MIT-licensed library, which [David] has been developing with [Mike Vanis] and [Andy Sheen], should be very helpful for anyone looking to bring multiple sensors online quickly.

The Device Wheel

We’re also very interested in what [David] calls the Approximate library. This allows an ESP8266 or ESP32 to use WiFi signal strength to determine when its been brought in close proximity to particular device, and from there, determine its IP and MAC address. In this project, it’s used to pair the “Device Wheel” monitor with its intended target.

Once locked on, the monitor’s black and white wheel will spin when it detects traffic from the paired device. We think this library could have some very interesting applications in the home automation space. For example, it would allow a handheld remote to control whatever device the user happens to be closest to at the time.

Whether you follow along with the instructions and duplicate the meters as-is, or simply use the open source libraries that power them in your own project, we think [David] has provided the community with quite a gift in these unique gadgets.