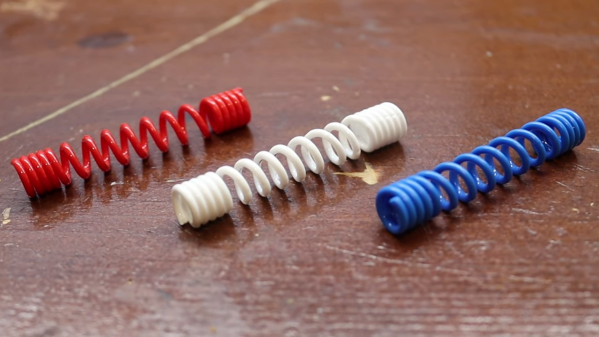
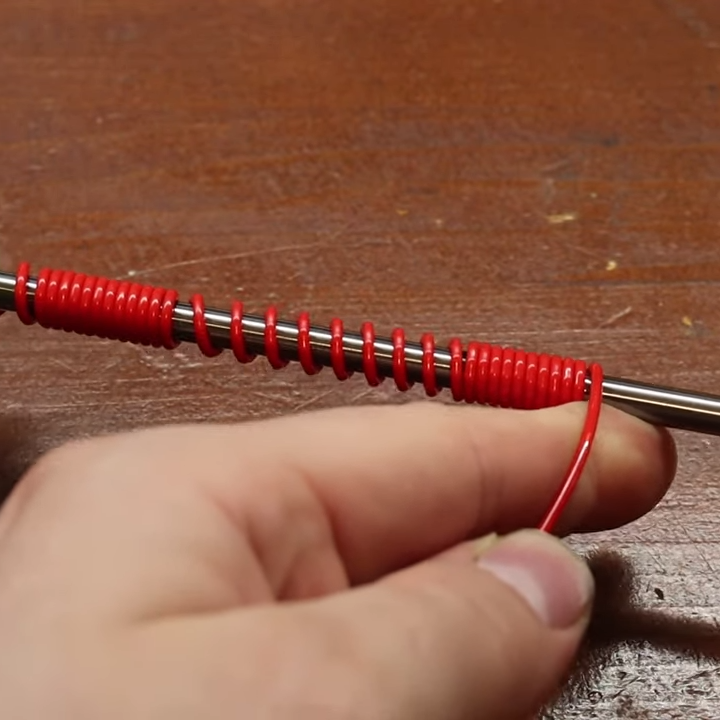
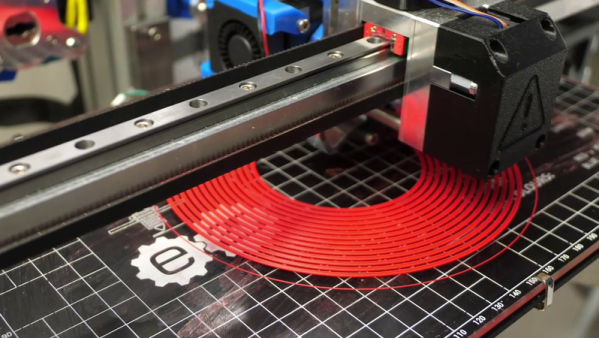
Automatic Rewinder Makes Kite Retrieval A Breeze

So you’ve built a fine kite, taken it to the beach, and let it ride the wind aloft on a spool of line. Eventually it has to come down, and the process of reeling all that line that was so easily paid out is likely a bigger chore than you care to face. What to do?

If you’re like [Matt Bilsky], the answer is simple: build a motorized kite reel to bring it back in painlessly. Of course what’s simple in conception is often difficult to execute, and as the second video below shows, [Matt] went through an extensive design and prototype phase before starting to create parts. Basic questions had to be answered, such as how much torque would be needed to reel in the kite, and what were the dimensions of a standard kite string reel. With that information and a cardboard prototype in hand, the guts of a cordless drill joined a bunch of 3D-printed parts to form the running gear. We really liked the research that went into the self-reversing screw used to evenly wind the string across the spool; who knew that someone could do a doctoral dissertation on yarn-winding? Check out the “Reeler-Inner” in action in the first, much shorter video below.

With some extra power left from the original drill battery, [Matt] feature-crept a bit with the USB charger port and voltmeter, but who can blame him? Personally, we’d have included a counter to keep track of how much line is fed out; something like this printer filament counter might work, as long as you can keep the sand out of it.

Continue reading “Automatic Rewinder Makes Kite Retrieval A Breeze”

Assessing Nozzle Wear In 3D-Printers

How worn are your nozzles? It’s a legitimate question, so [Stefan] set out to find out just how bad 3D-printer nozzle wear can get. The answer, as always, is “It depends,” but exploring the issue turns out to be an interesting trip.

Reasoning that the best place to start is knowing what nozzle wear looks like, [Stefan] began by printing a series of Benchies with brand-new brass nozzles of increasing diameter, to simulate wear. He found that stringing artifacts, interlayer holes, and softening of overhanging edges and details all worsened with increasing nozzle size. Armed with this information, [Stefan] began a torture test of some cheap nozzles with both carbon-fiber filament and a glow-in-the-dark filament, both of which have been reported as nozzle eaters. [Stefan] found that to be the case for at least the carbon-fiber filament, which wore the nozzle to a nub after extruding only 360 grams of material.

Finally, [Stefan] did some destructive testing by cutting used nozzles in half on the mill and looking at them in cross-section. The wear on the nozzle used for carbon-fiber is dramatic, as is the difference between brand-new cheap nozzles and the high-quality parts. Check out the video below and please sound off in the comments if you know how that peculiar spiral profile was machined into the cheap nozzles.

Hats off to [Stefan] for taking the time to explore nozzle wear and sharing his results. He certainly has an eye for analysis; we’ve covered his technique for breaking down 3D-printing costs in [Donald Papp]’s  “Life on Contract” series.

Continue reading “Assessing Nozzle Wear In 3D-Printers”

ABS: Three Plastics In One

It would be really hard to go through a typical day in the developed world without running across something made from ABS plastic. It’s literally all over the place, from toothbrush handles to refrigerator interiors to car dashboards to computer keyboards. Many houses are plumbed with pipes extruded from ABS, and it lives in rolls next to millions of 3D-printers, loved and hated by those who use and misuse it. And in the form of LEGO bricks, it lurks on carpets in the dark rooms of children around the world, ready to puncture the bare feet of their parents.

ABS is so ubiquitous that it makes sense to take a look at this material in terms of its chemistry and its properties. As we’ll see, ABS isn’t just a single plastic, but a mixture that takes the best properties of its components to create one of the most versatile plastics in the world.

Continue reading “ABS: Three Plastics In One”

Tiny Drone Racing Gates Use Up Those Filament Scraps

Drone racing comes in different shapes and sizes, and some multirotor racers can be very small indeed. Racing means having gates to fly though, and here’s a clever DIY design by [Qgel] that uses a small 3D printed part and a segment of printer filament as the components for small-scale drone racing gates.

The base is 3D printed as a single piece and is not fussy about tolerances, meanwhile the gate itself is formed from a segment of printer filament. Size is easily adjusted, they disassemble readily, are cheap to produce, and take up very little space. In short, perfect for its intended purpose.

Races benefit from being able to measure lap time, and that led to DIY drone racing transponders, complete with a desktop client for managing the data. Not all flying is about racing, but pilots with racing skills were key to getting results in this Star Wars fan film that used drones. Finally, those who still feel that using the word “drone” to include even palm-sized racers is too broad of a use may be interested in [Brian Benchoff]’s research into the surprisingly long history of the word “drone” and its historically broad definition.

Bask In The Warm Glow Of DIY Incandescent Bulbs

With most of the apparatus and instruments we now take for granted yet to be developed, the early pioneers of the Electric Age had to bring a lot to the lab besides electrical skills. Machining, chemistry, and metallurgy were all basic skills that the inventor either had to have or hire in. Most of these skills still have currency of course, but one that was once crucial – glassblowing – has sadly fallen into relative obscurity.

There are still practitioners of course, like [2SC1815] who is learning how to make homemade incandescent light bulbs. The Instructable is in both English and Japanese, and the process is explained in some detail. Basic supplies include soda-lime glass tubing and pre-coiled tungsten filaments. Support wires are made from Dumet, an alloy of iron, nickel, and cobalt with an oxidized copper cladding which forms a vacuum-tight seal with molten glass. The filament is crimped to the Dumet leads and pinched into a stem of glass tubing. A bulb is blown in another piece of tubing and the two are welded together, evacuated with a vacuum pump, and sealed. The bulbs are baked after sealing to drive off any remaining water vapor. The resulting bulbs have a cheery glow and a rustic look that we really like.

Of course, it’s not a huge leap from DIY light bulbs to making your own vacuum tubes. That’s how [Dalibor Farny] got started on his handmade Nixie business, after all.

Prusa Unveils Their Own Line Of PLA Filament

There’s little debate that the Original Prusa i3 MK3 by Prusa Research is just about the best desktop 3D printer you can buy, at least in its price bracket. It consistently rates among the highest machines in terms of print quality and consistency, and offers cutting edge features thanks to its open source iterative development. Unless you’re trying to come in under a specific budget, you really can’t go wrong with a Prusa machine.

But while the machine itself can be counted on to deliver consistent results, the same can’t always be said for the filament you feed into it. In a recent blog post, [Josef Prusa] explains that his team was surprised to see just how poor the physical consistency was on even premium brands of 3D printer filament. As a company that prides itself with keeping as much of the 3D printing experience under their control as possible, they felt they had an obligation to do better for their customers. That’s why they’ve started making their own filament which they can hold to the same standards as the rest of their printer.

Their new filament, which is aptly called “Prusament”, is held to higher physical standards of not only diameter but ovality. Many manufacturers simply perform spot checks on the filament’s diameter, but this can miss bulges or changes in its cross-sectional shape. On your average 3D printer this might cause some slightly uneven extrusion and a dip in print quality, but likely not a failure. But the Prusa i3 MK3, specifically with the Multi Material upgrade installed, isn’t most printers. During testing even these slight variations were enough to cause jams.

But you won’t have to take their word for it. Every spool of Prusament will have a QR code that points to a page which tells you the exact production date, length, percent ovality, and standard diameter deviation of that particular roll. An interactive graph will even allow you to find the filament’s diameter for a specific position in the spool, as well as determine how much filament is remaining for a given spool weight. It should be very interesting to see what the community will do with this information, and we predict some very interesting OctoPrint plugins coming down the line.

Prusament is currently only available in PLA, but PETG and ASA variants are coming soon. You can order it now directly from Prusa Research in Prague for $24.99 per kilogram, but it will also be available on Amazon within the month for help keep the shipping costs down.

Continue reading “Prusa Unveils Their Own Line Of PLA Filament”

Semi-automated Winder Spins Rotors For Motors

What’s your secret evil plan? Are you looking for world domination by building a machine that can truly replicate itself? Or are you just tired of winding motor rotors and other coils by hand? Either way, this automated coil winder is something you’re probably going to need.

We jest in part, but it’s true that closing the loop on self-replicating machines means being able to make things like motors. And for either brushed or brushless motors, that means turning spools of wire into coils of some sort. [Mr Innovative]’s winder uses a 3D-printed tube to spin magnet wire around a rotor core. A stepper motor turns the spinner arm a specified number of times, pausing at the end so the operator can move the wire to make room for the next loop. The rotor then spins to the next position on its own stepper motor, and the winding continues. That manual step needs attention to make this a fully automated system, and we think the tension of the wire needs to be addressed so the windings are a bit tighter. But it’s still a nice start, and it gives us some ideas for related coil-winding projects.

Of course, not every motor needs wound coils. After all, brushless PCB motors with etched coils are a thing.

Continue reading “Semi-automated Winder Spins Rotors For Motors”