Hackaday Prize 2022: Saving The World, One Brew At A Time

OK, so maybe [satanistik] is overreaching with his project title “Save the Coffee, Save the World” but keeping an otherwise working coffee machine out of the landfill by hacking around its broken display is nonetheless a worthy pursuit. The juice must flow!

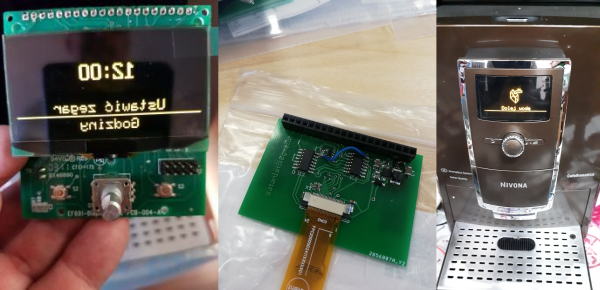
The busted display used a SSD1303 controller OLED module, for which the SSD1305Z is an almost-compatible module. Almost. The one glitch is that the screen is filled in the opposite direction by default. Digging through the manuals, there is a screen-direction bit to set, and tracing out the communication with a logic analyzer, it’s set the wrong way with every screen refresh. If only he could flip that one bit while it’s in transit. Time to man-in-the-middle!

While we certainly would have put a microcontroller in the game, [satanistik] goes old-school. A two-IC logic solution can do exactly the same thing, trading wires for code. The final iteration of the converter board is correspondingly spartan, but it does its one job.

So if you’ve got a Nivona coffee machine with a bum display, or perhaps an Agilent U1273A multimeter, or any other piece of equipment that needs a hard-to-find SSD1303 controller, now you have a ready-made solution. But if not, and you find yourself looking for a display that you can’t find, let this serve as an example to you – with a little (fun) effort, you can hack it back.

Hard(er) Drives: Impractical, Slow, Amazing, And Incredible

Computer memory is a problem that has been solved for many years. But early on, it was more than just a small problem. We’ve many of the different kinds at Hackaday over the years, and we’ll link to some of them later on. But one of the original types of memory was called Delay Line memory, which worked by waiting for a signal to propagate slow enough through a device that it was essentially stored in the device. This was highly inefficient, but still a neat concept- one that [Tom7] has taken to entirely new levels of amazing and impractical as seen in the video below the break.

Such factors as “harm to society” are artfully considered

Starting with a demonstration of orbiting chainsaws, he then moves on to explaining how radio propagation waves could be used to temporarily store data while it’s in transit. He missed the opportunity to call it cloud storage, but we’ll forgive him. Extrapolating that further, he decided to use the Entire Internet to store data without its permission, utilizing large ICMP packets and even making it available as block storage in Linux.

Not content to use the entire Internet to store a few kb of data, he moved on to several thousand virtualized NES game systems which are all playing “an inventory management survival horror game” commonly known as Tetris. [Tom7] deconstructs Tetris, analyzing its Random Number Generator, gaming the system to store data in virtual NES consoles by the thousands. What data did he store? The source code to Tetris for the NES. And what did he do with it? Well, he mounted it and ran the program, of course!

The last Harder Drive we’ll leave for those who want to watch the video, because it’s a bit on the “ewww gross!” side of things but is also a bit less successful due to some magic smoke being released.

If none of these things we’ve mentioned were enough, then watch the video for an excellent breakdown of the cost, efficiency, and even the harm to society. For fun, he also tosses blockchain into the mix to see how it fares against the Harder Drives. There’s also at least one easter egg in the video, and the whimsical discussion of engineering is both entertaining and inspiring. How would you implement a Harder Drive?

[Tom7] also gives you the opportunity to follow along with the fun and mayhem by making much of the code available for your perusal. For more fun reading, check out this walk down computer memory lane that we covered last year, as well as a look into Acoustic Delay Line memory.

Continue reading “Hard(er) Drives: Impractical, Slow, Amazing, And Incredible”

Modular Laptop Maker Provides Mainboard Documentation For Non-Laptop Projects

If you’ve been following the latest advancements in computing for a while, you already know that there’s a big problem with laptops: When they’re no longer useful as a daily driver, it can be a struggle to find a good use for all its parts. Everything is proprietary, and serious amounts of reverse engineering are required if you decide to forge ahead. This is where Framework, a laptop company building modular laptops comes in. They’ve made it clear that when you upgrade your Framework laptop with a new mainboard they want you to be able to continue to use the old mainboard outside of the laptop.

When it's done powering your laptop, use it for a cyberdeck?
When it’s done powering your laptop, use it for a cyberdeck?

To that end, Framework have provided 2D mechanical drawings of their mainboard and 3D printable cases that can of course be modified as needed. “But what about peripherals?” you might ask. Framework has provided pinouts for all of the connectors on the board along with information on which connectors to use to interface with them. No reverse engineering needed!

While it’s possible to buy a mainboard now and use it, their stated goal is to help people make use of used mainboards leftover from upgrades down the line. With just a stick of memory and a USB-C power adapter, the board will spring to life and even has i2c and USB immediately available.

What would you do with a powerful Intel i5-1135G7 mainboard? Framework wants to know, and to that end, they are actually giving away 100 mainboards to makers and developers. Mind you this is a program created and ran by Framework — and is not associated in any way Hackaday or our overlords at Supplyframe.

If you’ve read this far and still don’t know what the Framework laptop is, go check out this introduction by our own [Jenny List].

Hacking An Experimental ESA Satellite

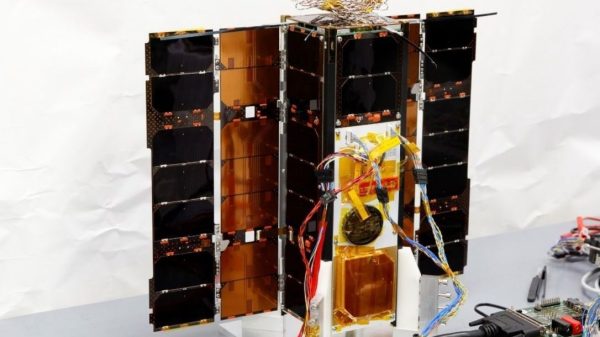
Hacking these days means everything from someone guessing your password and spamming your contacts with toxic links, to wide-scale offensive cyberattacks against infrastructure by sophisticated operators backed by nation states. When it comes to hacking satellites, though, [Didelot Maurice-Michel] found himself tangling with some hardware belonging to the European Space Agency. 

As part of an event called HackCYSAT, hackers were invited to attack the ESA’s OPS-SAT, a CubeSat intended to demonstrate improved techniques for mission control and more advanced satellite hardware. The computer hardware on board is ten times more powerful than other existing ESA satellites, and aims to take satellite technology on a new leap forward.

Continue reading “Hacking An Experimental ESA Satellite”

When Hacking And Biosensing Collide

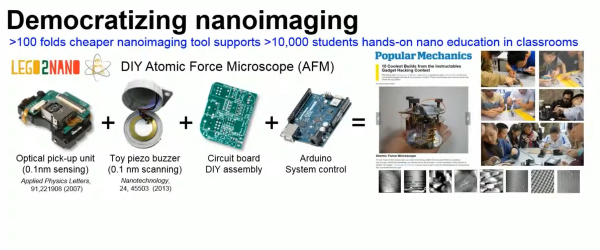
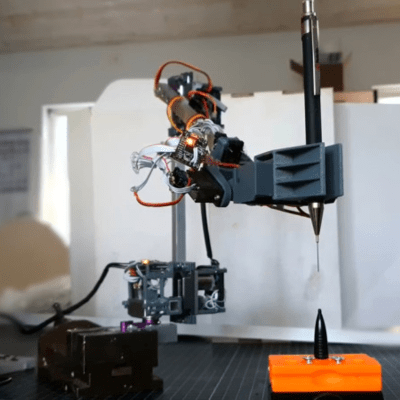
[Prof. Edwin Hwu] of the Technical University of Denmark wrote in with a call for contributions to special edition of the open-access scientific journal Biosensors. Along the way, he linked in videos from three talks that he’s given on hacking consumer electronics gear for biosensing and nano-scale printing. Many of them focus on clever uses of the read-write head from a Blu-ray disc unit (but that’s not all!) and there are many good hacks here.

For instance, this video on using the optical pickup for the optics in an atomic force microscope (AFM) is bonkers. An AFM resolves features on the sub-micrometer level by putting a very sharp, very tiny probe on the end of a vibrating arm and scanning it over the surface in question. Deflections in the arm are measured by reflecting light off of it and measuring their variation, and that’s exactly what these optical pickups are designed to do. In addition to phenomenal resolution, [Dr. Hwu’s] AFM can be made on a shoestring budget!

Speaking of AFMs, check out his version that’s based on simple piezo discs in this video, but don’t neglect the rest of the hacks either. This one is a talk aimed at introducing scientists to consumer electronics hacking, so you’ll absolutely find yourself nodding your heads during the first few minutes. But then he documents turning a DVD player into a micro-strobe for high speed microfluidics microscopy using a wireless “spy camera” pen. And finally, [Dr. Hwu’s] lab has also done some really interesting work into nano-scale 3D printing, documented in this video, again using the humble Blu-ray drive, both for exposing the photopolymer and for spin-coating the disc with medium. Very clever!

If you’re doing any biosensing science hacking, be sure to let [Dr. Hwu] know. Or just tear into that Blu-ray drive that’s collecting dust in your closet.

Continue reading “When Hacking And Biosensing Collide”

Orphaned IoT Sleep Tracker Resurrected As An Air Quality Monitor

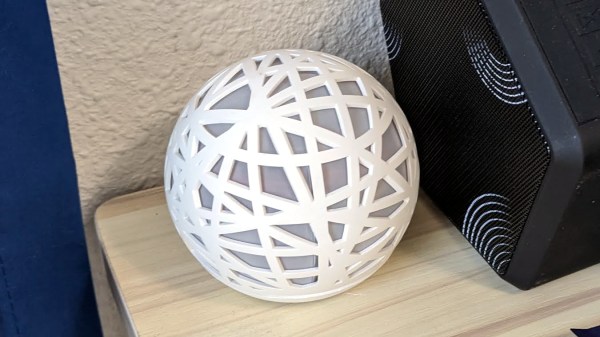
If you have a Hello Sense sleep tracking device lying around somewhere in your drawer of discards, it can be brought back to life in a new avatar. Just follow [Alexander Gee]’s instructions to resurrect the Hello Sense as an IoT air quality data-logger.

In 2014, startup “Hello” introduced the Sense, an IoT sleep tracking device with a host of embedded sensors, all wrapped up in a slick, injection molded spherical enclosure. The device was quite nice, and by 2015, they had managed to raise $21M in funding. But their business model didn’t seem sustainable, and in 2017, Hello shut shop. Leaving all the Sense devices orphaned, sitting dormant in beautifully designed enclosures with no home to dial back to.

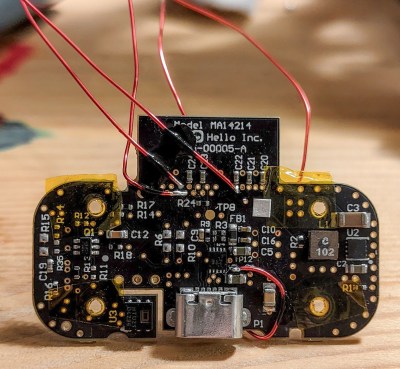
The original Sense included six sensors: illumination, humidity, temperature, sound, dust / particulate matter on the main device, and motion sensing via a separate Bluetooth dongle called the Pill. [Alexander] was interested in air quality measurements, so only needed to get data from the humidity/temperature and dust sensors. Thankfully for [Alexander], a detailed Hello Sense Teardown by [Lindsay Williams] was useful in getting started.

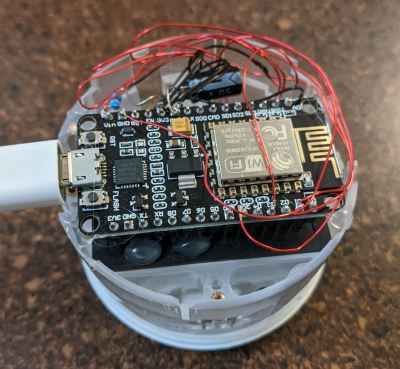
The hardware consisted of four separate PCB’s — power conditioning, LED ring, processor, and sensor board. This ensured that everything could be fit inside the orb shaped enclosure. Getting rid of the LED ring and processor board made space for a new NodeMCU ESP8266 brain which could be hooked up to the sensors. Connecting the NodeMCU to the I2C interface of the humidity/temperature sensor required some bodge wire artistry. Interfacing the PM sensor was a bit more easier since it already had a dedicated cable connected to the original processor board which could be reconnected to the new processor board. The NodeMCU board runs a simple Arduino sketch, available on his Git repo, to gather data and push it online.

For the online data display dashboard, [Alexander] found a nice solution by [Nilhcem] for home monitoring using MQTT, InfluxDB, and Grafana. It could be deployed via a docker compose file and have it up and running quickly. Unfortunately, such projects don’t usually succeed without causing some heartburn, so [Alexander] has got you covered with a bunch of troubleshooting tips and suggestions should you get entangled.

If you have an old Sense device lying around, then this would be a good way to put it some use. But If you’d rather build an air-quality monitor from scratch, then try “Building a Full-Fat Air-Quality Monitor” or “An Air-quality Monitor That Leverages the Cloud“.

Putting Your Time In

I was absolutely struck by a hack this week — [Adam Bäckström]’s amazing robot arm built with modified hobby servos. Basically, he’s taken apart and re-built some affordable off-the-shelf servo motors, and like the 6-Million-Dollar Man, he’s rebuilt them better, stronger, faster. OK, and smoother. We have the technology.

The results are undeniably fantastic, and enable the experienced hacker to get champagne robot motion control on a grape-juice budget by employing some heavy control theory, and redundant sensors to overcome geartrain backlash, which is the devil of cheap servos. But this didn’t come out of nowhere. In his writeup, [Adam] starts off with “You could say this project started when I ordered six endless servos in middle school, more than 15 years ago.” And it shows.

Go check out this video of his first version of the modified servos, from a six-axis arm he built in 2009(!). He’s built in analog position sensors in the motors, which lets him control the speed and makes it work better than any other hobby servo arm you’ve ever seen, but there’s still visible backlash in the gears. A mere twelve years later, he’s got magnetic encoders on the output and a fast inner loop compensates for the backlash. The result is that the current arm moves faster and smoother, while retaining accuracy.

Twelve years. I assume that [Adam] has had some other projects on his plate as well, but that’s a long term project by any account. I’m stoked to see his work, not the least because it should help a lot of others who are ready to step up their desktop servo-arm projects. But the real take-home lesson here is that if you’ve got a tough problem that you’re hacking on, you don’t have to get it done this weekend. You don’t have to get it done next weekend either. Keep hammering on it as long as you need, but keep on hammering. When you get it done, the results will be all the better for the long, slow, brewing time. What’s the longest project that you’ve ever worked on?