Hacking Hackaday.io From CircuitPython

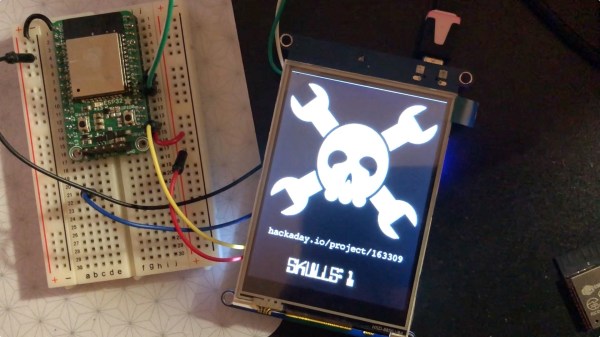
If you’ve ever engaged in social media, you’re familiar with the little thrill you receive when your post, tweet, or project gets a like. But, if logging in feels like too much overhead to obtain your dopamine reward, [pt’s] CircuitPython Hackaday portal may be just what you’re looking for. This project creates a stand-alone counter to display the number of “skulls” (aka likes) received by a project on hackaday.io, and of course, it’s currently counting its own.

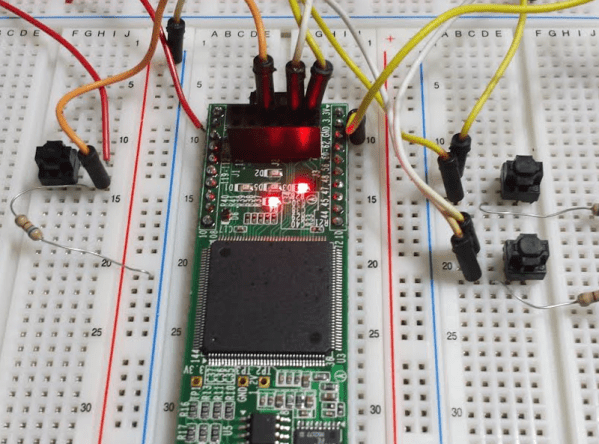
The code is running on a SAMD51 (Cortex M4) microcontroller and serving up the skulls on 240×320 TFT display. For WiFi connectivity, the project uses an ESP-32 controlled through the usual AT command set. All the gory details of this interaction are abstracted away by a CircuitPython library, which is great because that code really isn’t something you want to write for every project. The program accesses the hackaday.io API to retrieve the number of skulls for the project, but could be easily modified to interface with any service that returned a JSON result.

We’ve been seeing a lot of CircuitPython code lately. Just in case you’re not familiar with it, CircuitPython is Adafruit’s version of Micropython, a python language targeted at embedded processors. While it sounds like something concocted purely to make old-school embedded-C programmers grumble, it’s actually powerful and convenient for embedded prototyping and development. Fueled by the speed of the latest inexpensive microcontrollers and a rapidly growing set of libraries that take the sting out of using integrated peripherals and common hacker-friendly parts, it offers a solid alternative to older embedded frameworks. There are lots of examples around if you want to get started, and we’re maintaining our own list of CircuitPython projects over on hackaday.io that you can check out.

You can see a video of the display after the break. It’s not a live stream, so you won’t see your like appear on the display, but rest assured, [pt] will!

Continue reading “Hacking Hackaday.io From CircuitPython”

Less Is More: A Micromatrix Display In A Square Inch

In your living room, the big display is what you want. But in an embedded project, often less is more. We think [bobricius] will agree since he submitted a tiny 4×5 LED display into our square inch challenge. The board features an ATtiny CPU and twenty SMD LEDs in a nice grid. You can see them in action, scrolling to some disco music in the video below.

There is plenty of room left in the CPU for bigger text strings — the flash memory is just over 10% full. A little side-mounted header makes it easy to program the chip if you want to change anything.

Continue reading “Less Is More: A Micromatrix Display In A Square Inch”

How Big Is Your Oscilloscope? One Inch?

We are anxious to see the finished product of [Mark Omo’s] entry into our one square inch project. It is a 20 megasample per second oscilloscope that fits the form factor and includes a tiny OLED screen. We will confess that we started thinking if you could use these as replacements for panel meters or find some other excuse for it to exist. We finally realized, though, that it might not be very practical but it is undeniably cool.

There are some mockup PCB layouts, but the design appears feasible. A PIC32MZ provides the horsepower. [Mark] plans to use an interleaved mode in the chip’s converters to get 20 megasamples per second and a bandwidth of 10 MHz. It appears he’ll use DMA to drive the OLED. In addition to the OLED and the PIC, there’s a termination network and a variable gain stage and that’s about it.

Continue reading “How Big Is Your Oscilloscope? One Inch?”

One Square Inch Expanded In The Time Dimension

No, we’re not talking about spooky feats of General Relativity. But you should know that the Return of the Square Inch Project just got its deadline extended.

If you missed the call the first time around, our favorite user-contributed contest on Hackaday.io is up and running again. Hackaday.io tossed in some good money for prizes, and folks started thinking about what functionality they could cram inside a 25.4 mm x 25.4 mm square. But while one constraint can help bring out creativity, adding a tight deadline to a tight squeeze caused a number of our entrants to ask for an extension.

If you’re working on the Square Inch Project, you’ve got until October 1st to get your boards ready. Breathe a quick sigh of relief and then get back to soldering! We’re looking forward to seeing all the great entries.

Learn FPGA Fast With Hackaday’s FPGA Boot Camp

FPGAs have gone from being a niche product for people with big budgets to something that every electronics experimenter ought to have in their toolbox. I am always surprised at how many people I meet who tell me they are interested in using FPGAs but they haven’t started. If you’ve been looking for an easy way to get started with FPGAs, Hackaday’s FPGA boot camp is for you. There’s even a Hackaday.io chat in the group specifically for FPGA talk for questions and general discussion!

While it is true FPGAs aren’t for everything, when you need them you really need them. Using FPGAs you can build logic circuits — not software simulations, but real circuits — and reap major performance benefits compared to a CPU. For digital signal processing, neural networks, or computer vision applications, being able to do everything essentially in parallel is a great benefit. Sometimes you just need the raw speed of a few logic gates compared to a CPU plodding methodically through code. We expect to see a lot more FPGA activity now that Arduino is in the game.

These boot camps gather together some of the material you seen spread over many articles here before, plus new material to flesh it out. It’s designed for you to work through more like a training class than just some text to read. There’s plenty of screenshots and even animations to help you see what you are supposed to be doing. You’ll be able to work with simulations to see how the circuits we talk about work, make changes, and see the results. We’ll focus on Verilog — at least for now — as it is close to C and easier for people who know C to pick up. Still not convinced? Let’s run though the gist of the boot camp series.

Continue reading “Learn FPGA Fast With Hackaday’s FPGA Boot Camp”

Friend In Need Gets Junk Bin PC For Cramped Quarters

If you doubt the power of the Hackaday community, check this one out. Stalwart reader and tipster [starhawk] has pitched in to help a friend in need, someone he met through Hackaday.io. Seems this friend’s current living arrangements are somewhat on the cramped side, and while he’s in need of a PC, even a laptop would claim too much space.

So with a quick trip to the store and a few items from the junk bin, [starhawk] whipped up an all-in-one PC the size of a tablet for his friend. As impressed as we are by the generosity, we’re more impressed by the quality of his junk bin. The heart of the compact machine is a motherboard from a Wintel CX-W8, scarcely larger than a Raspberry Pi model A. After the addition of a larger heatsink and fan, the board was attached via a sheet of plastic to the back of a 7-inch touchscreen, also a junk bin find. A cheap picture frame serves as the back of the all-in-one, complete with Jolly Wrencher, of course. Alas, the DC-DC converter was one of the only purchased items, bringing the cost for the build to all of $22, including the $15 for a wireless keyboard/touchpad on clearance from Walmart. After some initial power troubles, the fixes for which are described in this update, the machine was ready to ship.

Does this one seem familiar? It should — [starhawk] built a similar “laptop” for himself a while back when he was low on funds. Now it seems like he’s paying it forward, which we appreciate. For more details on how he pulled this all of, check out The Anytop, [starhawk’s] portable computer anyone can build. It was his 2017 Hackaday Prize entry!

No, Cat, This Is Not The Litter Box

Hackaday.io user [peterquinn] has encountered a problem with his recently unruly cat peeing under the dining table. Recognizing that the household cat’s natural enemy is the spray bottle, he built an automatic cat sprayer to deter her antics.

The build is clear-cut: an Arduino Uno clone for a brain, an MG995 servo, PIR sensor, spray bottle, and assorted electronics components. [peterquinn] attached the servo to the spray bottle with a hose clamp — ensuring that the zero position is pointing at the trigger — and running a piece of cabling around the trigger that the servo will tug on. Adding a capacitor proved necessary after frying the first Uno clone, as the servo powering up would cause the Uno to reset.

The code is set up to trigger the servo — spraying the cat twice — once the PIR detects the cat for more than ten seconds. After toying with a few options, [peterquinn] is using a 9V, 2A power supply that works just fine. For now, he hopes the auto-sprayer should do the trick. If it somehow doesn’t work, [peterquinn] has mused that a drastic upgrade to the vacuum may be necessary.