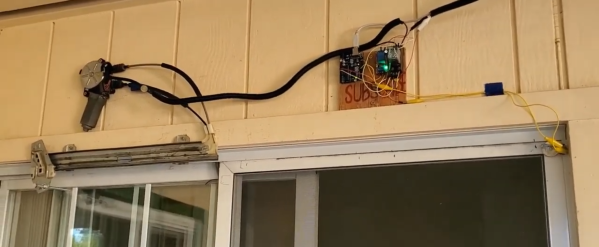
Home Assistant Get Fingerprint Scanning

Biometrics — like using your fingerprint as a password — is certainly convenient and are pretty commonplace on phones and laptops these days. While their overall security could be a problem, they certainly fit the bill to keep casual intruders out of your system. [Lewis Barclay] had some sensors gathering dust and decided to interface them to his Home Assistant setup using an ESP chip and MQTT.

You can see the device working in the video below. The code is on GitHub, and the only thing we worried about was the overall security. Of course, the security of fingerprint scanners is debatable since you hear stories about people lifting fingerprints with tape and glue, but even beyond that, if you were on the network, it would seem like you could sniff and fake fingerprint messages via MQTT. Depending on your security goals, that might not be a big deal and, of course, that assumes someone could compromise your network to start with.

Continue reading “Home Assistant Get Fingerprint Scanning”

An ESP32 Home Automation Swiss Army Knife

Thanks to the ESP8266 and the ESP32, we’ve seen an explosion in DIY home automation projects recently. When it only takes $3 and a few lines of code to bring your gadgets onto the network, that’s hardly a surprise. But hacking bare ESP modules onto devices will only get you so far. Eventually you’ll probably want to put together a slightly more mature home automation system, and that’s where things can get a little tricky.

Which is why [Alfredo] created the Maisken Homelay. This device is a one-stop-shop for your home automation needs that leverages the power of the ESP32. With the microcontroller slotted into this compact PCB, you’ll be able to trigger four relays for your high current or AC loads, and still have 8 GPIOs and the I2C bus for expansion. All while retaining compatibility with existing open source projects like Home Assistant and ESPHome.

What really sets this project apart is the attention to detail. [Alfredo] has included a HLK-PM01 power supply on the board which takes mains voltage and brings it down to 5 VDC for the ESP32, so won’t need a separate power cable. He’s also taken the time to add isolation slots to separate the potential high-voltage connected to the relays from the rest of the board, added current and thermal fuses for protection, and peppered the board with screw terminals so you can easily connect everything up.

Sure you could get a simple relay board shipped to your door for a few bucks from the usual suspects. But it’s not going to offer the kind of quality of life and safety features that the Maisken Homelay has. There’s even a 3D printed enclosure available to help tidy things up.

With some of the blatantly anti-consumer decisions big-name home automation companies have been making recently, there’s more reason than ever to roll your own smart home using open source hardware and software. It still takes more effort than buying a bunch of modules from the Big Box retailer, but projects like this one are certainly starting to blur the line between consumer and DIY.

The Auto-Bartender

It’s the end of the academic semester for many students around the globe, so here comes the flurry of DIY projects. Always a great time to check out all the cool hacks from our readers all over the world. One project that piques our interest comes courtesy of [Jason Ummel] and his Auto-Bartender. (Video, embedded below.)

[Jason] developed this project as a part of his robotics class taught by Professor Martinez, one of our friends at FlexiLab. Powered by one of our favorite microcontrollers, the ATmega328, the Auto-Bartender is driven by a single 12 V motor coupled with 10 individual valves for separate drinks. Drinks are pumped into a cup sitting on top of a scale, allowing the device to know how much of each drink has been dispensed. The entire setup is controlled using a smartphone application developed in MIT App Inventor, a super-easy way to prototype Android applications.

Furthermore, [Jason] incorporated a number of user-centered design considerations into his project. These include an LCD to display updates, a green LED to indicate the device is in progress, and a buzzer to let the user know the drink is complete.

We really like the combination of craftsmanship, electronics hardware design, and software development that [Jason] put into his project. It’s the kind of project we know our readers will enjoy.

It looks like Jason substituted tap water for Whiskey and Dr. Pepper for his demo. Not exactly what we had in mind, but I guess he still has exams to finish.

Cool project [Jason]! We can’t wait to see Auto-Bartender on Hackaday.io.

Bottoms up! Continue reading “The Auto-Bartender”

Building A New RF Remote From Scratch

We’ve seen no shortage of projects that use the ESP8266 or ESP32 to add “smart” features to existing home appliances, often by pairing the microcontroller with a radio or IR transmitter. If your device has an existing remote, integrating it into a custom home automation system is often just a matter of getting a few cheap modular components and writing some simple code to glue it all together.

But what if the appliance you want to control doesn’t use a common frequency? That’s a question that [eigma] recently had to answer after finding the remote control for the bedroom ceiling fan was operating at a somewhat unusual 304 MHz. Something like the MAX1472 could probably have been tuned to this frequency, but the chip doesn’t seem to be available in a turn-key module as the popular 315 MHz transmitters are.

There were a few possible options, including using a software defined radio (SDR), but [eigma] didn’t want to spend a fortune on this project or wait months for parts to get shipped from overseas. The most straightforward solution was to design a custom transmitter tuned to the proper frequency using discrete components; something of a dark art to those of us who’ve been spoiled by the high availability of modular components.

What follows is an fascinating look at the design, testing, and troubleshooting of a truly scratch-built transmitter. You won’t find any ICs here, the carrier signal is generated with just a transistor, some carefully measured pieces of wire, and a handful of passive components. By modulating the signal with an ESP32, [eigma] successfully makes the oddball ceiling fan an honorary member of the Internet of Things.

The write-up that [eigma] has done is an absolutely invaluable resource if you ever find yourself in need of rolling a bespoke transmitter. It easily ranks among some of the most informative radio reverse engineering work we’ve covered, and you’d be wise to file this one away for future reference. That said, most of the newer hardware you’re going to run into will probably be utilizing a widely-supported frequency like 433 MHz.

DIY ESP32 Alarm System Leverages 433 MHz Sensors

There’s a huge market for 433 MHz alarm system hardware out there, from PIR motion detectors to door and window sensors. If you want to put them to work, all you need is a receiver, a network-enabled microcontroller, and some code. In his latest video, [Aaron Christophel] shows how easy it can be.

In essence, you connect a common 433 MHz receiver module to an ESP32 or ESP8266 microcontroller, and have it wait until a specific device squawks out. From there, the code on the ESP can fire off using whatever API works for your purposes. In this case [Aaron] is using the Telegram API to send out messages that will pop up with a notification on his phone when a door or window is opened. But you could just as easily use something like MQTT, or if you want to go old-school, have it toggle a relay hooked up to a loud siren.

Even if you aren’t looking to make your own makeshift alarm system, the code and video after the break are a great example to follow if you want to get started with 433 MHz hardware. Specifically, [Aaron] walks the viewer through the process of scanning for new 433 MHz devices and adding their unique IDs to the list the code will listen out for. If you ever wondered how quickly you could get up and running with this stuff, now you’ve got your answer.

In the past we’ve seen the Raspberry Pi fill in as an RF to WiFi gateway for these type of sensors, as well as projects that pulled them all together into a complete home automation system on the cheap.

Continue reading “DIY ESP32 Alarm System Leverages 433 MHz Sensors”

Reverse Engineering A Ceiling Fan Remote

In the quest to automate everything in your home, you no doubt have things that aren’t made with home automation in mind. Perhaps your window AC unit, or the dimmer in your dining room. [Seb] has several ceiling fans that are controlled by remotes and wanted to connect them to his home automation system. In doing so, [Seb] gives a good overview of how to tackle this problem and how to design a PCB so he doesn’t have a breadboard lying around connected to the guts of his remote control.

There are several things [Seb] needs to figure out in order to connect his fans to Home Assistant, the home automation system he uses: He needs to determine if the circuit in the remote can be powered by 5 or 3.3 V, he needs to connect the circuit to an ESP32 board, and he needs to figure out if he can create a custom PCB that combines the circuit and the ESP32 into one. The video goes through each of these steps and shows the development of each along the way.

There’s a lot of info in the video, so it might need to be slowed down a bit to see all the details. There are some other reverse engineering of home automation gear on the site, here, or, you might want to build your own remote to control your automated devices.

Continue reading “Reverse Engineering A Ceiling Fan Remote”

Printed Door Handle Turns Key With A Servo

[Madalin Valceleanu] had a somewhat unique problem. He wanted to make his front door a bit “smarter”, but none of the IoT door locks he found were compatible with the style of reinforced door he had. So he set out to design and 3D print his own Internet-controlled door handle.

Now we say handle and not lock because the internal mechanisms haven’t actually been replaced. Those aren’t exactly the kind of parts that lend themselves to being recreated in PLA, after all. The printed components simply replace the original plate and handle on the interior of the door.

In that case, you might be wondering what the point of all this was. If he’s still using the same internal mechanism, how does a new handle help? On his new handle, [Madalin] has integrated a servo that’s capable of turning the original key in the door. With the servo wired up to a Raspberry Pi, this allows him to lock and unlock the door through his home automation system.

[Madalin] has made the STLs for his printed handles available on Thingiverse, but like most of these “bolt on” style door modifications, we imagine the design is bespoke enough that it won’t be much practical use to anyone else. Still, it’s an excellent example of solving a real-world problem with some outside of the box thinking. Continue reading “Printed Door Handle Turns Key With A Servo”