ATMega328 SSB SDR For Ham Radio

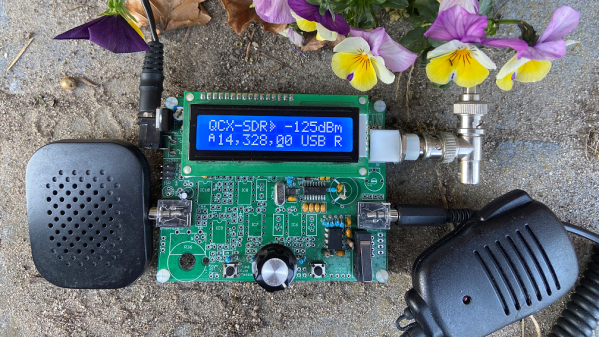
The humble ATmega328 microcontroller, usually packaged as an Arduino Uno, is the gateway drug for millions of people into the world of electronics and embedded programming. Some people just can’t pass up the challenge of seeing how far they can push the old workhorse, and it looks like [Guido PE1NNZ] is one of those. He has managed to implement a software-defined SSB ham radio transceiver for the HF bands on the ATMega328, and it looks like the project is going places.

The radio started life as a QRP Labs QCX, a $49 single-band CW (morse code) HF transceiver kit that is already one of the cheapest ways to get on the HF bands. [Guido] reduced the part count of the radio by about 50%, implementing much of the signal processing digitally on the ATmega328. On the transmitter side, the SSB signal is generated by making slight frequency changes to a Si5351 clock generator using 800kbit/s I2C, and controlling a very efficient class-E RF power amplifier with PWM for about 5W of output power. The increased efficiency means that there is no need for the bulky heat sink usually seen on SSB radios. The radio is continuously tunable from 80m to 10m (3.5 Mhz – 30 Mhz), but it does require plugging in a different low pass filters for each band. Continue reading “ATMega328 SSB SDR For Ham Radio”

Breadboard Computer Plays Snake On Character Display; Also In A Browser!

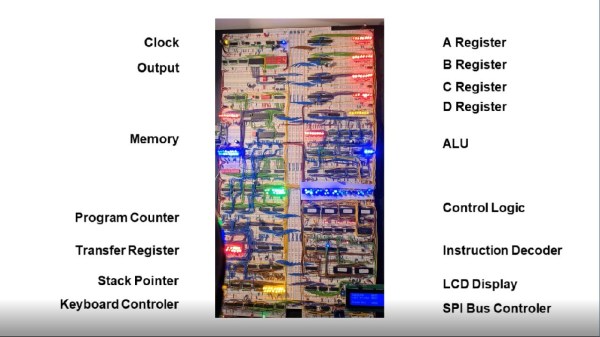
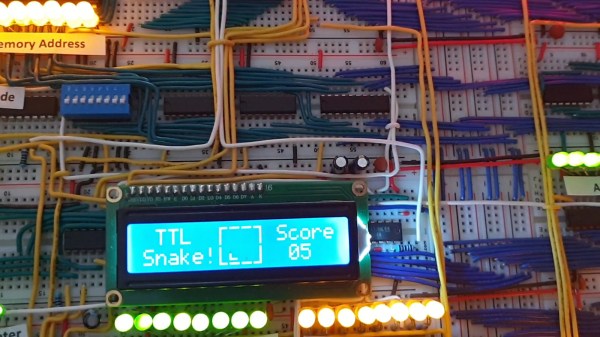
If building a homebrew computer on a breadboard is your thing, you’re most certainly familiar with [Ben Eater], whose design of using nothing but logic gates has served as inspiration for many replicas over the years. [visrealm] took the concept and expanded upon it, even adding a 16×2 LCD that let’s you play Snake by moving a single pixel on the character display!

Making the most of tiny resolution is impressive — it’s a difficult constraint for the game field. But there are other tricks at work as well. [visrealm] uses different intensities to distinguish between the snake and its food which is kind of a dark pixel in the demo shown after the break. But what stands out most is that the breadboard build is really only half of the story. In addition, [visrealm] built an entire emulator that resembles his actual breadboard design, which can be programmed and used via browser, giving WebAssembly a whole new meaning. While that’s convenient for anyone interested to play around with these breadboard computers, but lacks the patience to build one themselves, it also functions as the real one’s programming environment. In addition, an ESP8266 is used to load a new program directly via WiFi.

All the code and some build notes are available on GitHub, and if you’re looking for a nifty LCD emulator for your web site, there’s a standalone repository for that as well. But in case you need a better display option for your own breadboard computer, how about adding a VGA connector? And if you don’t build your own yet, it’s never too late to start.

Continue reading “Breadboard Computer Plays Snake On Character Display; Also In A Browser!”

Amateur Radio Homebrewing Hack Chat

Join us on Wednesday, March 18 at noon Pacific for the Amateur Radio Homebrewing Hack Chat with Charlie Morris!

For many hams, the most enticing part of amateur radio is homebrewing. There’s a certain cachet to holding a license that not only allows you to use the public airwaves, but to construct the means of doing so yourself. Homebrew radios range from simple designs with a few transistors and a couple of hand-wound coils to full-blown rigs that rival commercial transceivers in the capabilities and build quality — and sometimes even surpass them. Hams cook up every piece of gear from the antenna back, and in many ways, the homebrewers drive amateur radio technology and press the state of the art forward.

Taking the dive into homebrewing can be daunting, though. The mysteries of the RF world can be a barrier to entry, and having some guidance from someone who has “been there, done that” can be key to breaking through. New Zealand ham Charlie Morris (ZL2CTM) has been acting as one such guide for the adventurous homebrewer with his YouTube channel, where he presents his radio projects in clear, concise steps. He takes viewers through each step of his builds, detailing each module’s design and carefully walking through the selection of each component. He’s quick to say that his videos aren’t tutorials, but they do teach a lot about the homebrewer’s art, and you’ll come away from each with a new tip or trick that’s worth trying out in your homebrew designs.

Charlie will join us for the Hack Chat this Wednesday to discuss all things homebrewing. Stop by with your burning questions on DIY amateur radio, ask about some of Charlie’s previous projects, and get a glimpse of where he’s going next.

join-hack-chatOur Hack Chats are live community events in the Hackaday.io Hack Chat group messaging. This week we’ll be sitting down on Wednesday, March 18 at 12:00 PM Pacific time. If time zones have got you down, we have a handy time zone converter.

Click that speech bubble to the right, and you’ll be taken directly to the Hack Chat group on Hackaday.io. You don’t have to wait until Wednesday; join whenever you want and you can see what the community is talking about.

Continue reading “Amateur Radio Homebrewing Hack Chat”

Riding The Nostalgia Train With A 6502 From The Ground Up

In the very early days of the PC revolution the only way to have a computer was to build one, sometimes from a kit but often from scratch. For the young, impoverished hobbyist, leafing through the pages of Popular Electronics was difficult, knowing that the revolution was passing you by. And just like that, the days of homebrewing drew to a close, forced into irrelevance by commodity beige boxes. Computing for normies had arrived.

Many of the homebrewers-that-never-were are now looking back at this time with the powerful combination of nostalgia and disposable income, and projects such as [Ben Eater]’s scratch-built 6502 computer are set to scratch the old itch. The video below introduces not only the how-to part of building a computer from scratch, but the whys and wherefores as well. Instead of just showing us how to wire up a microprocessor and its supporting chips, [Ben] starts with the two most basic things: a 6502 and its datasheet. He shows what pins do what, which ones to make high, and which ones get forced low. Clocked with a custom 555 circuit that lets him single-step and monitored with an Arduino Mega-based logic analyzer, we get a complete look at the fetch and execute cycle of a simple, hard-wired program at the pin level.

This is one of those rare videos that was over too soon and left us looking for more. [Ben] promises a follow-up to add a ROM chip and a more complex program, and we can’t wait to see that. He’s selling kits so you can build along if you don’t already have the parts. There seems to be a lot of interest in 6502 builds lately, some more practical than others. Seems like a good time to hop on the bandwagon.

Continue reading “Riding The Nostalgia Train With A 6502 From The Ground Up”

RuneScape GBA Controller Is A Nostalgic Mash-Up

For gamers, the early 2000s certainly stand out as a memorable era. The dawn of the 21st century ushered in the sixth generation of home video game consoles, with Sony, Nintendo, and Microsoft all releasing their systems within a few years of each other. Nintendo also released their Game Boy Advance at around the same time, representing a minor revolution for mobile gaming. On the PC front, a free-to-play MMORPG called RuneScape was redefining people’s expectations of browser-based software.

Now, thanks to modern technology and the expert guidance of [TiKevin83], these varied bits of video game history can be used in conjunction for maximum rose-tinting effect. Using homebrew software on the GameCube and a healthy collection of wires and adapters, the GBA can be used as a controller for your adventures through the realm of Gielinor. After nearly two decades, the dreams of gamers everywhere have come true.

Well, that might be a stretch. In fact, we’d wager that nobody in human history has ever looked at the GBA and thought it would be a particularly good controller for an MMORPG. Watching the video after the break, it’s not hard to see why. Using the handheld system’s digital pad to control the mouse in RuneScape looks to be precisely as clunky as you’d imagine. But of course, that’s hardly the point.

So how is it accomplished? A homebrew tool for the GameCube’s “Game Boy Player” accessory allows the GBA, when connected to the console via the appropriate adapter cable, to mimic a standard controller. Once the GBA is running in this mode, it can then be connected to the computer using a Wii U to USB adapter. Finally, the program JoyToKey is used to map the GBA’s buttons to mouse and keyboard input for “Old School” RuneScape.

If you’d like to do something similar but aren’t quite committed enough to collect up all the Nintendo-branded ephemera this method requires, you may be interested in this DIY adapter that allows the venerable GBA to be used as a standard Bluetooth controller.

Continue reading “RuneScape GBA Controller Is A Nostalgic Mash-Up”

Another Way To Make PCBs At Home

One of the more popular ways of rolling out your own custom PCB is to simply create the model in your CAD program of choice and send it off to a board manufacturer who will take care of the dirty work for you. This way there is no need to deal with things like chemicals, copper dust, or maintaining expensive tools. A middle ground between the board manufacturer and a home etching system though might be what [igorfonseca83] has been doing: using an inexpensive laser engraver to make PCBs for him.

A laser engraver is basically a low-power laser CNC machine that’s just slightly too weak to cut most things that would typically go in a laser cutter. It turns out that the 10W system is the perfect amount of energy to remove a mask from a standard PCB blank, though. This in effect takes the place of the printer in the old toner transfer method, and the copper still has to be dissolved in a chemical solution, but the results are a lot more robust than trying to modify a printer for this task.

If you aren’t familiar with the days of yore when homebrew PCBs involved a standard desktop printer, many people still use this method, although the results can be mixed based on printer reliability. If you want to skip the middleman, and the need for a chemical bath, a more powerful laser actually can cut the traces for you, too.

Continue reading “Another Way To Make PCBs At Home”

Four Chips To Retro Perfection

Over the years, we’ve seen many people build a computer from the ground up. It’s always great, but this one takes the cake. I’m not just saying that because there’s a cute little ‘Z80 Inside’ logo on the silk screen, either. It’s a four IC Z80 computer, a tiny board, and [Just4Fun]’s entry into this year’s Hackaday Prize.

This single board computer is only four chips, the most important being the CMOS Z80 CPU. This is the same CPU as was found in the TRS-80 and the ZX Spectrum, both classics from the early days of computing. In addition to the PCU, there’s a Toshiba SRAM with 128 whole kilobytes of random access memories. A 74HC00 is thrown into the mix for glue logic, and everything else happens through a specially-programmed ATMega32A. This last chip provides a universal I/O subsystem, the EEPROM, and the 4/8MHz clock for the CPU.

Those four chips are really all you need for a fully functional computer, but you can do so much more with this little board. There’s a uCom board, or basically a ‘transparent’ USB-to-serial emulator that will allow you to upload a hex file to the board. Of course this means you can also connect it to a terminal, and with FuzixOS, there’s Unix for the Z80. It’s a wonderment of retrocomputing, and one of the best ways to build an old computer today.

Continue reading “Four Chips To Retro Perfection”