DIY Cryogel Sustains Live Cells

We like to think our readers are on the cutting edge. With the advent of CRISPR kits at home and DIY bio blooming in workshops across the world, we wanted to share a video which may be ahead of its time. [The Thought Emporium] has just shown us a way to store eukaryotic cells at room temperature. His technique is based on a paper published in Nature which he links to from the YouTube page, but you can see his video after the break.

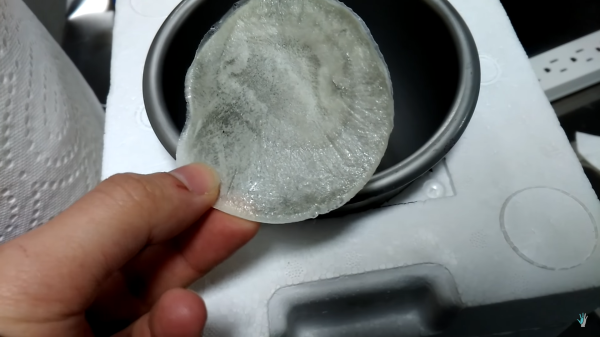
Eukaryotic cells, the kind we are made of, have been transported at low temperatures with techniques like active refrigeration, liquid nitrogen, and dry ice but those come with a host of problems like cost, convenience, and portability. Storing the cells with cryogel has been shown to reliably keep the cells stable for up to a week at a time and [The Thought Emporium] made some in his homemade freeze-dryer which he’s shown us before. The result looks like a potato chip, but is probably less nutrious than astronaut ice cream.

If cell transport doesn’t tickle your fancy, cryogel is fascinating by itself as a durable, lightweight insulator similar to Aerogel. You can make Aerogel at home too.
Continue reading “DIY Cryogel Sustains Live Cells”

Fool Giants With Novelty-Sized Gold Bricks

If you ever wondered how to make a giant-sized gold bar out of sheets of pink household insulation, well, there is a video showing you the steps. YouTube workshop guru [Jimmy DiResta] built oversized prop gold bricks out of foam. He cut sheets of 1.5″ Owens Corning foam insulation on his Saw Stop, making angled edges onto each piece so they could fit together in the trapezoidal ingot shape we know and love.

The pieces were put together with Great Stuff insulating foam sealant, the sort of spray foam used for filling up gaps in your house’s insulation, but here serving as glue.  [Jimmy] created lettering by lasering out the shapes in what appears to be cardboard, then gluing the letters in place, using the leftover material from the laser cut to place the letters in neat rows. He then sanded down the edges, priming and painting the bars with gold paint–but there were too many imperfections visible so he re-sanded and repainted.

We have been inundated in foam projects recently, like this ultralight built out of foam insulation and a foam cutter built with a 9V battery.

Continue reading “Fool Giants With Novelty-Sized Gold Bricks”

3D Printer Enclosure Is Pleasant On The Eyes And Ears

There’s a lot going on in the 3D printing world. Huge printing beds, unique materials like concrete, and more accessible, inexpensive printers for us regular folk. The only thing that’s often overlooked with these smaller printers is the ruckus that they can make. The sounds of all those motors can get tiresome after a while, which was likely the inspiration for [Fabien]’s home 3D printer workstation. (Google Translate from French)
After acquiring a new printer, [Fabien] needed a place to put it and created his own piece of furniture for it. The stand is made out of spruce and is lined with insulation. He uses a combination of cork, foam, and recycled rubber tile to help with heat, sound, and vibration respectively. Don’t worry, though, he did install a ventilation system for the fumes! After the printer housing is squared away, he place a webcam inside so that the user can monitor the print without disturbing it. Everything, including the current print, is managed with a computer on the top of the cabinet.
Having a good workspace is just as important as having a quality tool, and [Fabien] has certainly accomplished that for his new 3D printer. There have been a lot of good workspace builds over the years, too, including electronics labs in a portable box and this masterpiece workbench. If you’ve ever experienced the frustration of working in an area that wasn’t designed for the task at hand, you’ll easily be able to appreciate any of these custom solutions.

Improving Rice Cooker Efficiency

Looking at the plate on the bottom of his electric rice cooker, [AC_Hacker] was surprised to find that it was rated to consume 400 watts. Furthermore when he measured its consumption he found that it consumed 385 watts without even having a cooking cycle initiated. The circuit to keep cooked rice warm was always on – even when the cooking circuit wasn’t engaged.

Something clearly had to be done, so he set about modifying the cooker for better economy. Removing the base revealed that disabling the warming circuit was as simple as disconnecting it. [AC_Hacker] also noticed that the device had no thermal insulation. There was plenty of space between the inner and outer walls, so he packed it with glass wool. The final modification was to reduce the power taken by the heater by installing a half-wave rectifier diode. The cooker still reached the desired temperature, it just used half the power.

You might think that would be the end of it, given that the modifications significantly reduced the cooker’s power consumption without detriment to its rice cooking ability. Rice now took a little longer to cook, so there was still room for improvement. The moment of inspiration came when [AC_Hacker] realized that the cooking time was proportional to the amount of water used in a cooking cycle. He could safely reduce the water without affecting the cooked rice. A 30% water reduction led to a proportional cooking time reduction, and rice cooked using a lot less power.

Surprisingly this seems to have been Hackaday’s first rice cooker hack. Perhaps that’s because you’ve been so busy supplying us with sous vide hacks to write about.

Wrangling High Voltage

Working with high voltage is like working with high pressure plumbing. You can spring a leak in your plumbing, and of course you fix it. And now that you’ve fixed that leak, you’re able to increase the pressure still more, and sometimes another leak occurs. I’ve had these same experiences but with high voltage wiring. At a high enough voltage, around 30kV or higher, the leak manifests itself as a hissing sound and a corona that appears as a bluish glow of excited ions spraying from the leak. Try to dial up the voltage and the hiss turns into a shriek.

Why do leaks occur in high voltage? I’ve found that the best way to visualize the reason is by visualizing electric fields. Electric fields exist between positive and negative charges and can be pictured as electric field lines (illustrated below on the left.) The denser the electric field lines, the stronger the electric field.

The stronger electric fields are where ionization of the air occurs. As illustrated in the “collision” example on the right above, ionization can happen by a negatively charged electron leaving the electrically conductive surface, which can be a wire or a part of the device, and colliding with a nearby neutral atom turning it into an ion. The collision can result in the electron attaching to the atom, turning the atom into a negatively charged ion, or the collision can knock another electron from the atom, turning the atom into a positively charged ion. In the “stripping off” example illustrated above, the strong electric field can affect things more directly by stripping an electron from the neutral atom, again turning it into a positive ion. And there are other effects as well such as electron avalanches and the photoelectric effect.

In either case, we wanted to keep those electrons in the electrically conductive wires or other surfaces and their loss constitutes a leak in a very real way.

Continue reading “Wrangling High Voltage”

Aerogel Insulation For 3D Printers

A heated bed is nearly essential for printing with ABS. Without it, it is difficult to keep parts from warping as the plastic cools. However, heating up a large print bed is difficult and time consuming. It is true that the printer easily heats the hot end to 200C or higher and the bed’s temperature is only half of that. However, the hot end is a small insulated spot and the bed is a large flat surface. It takes a lot of power and time to heat the bed up and keep the temperature stable.

We’ve used cork and even Reflectix with pretty good results. However, [Bill Gertz] wasn’t getting the performance he wanted from conventional material, so he got a piece of aerogel and used it as insulation. Aerogel material is a gel where a gas replaces the liquid part of the gel. Due to the Knudsen effect, the insulating properties of an aerogel may be greater than the gas it contains.

Continue reading “Aerogel Insulation For 3D Printers”

Fail Of The Week: Rewiring Robosapien

fotw-rewiring-robosapien

Our first thought was “check out all of those TO-92 components!”, but then we saw the wiring nightmare. [Tom] picked up a Robosapien from an estate sale for just $10. Most hackers couldn’t resist that opportunity, but the inexpensive acquisition led to a time-consuming repair odyssey. When something doesn’t work at all you crack it open to see what’s wrong. He was greeted with wiring whose insulation was flaking off.

This is no problem for anyone competent with a soldering iron. So [Tom] set to work clipping all the bad wire and replacing it with in-line splices. Voila, the little guy was dancing to his own tunes once again! But the success was short-lived as the next day the robot was unresponsive again. [Tom] plans to do some more work by completely replacing the wires as soon as he receives the replacement connectors he ordered. So what do you think, is this an issue that will be resolved with a wire-ectomy or might there be actual damage to the board itself?


2013-09-05-Hackaday-Fail-tips-tileFail of the Week is a Hackaday column which runs every Wednesday. Help keep the fun rolling by writing about your past failures and sending us a link to the story — or sending in links to fail write ups you find in your Internet travels.