Giving A 4k Webcam Special Eyes

It’s a problem as old as photography: your camera is only as good as your lens. As cameras shrink, so do lenses, and so do the options for upgrading to a better lens. And forget about switching to a different focal length or aperture — it’s often just not an option. Unless you make it an option by adding a CS lens mount to a high-end webcam.

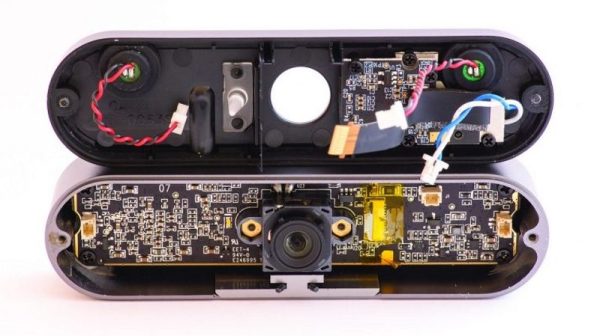
We’ll stipulate that at 4k resolution and packed with all sorts of goodies, the Logitech Brio Pro is a heck of a nice camera. And the lens isn’t bad either, as you’d hope for a camera with almost 9 megapixels at its disposal. But with an optical field of view optimized for video conferencing, it’s hard to use this premium camera for much else. [Saulius] fixed that by taking the camera apart and adding a new case with a built-in C- and CS-mount, resulting in literally thousands of lens choices. [Saulius]’ post has valuable teardown information, which includes exposing the CCD sensor completely. The new case is sold as a kit, but it looks like a 3D-printed case would be pretty easy to whip up.

[Salius] sure seems to love those optical hacks, whether they be a budget microscope camera, high-resolution LIDAR, or capturing license plates at great distances.

A Poor-Man’s Laser CNC Engraver

What do you get when you mix the disappointment that sometimes accompanies cheap Chinese electronics with the childhood fascination of torturing insects with a magnifying glass on a sunny day? You get a solar-powered CNC etcher, that’s what.

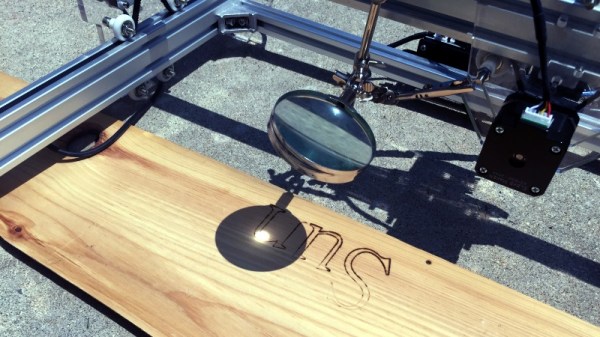
We all remember the days of focussing the sun on a hapless insect, or perhaps less sadistically on a green plastic army man or just a hunk of dry wood. The wonder that accompanied that intense white spot instantly charring the wood and releasing wisps of smoke stayed with you forever, as seemingly did the green spots in your vision. [drum303] remembered those days and used them to assuage his buyer’s remorse when the laser module on his brand new CNC engraver crapped out after the first 10 minutes. A cheap magnifying glass mounted to the laser holder and a sunny day, and he don’t need no stinkin’ lasers! The speed needs to be set to a super slow — 100mm per minute — and there’s the problem of tracking the sun, but the results are far finer than any of our childhood solar-artistic attempts ever were.

Do we have the makings of a possible performance art piece here? A large outdoor gantry with a big Fresnel lens that could etch a design onto a large piece of plywood would be a pretty boss beachside attraction. Of course, you’d need a simple solar tracker to keep things in focus.

Continue reading “A Poor-Man’s Laser CNC Engraver”

Lens Mount

X-Ray Imaging Camera Lens Persuaded To Join Micro Four Thirds Camera

Anyone who is into photography knows that the lenses are the most expensive part in the bag. The larger the aperture or f-stop of the lens, the more light is coming in which is better for dimly lit scenes. Consequently, the price of the larger glass can burn a hole in one’s pocket. [Anthony Kouttron] decided that he could use a Rodenstock TV-Heligon lens he found online and adapt it for his micro four-third’s camera.

The lens came attached to a Fischer Imaging TV camera which was supposedly part of the Fluorotron line of systems used for X-ray imaging. We find [Anthony’s] exploration of the equipment, and discovery of previous hacks by unknown owners, to be entertaining. Even before he begins machining the parts for his own purposes, this is an epic teardown he’s published.

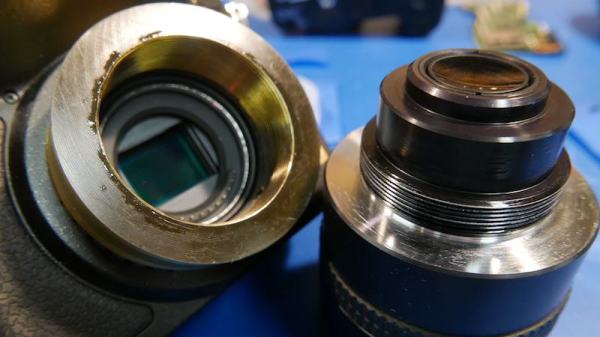
Since the lens was originally mounted on a brass part, [Anthony Kouttron] knew that it would be rather easy to machine the custom part to fit standardized lens adapters. He describes in detail the process for cleaning out the original mount by sanding, machining and threading it. Along the way you’ll enjoy his tips on dealing with a part that, instead of being a perfect circle on the outside, had a formidable mounting tab (which he no longer needed) protruding from one side.

The video after the break shows the result of shooting with a very shallow depth of field. For those who already have a manual lens but lack the autofocus motor, a conversion hack works like a charm as well.

Continue reading “X-Ray Imaging Camera Lens Persuaded To Join Micro Four Thirds Camera”

Burn Music On To Anything!

If at first you don’t succeed, try, try, and try again. This is especially true when your efforts involve a salvaged record player, a laser cutter, and He-Man. Taking that advice to heart, maniac maker extraordinaire [William Osman] managed to literally burn music onto a CD.

Considering the viability of laser-cut records is dubious — especially when jerry-built — it took a couple frustrating tests to finally see results, all the while risking his laser’s lens. Eventually, [Osman]’s perseverance paid off. The lens is loosely held by a piece of delrin, which is itself touching a speaker blaring music. The vibrations of the speaker cause the lens to oscillate the focal point of the laser into a wavelength that is able to be played on a record player. You don’t get much of the high-end on the audio and the static almost drowns out the music, but it is most definitely a really shoddy record of a song!

Vinyl aficionados are certainly pulling their hair out at this point. For the rest of us, if you read [Jenny’s] primer on record players you’ll recognize that a preamplifier (the ‘phono’ input on your amp) is what’s missing from this setup and would surely yield more audible results.

Continue reading “Burn Music On To Anything!”

DIY Optical Sensor Breakout Board Makes DIY Optical Mouse

Wanting to experiment with using optical mouse sensors but a bit frustrated with the lack of options, [Tom Wiggins] rolled his own breakout board for the ADNS 3050 optical mouse sensor and in the process of developing it used it to make his own 3D-printed optical mouse. Optical mouse sensors are essentially self-contained cameras that track movement and make it available to a host. To work properly, the sensor needs a lens assembly and appropriate illumination, both of which mate to a specialized bracket along with the sensor. [Tom] found a replacement for the original ADNS LED but still couldn’t find the sensor bracket anywhere, so he designed his own.

Continue reading “DIY Optical Sensor Breakout Board Makes DIY Optical Mouse”

Big Brother And Others Are Watching Your Car

We are all (hopefully) aware that we can be watched while we’re online. Our clicks are all trackable to some extent, whether it’s our country’s government or an advertiser. What isn’t as obvious, though, is that it’s just as easy to track our movements in real life. [Saulius] was able to prove this concept by using optical character recognition to track the license plate numbers of passing cars half a kilometer away.

To achieve such long distances (and still have clear and reliable data to work with) [Saulius] paired a 70-300 mm telephoto lens with a compact USB camera. All of the gear was set up on an overpass and the camera was aimed at cars coming around a corner of a highway. As soon as the cars enter the frame, the USB camera feeds the information to a laptop running openALPR which is able to process and record license plate data.

The build is pretty impressive, but [Saulius] notes that it isn’t the ideal setup for processing a large amount of information at once because of the demands made on the laptop. With this equipment, monitoring a parking lot would be a more feasible situation. Still, with even this level of capability available to anyone with the cash, imagine what someone could do with the resources of a national government. They might even have long distance laser night vision!

Nikon Resurrection: Repairing A Broken Lens

Modern DSLR cameras are amazing devices. Mechanics, electronics, and optics, all rolled up in a single package. All that technology is great, but it can make for a frustrating experience when attempting any sort of repair. Lenses can be especially difficult to work on. One misalignment of a lens group or element can lead to a fuzzy image.

[Kratz] knew all this, but it didn’t stop him from looking for a cheap lens deal over on eBay. He found a broken Nikon DSLR 55-200mm 1:4-5.6 AF-S VR camera lens for $30. This particular lens is relatively cheap – you can pick up a new one for around $150 online. Spending $30 to save $120 is a bit of a gamble, but [Kratz] went for it.

The lens he bought mostly worked – the auto-focus and vibration reduction system seemed to be fine. The aperture blades however, were stuck closed. Aperture blades form the iris of a lens. With the blades closed down, the lens was severely limited to brightly lit situations. All was not lost though, as the aperture is a relatively simple mechanical system, which hopefully would be easy to repair.

pinNikonKeeping screws and various parts in order is key when taking apart a lens. [Kratz] used a tip he learned right here on Hackaday: He drew a diagram of the screw positions on a thick piece of paper. He then stuck each screw right into the paper in its proper position.

Carefully removing each part, [Kratz] found a pin had slipped out of the rod that connects the lens’ internal parts with the external aperture control arm. Fixing the pin was simple. Getting the lens back together was quite a bit harder. Several parts have to be aligned blindly. [Kratz] persevered and eventually everything slipped into alignment. The finished lens works fine, albeit for a slightly noisy auto-focus.

It’s worth noting that there are service and repair manuals for many cameras and lenses out there in the dark corners of the internet, including [Kratz]’s 55-200 lens. Reading the repair procedures Nikon techs use shows just how many tools, fixtures, and custom bits of software go into making one of these lenses work.