Supersized Weather Station Uses Antique Analog Meters

For most of us, getting weather information is as trivial as unlocking a smartphone or turning on a computer and pointing an app or browser at one’s weather site of choice. This is all well and good, but it lacks a certain panache that old weather stations had with their analog dials and stained wood cases. The weather station that [BuildComics] created marries both this antique aesthetic with modern weather data availability, and then dials it up a notch for this enormous analog weather station build.

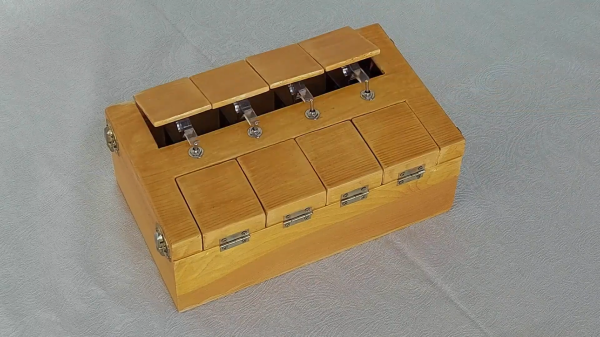
The weather station uses 16 discrete dials, each modified with a different label for the specific type of data displayed. Some of them needed new glass, and others also needed coils to be modified to be driven with a lower current than they were designed as well, since each would be driven by one of two Arduinos in this project. Each are tied to a microcontroller output via a potentiometer which controls the needle’s position for the wildly different designs of meter. The microcontrollers themselves get weather information from a combination of real-world sensors outside the home of [BuildComics] and from the internet, which allows for about as up-to-date information about the weather as one could gather first-hand.

The amount of customization of these old meters is impressive, and what’s even more impressive is the project’s final weight. [BuildComics] reports that it took two people just to lift it onto the wall mount, which is not surprising given the amount of iron in some of these old analog meters. And, although not as common in the real world anymore, these old antique meters have plenty of repurposed uses beyond weather stations as well.

Continue reading “Supersized Weather Station Uses Antique Analog Meters”

Teardown: Go Warmer USB Rechargeable Hand Heater

Under normal circumstances, if an electronic gadget in your pocket suddenly became hot to the touch, it would be cause for alarm. But not so with the Go Warmer. This lozenge shaped device is not only a USB power bank that can keep your mobile devices topped up, but is also doubles as a miniature heater that the manufacturer claims can bring its surface temperature up to 48 °C (120 °F) for several hours. You can hold in in your hand, put it in your pocket, maybe even sit on it if you’re particularly daring. The possibilities are endless, at least until the 4,000 mAh battery runs down.

For $14.99 USD, the Go Warmer certainly isn’t much of a deal when compared to other battery packs. Even if it does come with a swanky velveteen carrying pouch. But is it a good deal for one that can heat itself up without exploding? Let’s crack this metallic egg and find out.

Continue reading “Teardown: Go Warmer USB Rechargeable Hand Heater”

Complicated And Useless Cancel Each Other Out

We all know what it means to procrastinate, but what about actively spending time building a useless machine? You have undoubtedly seen the ornamental boxes with a tempting little toggle switch on the top. When you inevitably flip the switch, an actuator pops out from one half of the enclosure with the sole purpose of undoing its own power switch. [Paz Hameiri] took it a step further by adding some [Rube Goldberg] flavor, and with the help of a microcontroller, his levers take their sweet time powering themselves down. (Video after the break.)

We didn’t find any code or diagrams for the project, but if you know the useless machine’s internals, it shouldn’t be any trouble to recreate one for your desk. The most significant design factor is that the switches. Their contacts must be wired in parallel so that the controller has power as long as one is active. How would you spice up the useless machine?

Even though these are called useless machines, they serve the purpose of decoration, conversation-starting, or a way to show off your woodworking and programming skills.

Continue reading “Complicated And Useless Cancel Each Other Out”

Street-Legalize Your Ebike With A Magnet

Getting into e-biking is a great hobby. It can get people on bikes who might otherwise not be physically able to ride, it can speed up commute times, and it can even make hauling lots of stuff possible and easy, not to mention it’s also fun and rewarding. That being said, there are a wide array of conflicting laws around what your e-bike can and can’t do on the road and if you don’t want to run afoul of the rules you may need a programmable device that ensures your e-bike is restricted in the appropriate way.

This build is specifically for Bafang mid drives, which can be up to 1000 W and easily power a bike beyond the speed limit where [Tomblarom] lives. A small microcontroller is housed in a waterproof box on the bike and wired between the motor’s display and controller. A small hall effect sensor and magnet sit by this microcontroller, and if the magnet is removed then the microcontroller reprograms the bike’s controller to limit the speed and also to disable the throttle, another feature that is illegal in some jurisdictions but not others. As an added bonus, the microcontroller also handles brake lights, turn signals, and automatic headlights for the bike as well.

While the project page mentions removing the magnet while getting pulled over to avoid fines and other punishments, that’s on you. We imagine this could still be useful for someone who wants to comply with local laws when riding on the road, but still wants to remove the restrictions when riding on private property or off-road where the wattage and speed restrictions might not apply.

Motor Controller Reverse Engineering Releases Smoke

It may have been designed for a sewing machine, but [Haris Andrianakis] found his imported DC brushed motor was more than up to the challenge of powering his mini lathe. Of course there’s always room for improvement, so he set out to reverse engineer the motor’s controller to implement a few tweaks he had in mind. Unfortunately, things took an unexpected turn when plugging his AVR programmer into the board’s ISP socket not only released the dreaded Magic Smoke, but actually tripped the breaker and plunged his bench into darkness.

Studying how the Hall-effect sensors in the motor are wired.

Upon closer inspection, it turned out the board has no isolation between the high voltage side and its digital logic. When [Haris] connected his computer to it via the programmer, the 330 VDC coming from the controller’s rectifier shorted through the USB bus and tripped the Earth-leakage circuit breaker (ELCB). The good news is that his computer survived the ordeal, and even the board itself seemed intact. But the shock must have been too much for the microcontroller he was attempting to interface with, as the controller no longer functioned.

Now fully committed, [Haris] started mapping out the rest of the controller section by section. In the write-up on his blog, he visually masks off the various areas of the PCB so readers have an easier time following along and understanding how the schematics relate to the physical board. It’s a nice touch, and a trick worth keeping in mind during your own reverse engineering adventures.

In the end, [Haris] seems to have a good handle on what the majority of the components are up to on the board. Which is good, since getting it working again now means replacing the MCU and writing new firmware from scratch. Or perhaps he’ll just take the lessons learned from this controller and spin up his own custom hardware. In either event, we’ll be keeping an eye out for his next post on the subject.

Raspberry Pi Enters Microcontroller Game With $4 Pico

Raspberry Pi was synonymous with single-board Linux computers. No longer. The $4 Raspberry Pi Pico board is their attempt to break into the crowded microcontroller module market.

The microcontroller in question, the RP2040, is also Raspberry Pi’s first foray into custom silicon, and it’s got a dual-core Cortex M0+ with luxurious amounts of SRAM and some very interesting custom I/O peripheral hardware that will likely mean that you never have to bit-bang again. But a bare microcontroller is no fun without a dev board, and the Raspberry Pi Pico adds 2 MB of flash, USB connectivity, and nice power management.

As with the Raspberry Pi Linux machines, the emphasis is on getting you up and running quickly, and there is copious documentation: from “Getting Started” type guides for both the C/C++ and MicroPython SDKs with code examples, to serious datasheets for the Pico and the RP2040 itself, to hardware design notes and KiCAD breakout boards, and even the contents of the on-board Boot ROM. The Pico seems designed to make a friendly introduction to microcontrollers using MicroPython, but there’s enough guidance available for you to go as deep down the rabbit hole as you’d like.

Our quick take: the RP2040 is a very well thought-out microcontroller, with myriad nice design touches throughout, enough power to get most jobs done, and an innovative and very hacker-friendly software-defined hardware I/O peripheral. It’s backed by good documentation and many working examples, and at the end of the day it runs a pair of familiar ARM MO+ CPU cores. If this hits the shelves at the proposed $4 price, we can see it becoming the go-to board for many projects that don’t require wireless connectivity.

But you want more detail, right? Read on.

Continue reading “Raspberry Pi Enters Microcontroller Game With $4 Pico”

Arduino Wannabe Should Have Used A 555. Oh Wait, It Does.

It’s a little known secret that when the Hackaday writers gather in their secret underground bunker to work on our plans for world domination, we often take breaks to play our version of the corporate “Buzzword Bingo”, where paradigms are leveraged and meetings circle back to loop in offline stakeholders, or something like that. Our version, however, is “Comment Line Bingo”, and right in the middle of the card is the seemingly most common comment of all: “You should have used a 555,” or variations thereof.

So it was with vicious glee that we came across the Trollduino V1.0 by the deliciously named [Mild Lee Interested]. It’s the hardware answer to the common complaint, which we’ll grant is often justified. The beautiful part of this is that Trollduino occupies the same footprint as an Arduino Uno and is even pin-compatible with the microcontroller board, or at least sort of. The familiar line of components and connectors sprout from the left edge of the board, and headers for shields line the top and bottom edges too. “Sketches” are implemented in hardware, with jumpers and resistors and capacitors of various values plugged in to achieve all the marvelous configurations the indispensable timer chip can be used for. And extra points for the deliberately provocative use of Comic Sans in the silkscreen.

Hats off to [Lee] for a thoroughly satisfying troll, and a nice look at what the 555 chip can really do. If you want a more serious look at the 555, check out this 555 modeled on a breadboard, or dive into the story of the chip’s development.