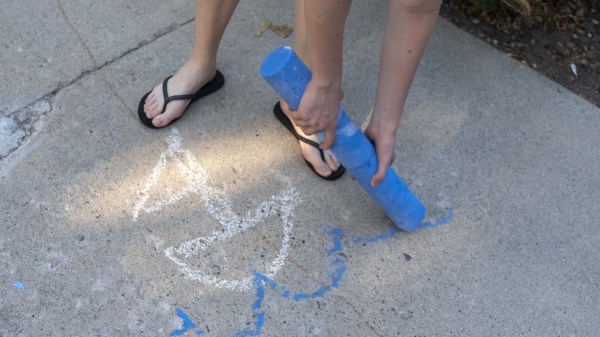
3D Printing Paper — Sort Of

There are only a few truly ancient engineered materials, and among the oldest is paper. Traditionally, paper is flat and can be bent into shapes. However, paper can be molded into for example packing material or egg cartons. [XYZAidan]  has a process that can recycle paper into 3D cardboard-like objects. You need a 3D printer, but it doesn’t actually print the paper. Instead, you use the printer to create a mold that can form paper pulp you make out of recycled paper and a blender.

[Aidan] provides seven different molds ranging from a desk tray and a dish to simple cubes and coasters. The molds are made in three parts to assist in removing the finished product.

Continue reading “3D Printing Paper — Sort Of”

Watch A Sand-Cast Slingshot Made, From Start To Finish

Sand-casting metal parts is a technique that has been around for a very long time, but it can be educational to see the process from start to finish. That’s exactly what [Frederico] shows us with his sand-cast slingshot of his own design, and it’s not bad for what he says is a first try!

First, [Frederico] makes a two-part green sand mold of the slingshot body. Green sand is a sand and clay mix, and is only green in the sense that it is wet or “raw” and not further processed. After the mold is made, it’s time to melt aluminum in the propane-powered furnace, and the molten aluminum is then poured into the mold.

After cooling, [Frederico] breaks up the sand to reveal the rough cast object. There is post-processing to do in the form of sprues to cut and some flashing around the seams to remove, but overall it looks to have turned out well. You can watch the whole process in the video, embedded below.

Continue reading “Watch A Sand-Cast Slingshot Made, From Start To Finish”

Solar-Harvesting Blinkenlights

A few years ago a fad ripped through the makersphere where people would build cheap, solar powered LED blinkers, glue a magnet to them, and throw them on anything metal. It was an interesting time, but luckily did not last for too long. With some effort and craftsmanship, though, the solar throwie idea can be turned into something more elegant, though, such as this solar harvesting blinking gadget.

Like its predecessors, the device itself behaves simply, although this one is equipped with a small supercapacitor which can run the device for 8 hours without sun. It has a small solar panel which can charge the capacitor in five minutes, and from there the LEDs inside simply blink. The quality shows in the final packaging, as [Jasper] has taken to encasing them in epoxy shapes such as pyramids, for a nice paperweight or tchotchke. It is also noteworthy because of Jasper’s test device; since he is mass producing them he needed something to test each board for functionality before encasing them in the epoxy, and he built a small pen tester specifically for them too.

While the build is pretty straightforward, anyone looking to enclose a simple circuit in epoxy without bubbles or other problems might want to check this one out. It would also be a good platform for building other throwie-like projects on top of. In the past they didn’t just blink lights but also did things like run small Linux servers.

3D Printed Wheels Get Some Much Needed Grip

You’d be hard-pressed to find more ardent supporters of 3D printing then we here at Hackaday; the sound of NEMA 17 steppers pushing an i3 through its motions sounds like a choir of angels to our ears. But we have to admit that the hard plastic components produced by desktop 3D printers aren’t ideal for a number of applications. For example, the slick plastic is useless for all but the most rudimentary of wheels. Sure there are flexible filaments that can give a printed wheel a bit of grip, but they came with their own set of problems (not to mention, cost).

In the video after the break, [Design/Forge] demonstrates a clever method for fitting polyurethane rubber “tires” onto 3D printed hubs which is sure to be of interest to anyone who’s in the market for high quality bespoke wheels for their project. The final result looks extremely professional, and while there’s a considerable amount of preparation that goes into it, once you’re set up you should be able to pump these out quickly and cheaply.

The process begins with a 3D printed mold pattern, which includes the final tire tread texture. This means you can create tire treads of any design you wish, which should have some creative as well as practical applications. The printed part is then submerged in silicone rubber and allowed to cure for 8 hours. Once solidified, the silicone rubber becomes the mold used for the next steps, and the original printed part is no longer needed.

The second half of the process is 3D printing the wheels to which the tires will be attached. These will be much smaller than the original 3D printed component, and fit inside of the silicone mold. The outside diameter of the printed wheel is slightly smaller than the inside diameter of the mold, which gives [Design/Forge] the space to pour in the pigmented polyurethane rubber. The attentive viewer will note that the 3D printed wheel has a slight ribbed texture designed into it, so that there will be more surface area for the polyurethane to adhere to. Once removed from the mold and cleaned up a bit, the final product really does look fantastic; and reminds us of a giant scale LEGO wheel.

Whether you’re casting metal parts or just want a pair of truly custom earbuds, creating silicone molds from 3D printed parts is an extremely useful skill to familiarize yourself with. Though even if you don’t have a 3D printer, there’s something to be said for knowing how to mold and cast real-world objects as well.

Continue reading “3D Printed Wheels Get Some Much Needed Grip”

Hackaday Superconference: Estefannie’s Daft Punk Helmet

There’s no single formula for success, but if we’ve learned anything over the years of covering cons, contests, and hackathons, it’s that, just like in geology, pressure can create diamonds. Give yourself an impossible deadline with high stakes, and chances are good that something interesting will result. That’s what Estefannie from the YouTube channel “Estefannie Explains It All” did when Bay Area Maker Faire was rolling around last year, and she stopped by the 2018 Hackaday Superconference to talk about the interactive Daft Punk helmet that came out of it.

It’s a rapid-fire tour of Estefannie’s remarkably polished replica of the helmet worn by Guy-Manuel de Homem-Christo, one half of the French electronic music duo Daft Punk. Her quick talk, video of which is below, gives an overview of its features, but we miss the interesting backstory. For that, the second video serves as a kickoff to a whirlwind month of hacking that literally started from nothing.

You’ll Learn it Along the Way

Before deciding to make the helmet, Estefannie had zero experience in the usual tools of the trade. With only 28 days to complete everything, she had to: convert her living room into a workshop; learn how to 3D print; print 58 separate helmet parts, including a mold for thermoforming the visor; teach herself how to thermoform after building the tools to do so; assemble and finish all the parts; and finally, install the electronics that are the hallmark of Daft Punk’s headgear.

The three videos in her series are worth watching to see what she put herself through. Estefannie’s learning curve was considerable, and there were times when nothing seemed to work. The thermoforming was particularly troublesome — first too much heat, then not enough, then not enough vacuum (pretty common hurdles from other thermoforming projects we’ve seen). But the finished visor was nearly perfect, even if it took two attempts to tint.

We have to say that at first, some of her wounds seemed self-inflicted, especially seeing the amount of work she put into the helmet’s finish. But she wanted it to be perfect, and the extra care in filling, sanding, priming, and painting the printed parts really paid off in the end. It was down to the wire when BAMF rolled around, with last minute assembly left to the morning of the Faire in the hotel room, but that always seems to be the way with these kinds of projects.

In the end, the helmet came out great, and we’re glad the run-up to the Superconference wasn’t nearly as stressful for Estefannie — or so we assume. And now that she has all these great new skills and tools, we’re looking forward to her next build.

Continue reading “Hackaday Superconference: Estefannie’s Daft Punk Helmet”

H2gO Keeps Us From Drying Out

The scientific community cannot always agree on how much water a person needs in a day, and since we are not Fremen, we should give it more thought than we do. For many people, remembering to take a sip now and then is all we need and the H2gO is built to remind [Angeliki Beyko] when to reach for the water bottle. A kitchen timer would probably get the job done, but we can assure you, that is not how we do things around here.

A cast silicone droplet lights up to show how much water you have drunk and pressing the center of the device means you have taken a drink. Under the hood, you find a twelve-node NeoPixel ring, a twelve millimeter momentary switch, and an Arduino Pro Mini holding it all together. A GitHub repo is linked in the article where you can find Arduino code, the droplet model, and links to all the parts. I do not think we will need a device to remind us when to use the bathroom after all this water.

Another intrepid hacker seeks to measure a person’s intake while another measures output.

Continue reading “H2gO Keeps Us From Drying Out”

Using Lasagna To Make Cost-Saving Molds

Building a one-off prototype is usually pretty straightforward. Find some perfboard and start soldering, weld up some scrap metal, or break out the 3D printer. But if you’re going to do a production run of a product then things need to have a little more polish. In [Eric Strebel]’s case this means saving on weight and material by converting a solid molded part into something that is hollow, with the help of some lasagna.

What [Eric] walks us through in this video is how to build a weep mold. First, the solid part is cast in silicone. Using the cast, some “sheet clay” is applied to the inside which will eventually form the void for the new part’s walls. The clay needs to be flush with the top of the mold, though, and a trick to accomplish this task is to freeze the mold (next to the lasagna) which allows the clay to be scraped without deforming.

From there, the second half of the mold is poured in, using special channels that allow the resin to “weep” out of the mold (hence the name). This two-part process creates a much more efficient part with thin walls, rather than the expensive solid prototype part.

[Eric] is no stranger around these parts, either. He’s an industrial designer with many tips and tricks of the profession, including a method for building a machining tool out of a drill press and a vise as well as some tips for how to get the most out of a low-volume production run of a product you might be producing.

Continue reading “Using Lasagna To Make Cost-Saving Molds”