The 1980s were the heyday of the venerable Z80, a processor that found its way into innumerable home computers, industrial systems, and yes — arcade machines. However, not everyone had a Z80 based machine at home, and so sometimes porting is required. [Glen] is tackling this with a port of Pac Man to the Radio Shack Colour Computer 3.
The key to any good arcade port is authenticity – the game should feel as identical to the real thing as possible. The Atari 2600 port got this famously wrong. Porting to the Colour Computer 3 is easier in theory – with more RAM, a Motorola 6809 CPU running at a higher clock rate, and a more powerful graphics subsystem, fewer compromises need to be made to get the game to run at a playable speed.
The way [Glen] tackled the port is quite handy. [Glen] built a utility that would scrape a disassembled version of the original Pac Man Z80 code, look up the equivalent 6809 CPU instruction, and replace it, while placing the original Z80 code to the side as a comment. Having the original code sitting next to the ported instructions makes debugging much easier.
Level 256 as seen in [Glen]’s port.There was plenty of hand tweaking to be done, and special effort was made to make sure all the data the original code was looking for was accessible at the same addresses as before. There was also a lot of work involved in creating a sprite engine that would reliably display the game video at a playable frame rate.
Overall, the port is highly faithful to the original, with the game code being identical at the CPU level. [Glen] reports that the same patterns used on the arcade machine can be used to complete the mazes on the Colour Computer 3 version, and it faithfully recreates the Level 256 bug as well. It’s an impressive piece of work to create such an authentic port on a home computer from 1986.
For another classic port, but with the temporal vectors flipped, check out Portal 2 on the Apple II.
The problem with click-bait titles, besides the fact that they make the reader feel cheated and maybe a little bit dirty for reading the article, is that they leave us with nothing to say when something is truly outstanding. But the video of [Tiburcio de la Carcova] building up a mini-Galaga cabinet (complete with actual tiny CRT screen from an old portable 5″ TV) is actually the best we’ve ever seen.
Plywood is laser-cut. Custom 3D printed parts are manufactured and assembled, including the joysticks and coin door. Aluminum panels are cut on a bandsaw and bent with a hand brake. Parts are super-glued. In short, it’s a complete, sped-up video of the cutting-edge of modern DIY fab. If that’s not enough reason to spend four minutes of your time, we don’t know what is.
[Tiburcio] has also made a mini Space Invaders, and is thinking of completing the top-20 of his youth. Pacman, Asteroids, and Missile Command are next. We can’t wait.
There are (ahem) a couple of Raspberry-Pi-powered video game emulators on Hackaday, so it’s a little awkward to pick one or two to link in. We’ll leave you with this build that also uses a small CRT monitor to good effect albeit in less-fancy clothing.
I usually see retro-gaming projects using tiny screens with a fair number of pixels (64×64) but what I really like is the look of making every pixel count. With this in mind I built 1-Pixel Pac-Man, the classic coin-op experience but with characters that consist of just one pixel. Playing a throw-back like this wouldn’t be the same without some vintage controls so I picked up an Atari joystick, patched it into a microcontroller, and started coding. Check it out:
Smartmatrix Bundle
32×32 RGB panel with acrylic diffuser
Back of the Smartmatrix
This piece of hardware made the project build really easy: the Smartmatrix. [Louis Beaudioin] developed the Smartmatrix and it’s been in the Hackaday Store for a while now. The display module itself is a commodity item that is used in LED billboards. There are shrouded headers on the back of the panels, to the left and right sides, which allow them to be daisy chained. The Smartmatrix PCB plugs into one of these shields, provides a soldering footprint for the Teensy 3.1 which drives the display, and gives you the wiring to connect screw terminals from the PCB to the power terminals on the module. Why the need for beefy power jumpers? At full white the thing can draw about 3.5A — don’t worry there’s a power supply included in the bundle.
Also integral to making this look good is the diffuser panel which is frosted acrylic. The Smartmatrix is designed to be housed in a shadowbox frame; it even includes a frame backer board with a cut-out for the Teensy 3.1 so it can be programmed without opening the thing up. I like looking at the guts so I’m leaving my free floating until I come up with an interesting way to mount everything as one unit.
Programming Pac-Man from the Ground Up
If you haven’t looked into it before, the ghost AI and gameplay details for Pac-Man are absolutely brilliant. [Toru Iwatani] did a masterful job with the original, and you should take a look at all of the analysis that has been done over the years. The best collection I could find was the Pac-Man Dossier and I based most of my code on the rules described there.
Basically the ghosts have two modes, chase and scatter. The modes set the enemy targets differently; to points at the four corners of the board in scatter, and to points relative to the player in chase. The relative part is key; only the red enemy actually chases you. Another one of them looks at the red enemy’s distance and angle, and targets the reflection of that vector. Really easy, really clever, and results in enemy behavior that’s believable. It isn’t just the enemy movement, little touches like a speed penalty (1/60 of a second) for each dot the player gobbles up means the enemies can catch up if you continuously eat, but you can escape by taking the path already-eaten.
Library, DMA, and Extra Hardware
Teensy 3.1
DB9 Connector for Joystick
Extras in the Bundle
Kickstarter remote and RTC Module
The hardware and software running the Smartmatrix made the display portions of the project really simple. First off, the Teensy 3.1 is fast, running at 96MHz in this case. Second, it has Direct Memory Access (DMA) which [Louis] used in the Smartmatrix library. This means that driving the display takes almost no CPU time at all, leaving the rest for your own use. This example of a game is under-utilizing this power… it’s totally capable of full-motion video and calculating amazing visualizations on the fly.
The PCB hosting the Teensy 3.1 breaks out several pins to one side. I’m not sure what I’ll add in the future so I actually used the extra surface-mount IO pins on the bottom of the Teensy to connect the Atari joystick (which is simply a set of switches). The are enough pads for two joysticks so I used pin sockets to interface the Teensy to the PCB so that I can get to it again later.
The kit also includes an IR receiver and remote, and also a microSD card to loading animations (there’s an SD socket on the PCB). The bundle in the Hackaday Store is a kit you solder yourself, but [Louis’] company, Pixelmatix, has a Kickstarter running for fully-assembled versions that come with a black remote and sound-visualization hardware.
Future Improvements
The game is fully working, but there are a few key things that I really want to add. The Teensy 3.1 has a single DAC pin available. I’m fairly certain the original coin-op game had mono audio. It should be possible to reproduce the sound quite accurately with this board. That would really make the project pop.
There are also a bunch of touch-ups that need to happen. I’d like to add an animation when the player is eaten by an enemy, and a countdown before the level restarts. The score, shown in binary on the right column, should be scrolled out in decimal when the game ends, and what’s a coin-op recreation without a high-score screen?
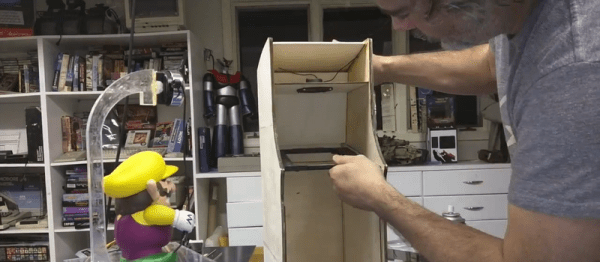
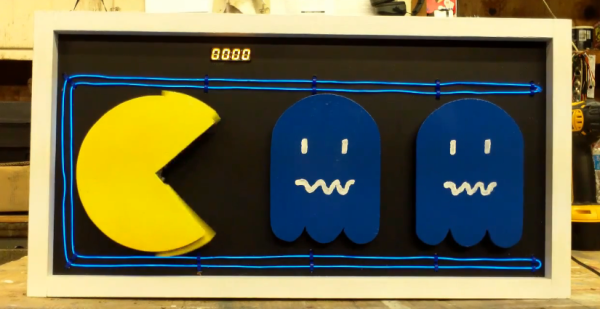
[Bob’s] Pac-Man clock is sure to appeal to the retro geek inside of us all. With a tiny display for the time, it’s clear that this project is more about the art piece than it is about keeping the time. Pac-Man periodically opens and closes his mouth at random intervals. The EL wire adds a nice glowing touch as well.
The project runs off of a Teensy 2.0. It’s a small and inexpensive microcontroller that’s compatible with Arduino. The Teensy uses an external real-time clock module to keep accurate time. It also connects to a seven segment display board via Serial. This kept the wiring simple and made the display easy to mount. The last major component is the servo. It’s just a standard servo, mounted to a customized 3D printed mounting bracket. When the servo rotates in one direction the mouth opens, and visa versa. The frame is also outlined with blue EL wire, giving that classic Pac-Man look a little something extra.
The physical clock itself is made almost entirely from wood. [Bob] is clearly a skilled wood worker as evidenced in the build video below. The Pac-Man and ghosts are all cut on a scroll saw, although [Bob] mentions that he would have 3D printed them if his printer was large enough. Many of the components are hot glued together. The electronics are also hot glued in place. This is often a convenient mounting solution because it’s relatively strong but only semi-permanent.
[Bob] mentions that he can’t have the EL wire and the servo running at the same time. If he tries this, the Teensy ends up “running haywire” after a few minutes. He’s looking for suggestions, so if you have one be sure to leave a comment. Continue reading “Pac-Man Clock Eats Time, Not Pellets”→
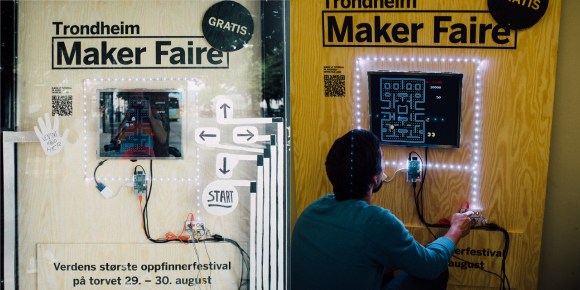
Waiting for the bus can be drag. You never know exactly when it will come, always looking down the road hoping to spot the vehicle as it turns a corner. When it doesn’t show up right away, the result is usually staring down at a ‘smart’ phone checking it for any incoming messages. Directing the attention up might produce a list of estimated arrival times and maybe even a map showing the routes that are taken throughout the day. But there is only one bus stop in the entire world, that we know of, where people can play Pac-Man while they watch for the bus to arrive.
It was created by the combining efforts of two maker communities in town. Norwegian Creations and Trondheim Makers teamed up to build an interactive gaming display that gave individuals the ability to pass the time by directing the famous video gaming character around a blue maze, eating yellow pellets and avoiding colorful ghosts along the way. This display was also made to raise awareness for the upcoming Trondheim Maker Faire that year. They choose Pac-Man as the foundation and integrated a slightly modified invention kit called Makey Makey with a Raspberry Pi running RetroPie into the actual frame of the bus stop. The people involved must have had some serious business connections in order to get approval for that. They figuratively hacked into the bus stop’s power grid gaining the necessary 230 volts required to energize the custom gaming unit. Once hooked up, anyone standing by could play Pac-Man until the bus came. [Ragnar] at Norwegian Creations told us in an email that future ideas of theirs include syncing up several stops that can communicate with each other, which could lead to some great multiplayer interactions. They also have a fantastic video that they uploaded that shows the building process of their current design. Check that out below, and let us know what other types of games you would like to see at a bus stop near you.
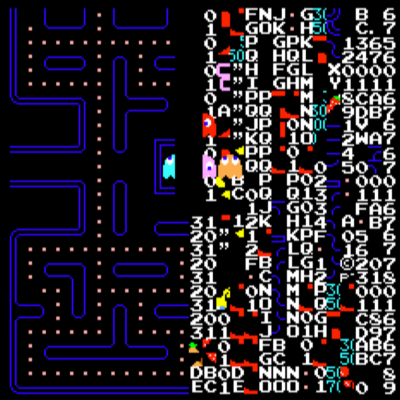
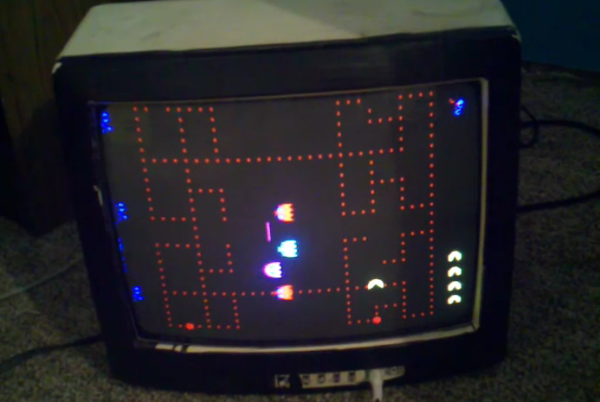
Finding himself in need of an arcade monitor [Eric Wright] turned to this ancient CRT television. The problem is that arcade monitors and televisions didn’t operate in the same way, differing in both resolution and refresh rate. [Eric] modified the television to work like an arcade monitor, but only with limited success. He’s hoping a few more alterations will lead him to a complete solution.
The image above shows him testing a Pac-Man machine on the altered Sharp television. Those familiar with the game will immediately notice that there is something wrong. We see most of the tracks upon which Pac-Man and the ghosts travel, but he maze itself is completely missing. To get to this point [Eric] consulted the television and arcade schematics to figure out how to connect the composite sync and three color channels directly to the arcade machine. This way the CRT timing is forced to conform to the game standard. The problem is that there is no way to adjust the drive and cutoff of the individual color channels. This is something [Eric] hopes to fix in the next iteration of his experiments.
If you’ve been trying to think of stuff you can do with the DCPU-16 this may inspire you to write a clone of a classic game.
This version of Pac-Man was written using a sprite system with a 16 color pallette. It runs in an HTML-based emulator, so you can even monkey around with the assembly code to help you figure out how it works. But if you’re not into writing code that is this machine-close, you can just click the ‘run’ button and use your keyboard arrows to play through a level or two. You’ll notice there’s only one game board available so far and some things are still missing like that familiar waka-waka as he gobbles up the dots. Let us know if you mange to extend the features of this version.
In case you missed it, this emulator is running the DCPU-16 spec from Notch’s new game, 0x10c (. We have no idea how that’s going to shape up, but getting in on the game early will pay off it turns out to be as popular as Minecraft.