Small sensor built into audio jack, held in tweezers

Measuring LED Flicker, With Phototransistor And Audio App

No one likes a flickering light source, but lighting is often dependent on the quality of a building’s main AC power. Light intensity has a close relation to the supply voltage, but bulb type plays a role as well. Incandescent and fluorescent bulbs do not instantly cease emitting the instant power is removed, allowing their output to “coast” somewhat to mask power supply inconsistencies, but LED bulbs can be a different story. LED light output has very little inertia to it, and the quality of both the main AC supply and the bulb’s AC rectifier and filtering will play a big role in the stability of an LED bulb’s output.

Mobile phone spectrum analyzer pointed at light source
The DIY photosensor takes the place of the microphone input.

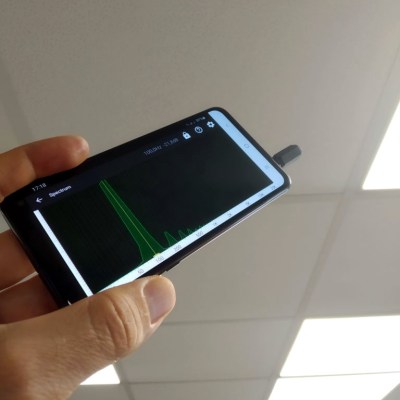
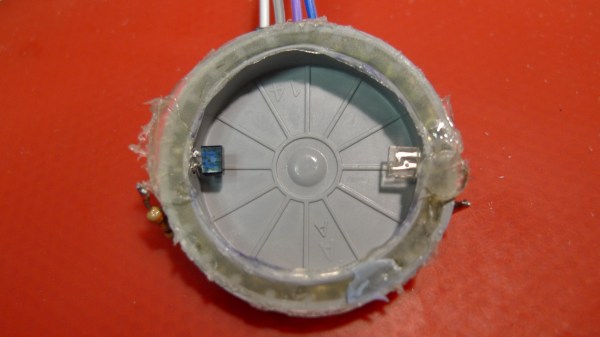
[Tweepy] wanted to measure and quantify this effect, and found a way to do so with an NPN phototransistor, a resistor, and a 3.5 mm audio plug. The phototransistor and resistor take the place of a microphone plugged into the audio jack of an Android mobile phone, which is running an audio oscilloscope and spectrum analyzer app. The app is meant to work with an audio signal, but it works just as well with [Tweepy]’s DIY photosensor.

Results are simple to interpret; the smoother and fewer the peaks, the better. [Tweepy] did some testing with different lighting solutions and found that the best performer was, perhaps unsurprisingly, a lighting panel intended for photography. The worst performer was an ultra-cheap LED bulb. Not bad for a simple DIY sensor and an existing mobile phone app intended for audio.

Want a closer look at what goes into different LED bulbs and how they tick? We have you covered. Not all LED bulbs are the same, either. Some are stripped to the bone and others are stuffed with unexpected goodness.

Digital Pregnancy Tests Use LEDs To Read Between The Lines

[Foone] saw a tweet a few weeks ago alleging that digital pregnancy tests are a rip-off. Regular, cheap tests have an absorbent strip running the length of the plastic, with one end exposed for collecting urine. A few excruciating minutes later, a little plastic window in the middle will show one line, two lines, or a plus or minus sign depending on the presence of human chorionic gonadotropin (HCG) in the urine.

As it turns out, at least two digital tests out there are the exact same thing, but with more steps. Instead of a window, they include circuitry that interprets the lines and publishes the result to a little screen in plain English. It can even tell you if you’re doing it wrong by flashing a little RTFM icon.

[Foone]’s teardown reveals a CR1616 coin cell, an 8-bit microcontroller, and a little phototransistor setup that shines LEDs on the strip and reads the incoming light. Unfortunately, the micro is the mask ROM version, so [Foone] can’t reprogram it to run Doom.

The original tweet’s author is probably not alone in assuming that digital tests are supposed to be more accurate somehow. We think the accuracy claim is more about removing the frazzled and/or incompetent human variable from the equation. If the test interprets the results for you, then there’s no mistaking the results, which is technically a higher degree of accuracy. But if you’re in doubt, you get a test from a doctor.

There’s been some discussion about the e-waste aspect of these all these tests — that it’s a shame to produce a microcontroller just to pee on it and throw it away. Sure, you could look at it that way, but unlike a lot of e-waste, these are tools. It’s unfortunate that this is the industry’s idea of higher accuracy, but what should we expect? It’s just testing for the presence of a hormone in urine. Interpreting the results is up to the viewer. We should probably be astounded that they got the cost down to two for $7.

Many people choose to wait a while to start spreading the news. With a Bluetooth-enabled pregnancy test, everyone can find out together.

Thanks for the tip, [Jay]!

Image Sensor From Discrete Parts Delivers Glorious 1-Kilopixel Images

Chances are pretty good that you have at least one digital image sensor somewhere close to you at this moment, likely within arm’s reach. The ubiquity of digital cameras is due to how cheap these sensors have become, and how easy they are to integrate into all sorts of devices. So why in the world would someone want to build an image sensor from discrete parts that’s 12,000 times worse than the average smartphone camera? Because, why not?

[Sean Hodgins] originally started this project as a digital pinhole camera, which is why it was called “digiObscura.” The idea was to build a 32×32 array of photosensors and focus light on it using only a pinhole, but that proved optically difficult as the small aperture greatly reduced the amount of light striking the array. The sensor, though, is where the interesting stuff is. [Sean] soldered 1,024 ALS-PT19 surface-mount phototransistors to the custom PCB along with two 32-bit analog multiplexers. The multiplexers are driven by a microcontroller to select each pixel in turn, one row and one column at a time. It takes a full five seconds to scan the array, so taking a picture hearkens back to the long exposures common in the early days of photography. And sure, it’s only a 1-kilopixel image, but it works.

[Sean] has had this project cooking for a while – in fact, the multiplexers he used for the camera came up as a separate project back in 2018. We’re glad to see that he got the rest built, even with the recycled lens he used. One wonders how a 3D-printed lens would work in front of that sensor.

Continue reading “Image Sensor From Discrete Parts Delivers Glorious 1-Kilopixel Images”

Homebrew Oscillator Is In A Glass By Itself

Great things happen when we challenge ourselves. But when someone else says ‘I bet you can’t’ and you manage to pull it off, the reward is even greater. After [WilkoL] successfully made a tuning fork oscillator, his brother challenged him to make one out of a wine glass. We’ll drink to that!

First, [WilkoL] needed to find a way to make the wine glass vibrate continuously without having to stand there running a moistened finger around the edge. A piezo speaker mounted close by did the trick. Then he had to detect the sound waves, amplify them, and feed them back in.

After toying with the idea of making a laser microphone, and tossing aside the idea of a regular microphone (because squealing feedback), he settled on using light. LEDs didn’t work, probably because the light is too divergent. But he found out that by aiming a laser just right, the curve of the wine glass modulates the light, and the waves can be detected with a phototransistor.  Then it was just a matter of amplifying the the sound and feeding it back to the piezo.

In the demo video after the break, you can see the vibrations in the glass manifest once he pours in some water. As anyone who’s ever played the water glasses can tell you, this also changes the frequency. [Editor’s note: I expected a much larger change in pitch. Not sure what’s going on here.]

Speaking of, here’s a steampunky glass armonica that uses an old turntable motor to rotate the wine glass, and a pneumatic cylinder to raise and lower the water level.

Continue reading “Homebrew Oscillator Is In A Glass By Itself”

LED Matrix And A Phototransistor Make A Reverse Camera

A digital camera has an array of sensors that captures light reflected or transmitted onto it. This build is something closer to a reverse camera – a single sensor that makes images on a matrix of LEDs. And we think it’s pretty neat.

We have to admit to being a little confused by [marciot]’s LED matrix scanner when we first stumbled upon it. From the video below we thought that the LEDs in the matrix were being used both to detect incident light and as a display. We’ve seen LEDs used as photodiodes before, so such a contraption could work, but that’s not what’s going on here. A phototransistor is wired to an Arduino Uno and positioned above a 32×32 RGB LED matrix. A scanning routine rasters over the LEDs in the matrix while the sensor watches, and then the program turns on the LEDs that the sensor saw during the scan. Positioned far above the matrix, a large disc of light results, making it look like the phototransistor is beaming light down onto the matrix. The effect is reinforced by placing something between the sensor and the matrix, which casts a virtual shadow. Used close to the LEDs the sensor acts more like a light pen.

It’s a cool effect and it looks like a fun project to throw together. Refresh time could perhaps be a bit snappier, though; maybe an ESP32 could help with that.

Continue reading “LED Matrix And A Phototransistor Make A Reverse Camera”

Laser Harp Sounds Real Thanks To Karplus-Strong Wave Equation

The harp is an ancient instrument, but in its current form, it seems so unwieldy that it’s a wonder that anyone ever learns to play it. It’s one thing to tote a rented trumpet or clarinet home from school to practice, but a concert harp is a real pain to transport safely. The image below is unrelated to the laser harp project, but proves that portable harping is begging for some good hacks.

Concert grand harps are so big there’s special equipment to move them around. This thing’s called the HarpCaddy

Enter this laser harp, another semester project from [Bruce Land]’s microcontroller course at Cornell. By replacing strings with lasers aimed at phototransistors, [Glenna] and [Alex] were able to create a more manageable instrument that can be played in a similar manner. The “strings” are “plucked” with the fingers, which blocks the laser light and creates the notes.

But these aren’t just any old microcontroller-generated sounds. Rather than simply generating a tone or controlling a synthesizer, the PIC32 uses the Karplus-Strong algorithm to model the vibration of a plucked string. The result is very realistic, with all the harmonics you’d expect to hear from a plucked string. [Alex] does a decent job putting the harp through its paces in the video below, and the write-up is top notch too.

Unique musical instruments like laser harps are far from unknown around these parts. We’ve seen a few that look something like a traditional harp and one that needs laser goggle to play safely, but this one actually looks and sounds like the real thing. Continue reading “Laser Harp Sounds Real Thanks To Karplus-Strong Wave Equation”

DIY Puff-Suck Interface Aims For Faster Text Input

Puff and Suck (or Sip and Puff) systems allow people with little to no arm mobility to more easily interact with computers by using a straw-like unit as an input device. [Ana] tells us that the usual way these devices are used to input text involves a screen-based keyboard; a cursor is moved to a letter using some method (joystick, mouse emulator, buttons, or eye tracking) and that letter is selected with a sip or puff into a tube.

[Ana] saw such systems as effective and intuitive to use, but also limited in speed because there’s only so fast that one can select letters one at a time. That led to trying a new method; one that requires a bit more work on the user’s part, but the reward is faster text entry. The Puff-Suck Interface for Fast Text Input turns a hollow plastic disk and a rubber diaphragm into bipolar pressure switch, able to detect three states: suck, puff, and idle. The unit works by having an IR emitter and receiver pair on each side of a diaphragm (one half of which is shown in the image above). When air is blown into or sucked out of the unit, the diaphragm moves and physically blocks one or the other emitter-receiver pair. The resulting signals are interpreted by an attached Arduino.

How does this enable faster text input? By throwing out the usual “screen keyboard” interface and using Morse code, with puffs as dots and sucks as dashes. The project then acts as a kind of Morse code keyboard. It does require skill on the user’s part, but the reward is much faster text entry. The idea got selected as a finalist in the Human-Computer Interface Challenge portion of the 2018 Hackaday Prize!

Morse code may seem like a strange throwback to some, but not only does the bipolar nature of [Ana]’s puff-suck switch closely resemble that of Morse code input paddles, it’s also easy to learn. Morse code is far from dead; we have pages of projects and news showing its involvement in everything from whimsical projects to solving serious communication needs.