HDMI DDC Keypad Controls Monitor From Rack

Sometime last year, [Jon Petter Skagmo] bought a Dell U3421WE monitor. It’s really quite cool, with a KVM switch and picture-by-picture support for two inputs at the same time. The only downside is that control is limited to a tiny joystick hiding behind the bezel. It’s such a pain to use that [Jon] doesn’t even use all of the features available.
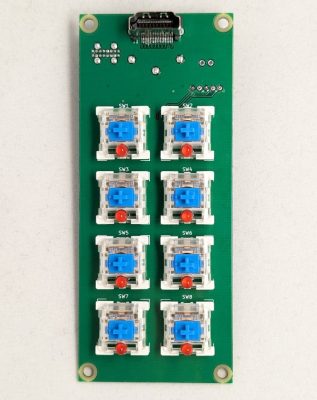
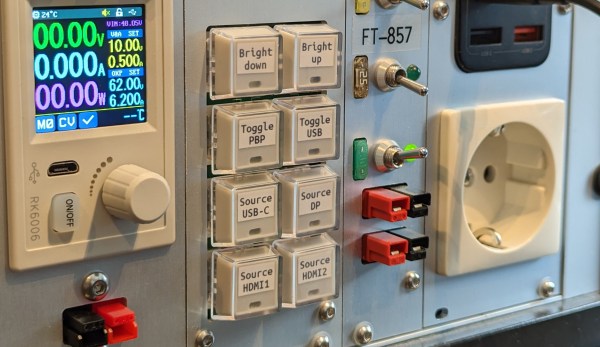
[Jon] tried ddcutil, but ultimately it didn’t work out. Enter the rack-mounted custom controller keyboard, a solution which gives [Jon] single keypress control of adjusting the brightness up and down, toggling picture-by-picture mode, changing source, and more.

How does it work? It uses the display data channel (DDC), which is an I²C bus on the monitor’s HDMI connector. More specifically, it has a PIC18 microcontroller sending those commands via eight Cherry MX-style blues.

Check this out — [Jon] isn’t even wasting one of the four monitor inputs because this build uses an HDMI through port. The finished build looks exquisite and fits right into the rack with its CNC-routed aluminium front panel. Be sure to check it out in action after the break.

Ever wonder how given keyboard registers the key you’re pressing? Here’s a brief history of keyboard encoding.

Continue reading “HDMI DDC Keypad Controls Monitor From Rack”

You Can’t Be Too Rich Or Too Thin — A 2mm Thick Computer

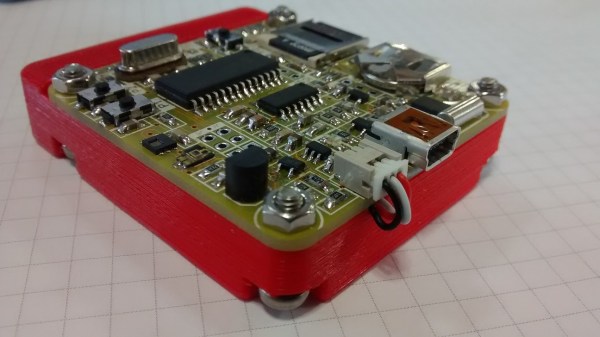
We’ve seen credit card-sized computers before, but [Kn/vD] shows us a PIC18-based computer with 9 components that is only 2 mm thick! With 13 K of RAM and 128 K of flash, you can’t do much with it, but a built-in BASIC interpreter can use half the flash like a disk drive and operate with the 20×4 LCD display and the PCB touch-panel keyboard.

The whole thing only has eleven parts, but that’s only because it needed ancillary components like decoupling capacitors and the battery along with a physical reset switch. All the real functions are in the CPU and the LCD display. The schematic is online, but we didn’t see the files for the PCB or the interpreter yet, but it sounds like they are forthcoming. Meanwhile, we wonder if anyone is up to the challenge of going even thinner.

[Kn/Vd] loves small computers. There are plans for a few other versions of the board with AVR and PIC24 processors. The last time we saw a tiny module from [Kn/vD] it ran C. If you check out other Hackaday.io projects on the account, there are several tiny computers there. If you want a business card that can run Linux, you might need to go a little bit thicker.

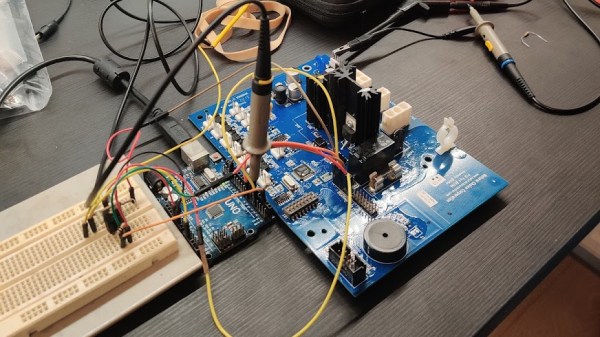
An image showing a water cooler PCB on the desk, with probes and jumper wires connected to it.

Taking Water Cooler UX Into Your Own Hands With Ghidra

Readers not aware of what Ghidra is might imagine some kind of aftermarket water cooler firmware or mainboard – a usual hacker practice with reflow ovens. What [Robbe Derks] did is no less impressive and inspiring:  A water cooler firmware mod that adds hands-free water dispensing, without requiring any hardware mods or writing an alternative firmware from scratch.

Having disassembled the cooler, [Robbe] found a PIC18F6527 on the mainboard, and surprisingly, it didn’t have firmware readback protection. Even lack of a PICkit didn’t stop him – he just used an Arduino to dump the firmware, with the dumper code shared for us to reuse, and the resulting dumps available in the same repository.

From there, he involved Ghidra to disassemble the code, while documenting the process in a way we can all learn from, and showing off the nifty tricks Ghidra has up its sleeves. Careful planning had to be done to decide which functions to hook and when, where to locate all the extra logic so that there’s no undesirable interference between it and the main firmware, and an extra step taken to decompile the freshly-patched binary to verify that it looks workable before actually flashing the cooler with it.

The end result is a water cooler that works exactly as it ought to have worked, perhaps, if the people defining its user interaction principles were allowed to make it complex enough. We could argue whether this should have been a stock function at all, but either way, it is nice to know that we the hackers still have some of the power to make our appliances friendly — even when they don’t come with an OS. Certainly, every single one of us can think of an appliance long overdue for a usability boost like this. What are your examples?

We’ve covered quite a few Ghidra-involving hacks, but it never feels like we’ve had enough. What about patching an air quality meter to use Fahrenheit? Or another highly educational write-up on cracking GBA games? Perhaps, liberating a Linux-powered 4G router to reconfigure it beyond vendor-defined boundaries? If you have your own goal in mind and are looking to start your firmware reverse-engineering journey, we can say with certainty that you can’t go wrong with our HackadayU course on Ghidra.

Make Your Own SPL DB Meter With A Microphone And MCU

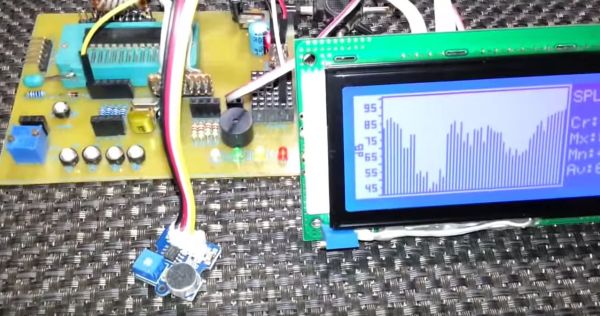
Measuring equipment such as SPL (Sound Pressure Level) decibel meters may seem daunting, but this article by [Shawon M. Shahryiar] shows that making your own need only have two essential ingredients: a microphone and a microcontroller. Obviously the microphone is for measuring the sound pressure level, and its output is then fed into the ADC of the microcontroller which does some math before sending the result to a display.

[Shawon] runs through all of the theory behind the calculations that have to be performed, before showing the C code that runs on the PIC18F242 8-bit MCU targeted by the prototype setup. The display is a graphical LCD type, capable of displaying the text with values as well as bar graphs indicating the measured levels. For the measurements themselves, the RMS value is taken of 16 ADC samples while the algorithm takes into account the specifications of the Seeed-sourced microphone module, specifically its average 50 dB sensitivity rating.

Although a full schematic is not provided, the essentials are all there for anyone to build their own SPL dB meter using virtually any microphone and MCU with built-in ADC. As the article also notes, opting for a higher quality microphone will yield better result and of course a faster MCU will offer more options, including FFT processing. Since the code itself is fairly basic, it should be easy enough to port it to an ARM-based MCU, which would allow one to use for example a TFT LCD.

Take a peek after the break for a video of the article’s SPL dB meter in action.

Continue reading “Make Your Own SPL DB Meter With A Microphone And MCU”

High Efficiency, Open-Sourced MPPT Solar Charger

A few years ago, [Lukas Fässler] needed a solar charge controller and made his own, which he has been improving ever since. The design is now mature, and the High Efficiency MPPT Solar Charger is full of features like data logging, boasts a 97% efficiency over a range of 1 to 75 Watts, and can be used as a standalone unit or incorporated as a module into other systems. One thing that became clear to [Lukas] during the process was that a highly efficient, feature-rich, open-sourced hardware solution for charge controllers just didn’t exist, at least not with the features he had in mind.

Data logging and high efficiency are important for a charge controller, because batteries vary in their characteristics as they recharge and the power generated from things like solar panels varies under different conditions and loads. An MPPT (Maximum Point Power Tracking) charger is a smart unit optimized to handle all these changing conditions for maximum efficiency. We went into some detail on MPPT in the past, and after three years in development creating a modular and configurable design, [Lukas] hopes no one will have to re-invent the wheel when it comes to charge controllers.

An Intel 8085 Microprocessor Trainer

The Intel 8085 microprocessor was introduced 40 years back, and along with its contemporaries — the Z80 and the 6502 — is pretty much a dinosaur in terms of microprocessor history. But that doesn’t stop it from still being included in the syllabus for computer engineering students in many parts of the world. The reason why a 40 year old microprocessor is still covered in computer architecture text books instead of computer history is a bit convoluted. But there’s a whole industry that thrives on the requirements of college laboratories and students requiring “8085 Microprocessor Training Kits”. [TisteAndii] just finished college in Nigeria, where these kits are not locally built and need to be imported, usually costing well over a 100 dollars.

Which is why his final year project was a low cost Intel 8085 Microprocessor Trainer. It’s a minimalist design with some basic read/write memory, program execution and register inspection, with no provision for single stepping or interrupts yet. The monitor program isn’t loaded in an EEPROM. Instead, a PIC18 is used and connected to the 8085 address, data and control pins. This makes it easier to write a monitor program in C instead of assembly. And allows use of a 1.8″ LCD with SPI interface instead of the more usual 7-segment displays used for these kind of kits. [TisteAndii] built a 6×4 keyboard for input, but couldn’t solve debounce issues and finally settled on a 5×4 membrane keypad.

Being a rookie, he ended up with a major flaw in his board layout — he missed connecting the SRAM and the PPI devices to the data bus. A bunch of jumper links seemed to solve the issue, but it wasn’t perfect. This, and a few other problems gave him a lot of grief, but towards the end, it all worked, almost. Most importantly, his BoM cost of about $35 makes it significantly cheaper compared to the commercial units available in Nigeria.

While some hackers may consider this a trivial project, it solves a local problem and we hope the next iteration of the design improves the kit and makes it more accessible.

Add Data To Your Shipping Suspicions With This Power-Sipping Datalogger

One only has to ship one or two things via a container, receiving them strangely damaged on the other end, before you start to wonder about your shipper. Did they open this box and sort of stomp around a bit? Did I perhaps accidentally contract a submarine instead of a boat? Did they take a detour past the sun? How could this possibly have melted?

[Jesus Echavarria]‘s friend had similar fears and suspicions about a box he is going to have shipped from Spain to China. So [Jesus] got to work and built this nice datalogger to discover the truth. Since the logger might have to go for a couple of months, it’s an exercise in low power design.

The core of the build is a humble PIC18. Its job is to take the information from an ambient light, temperature, and humidity sensor suite and dump it all to an SD card. Aside from the RTC, this is all powered from a generic LiPo power cell. The first iteration can run for 10 days on one charge, and that’s without any of the low power features of the microcontroller enabled. It should be able to go for much longer once it can put itself to sleep for a period.

It’s all housed in a 3D printed case with some magnets to stick it to shell of the shipping container. Considering the surprisingly astronomical price of commercial dataloggers, it’s a nice build!