Accurate Time On Your Pi, The Extreme Way

The Raspberry Pi is an extremely versatile little computer, but even its most ardent fans would acknowledge that there are some areas in which its hardware is slightly lacking. One of these is in the field of timing, the little board has no real-time clock. Users must rely on the on-board crystal oscillator, which is good enough as a microprocessor clock but subject to the vagaries of temperature as it is, not so much as a long-term timepiece.

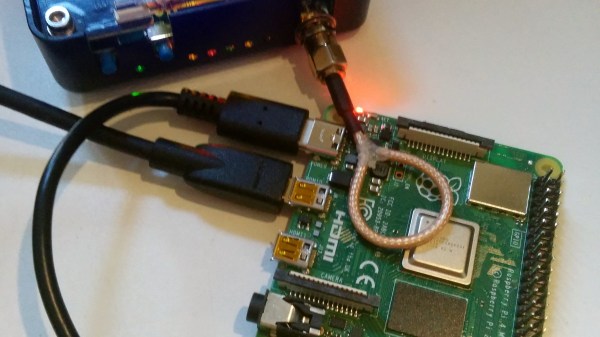
[Manawyrm] has tackled this problem in a rather unusual way, by dispensing entirely with the crystal oscillator on an older Pi model and instead using a clock derived from a GPS source. The source she’s used is a Leo Bodnar mini precision GPS reference clock, which includes a low-jitter synthesiser that can be set to the Pi’s 19.2 MHz required clock. Unexpectedly this also required a simple LC low-pass filter which was made on a sheet of PCB material, because the Pi at first appeared to be picking up a harmonic frequency. The Pi now has a clock that’s sufficiently stable for tasks such as WSPR transmission without constant referral to NTP or other timing sources to keep it on-track.

It’s a short write-up, but it brings with it a further link to a discussion of different time synchronisation techniques on a Pi including using a kernel module to synchronise with the more common GPS-derived 1PPS signal. We’ve not seen anyone else do this particular mod to a Pi before, but conversely we’ve seen a Pi provide an RF time reference to something else.

The Cheese Grater In Fusion 360

By now you will all have heard so much about the grille on Apple’s new “Cheese grater” Mac Pro that you might think there was nothing more to say. Before we move on though there’s one final piece of work to bring to your attention, and it comes from [Andy Pugh]. He’s replicated the design in Fusion 360, and used it to produce rather an attractive Raspberry Pi case.

It seems that for Fusion 360 users the problem lies in that package’s method of placing spheres which differs from that of some other CAD software. Using the page linked in our previous coverage of the grille he’s taken its geometry information and produced a video detailing every step in recreating it for Fusion 360. This is where following someone who really knows your CAD package pays dividends, because we suspect it would take us days to figure out some of the tricks he shows us.

The result is the Raspberry Pi case, which is for the Pi 3 and others like it. Sadly we couldn’t break our embargo and tell him about the Pi 4 and its different connector layout, but we’re guessing a halfway competent CAD operator could put together a Pi 4 case. Andy’s files can be found on Thingiverse, so you can all make one for yourselves.

Andy’s appeared here before a few times, not least for his Ner-A-Car motorcycle, and for designing a Robot Wars robot.

Continue reading “The Cheese Grater In Fusion 360”

Raspberry Pi 4 Just Released: Faster CPU, More Memory, Dual HDMI Ports

The Raspberry Pi 4 was just released. This is the newest version of the Raspberry Pi and offers a better CPU and more memory than the Raspberry Pi 3, dual HDMI outputs, better USB and Ethernet performance, and will remain in production until January, 2026.

There are three varieties of the Raspberry Pi 4 — one with 1GB of RAM, one with 2GB, and one with 4GB of RAM — available for $35, $45, and $55, respectively. There’s a video for this Raspberry Pi launch, and all of the details are on the Raspberry Pi 4 website.

A Better CPU, Better Graphics, and More Memory

The CPU on the new and improved Raspberry Pi 4 is a significant upgrade. While the Raspberry Pi 3 featured a Broadcom BCM2837 SoC (4× ARM Cortex-A53 running at 1.2GHz) the new board has a Broadcom BCM2711 SoC (a quad-core Cortex-A72 running at 1.5GHz). The press literature says this provides desktop performance comparable to entry-level x86 systems.

Of note, the new Raspberry Pi 4 features not one but two HDMI ports, albeit in a micro HDMI format. This allows for dual-display support at up to 4k60p. Graphics power includes H.265 4k60 decode, H.264 1080p60 decode, 1080p30 encode, with support for OpenGL ES, 3.0 graphics. As with all Raspberry Pis, there’s a component  composite video port as well tucked inside the audio port. The 2-lane MIPI DSI display port and 2-lane MIPI CSI camera port remain from the Raspberry Pi 3.

Continue reading “Raspberry Pi 4 Just Released: Faster CPU, More Memory, Dual HDMI Ports”

DIY Raspberry Pi Multi FX Stomp Box

From building your own analog effects pedal to processing audio through micro controllers, a lot of musicians love building their own boxes of sound modification. In his entry for the 2019 Hackaday Prize, [Craig Hissett] has a project to build an all-in-one multi-effects stomp box.

At the center of the box is a Raspberry Pi with an AudioInjector stereo sound card.  The card takes care of stereo in and out, and passing the signal to the Pi. The software is Modep, an open source audio processor that allows the setup of a chain of digital effects plugins to be run on the Pi. After finding some foot switches, [Craig] connected them to an Arduino Pro Micro which he set up as a MIDI device that sends MIDI messages to the Modep software running on the Pi.

There are still a few steps to go, but [Craig] has the basic layout covered. Next up is wiring it up and building a proper case for it, as well as working on latency. A few years ago, another multi-effects stomp box was featured in the Hackaday Prize, and last year, this multi-effects controller was featured.


Shorting Pins On A Raspberry Pi Is A Bad Idea; PMIC Failures Under Investigation

You may have noticed, we’re fans of the Raspberry Pi here at Hackaday. Hardly a day goes by that we don’t feature a hack that uses a Pi somewhere in the build. As useful as the Pis are, they aren’t entirely without fault. We’ve talked about the problems with the PoE hat, and multiple articles about keeping SD cards alive. But a new failure mode has popped that is sometimes, but not always, caused by shorting the two power rails on the board.

The Pi 3 B+ has a new PMIC (Power Management Integrated Circuit) made by MaxLinear. This chip, the MxL7704, is a big part of how the Raspberry Pi foundation managed to make the upgrades to the Pi 3 without raising the price over $35.

A quick look at the Raspberry Pi forum shows that some users have been experiencing a specific problem with their new Raspberry Pi 3 B+ units, where the power LED will illuminate but the unit will not boot. The giveaway is zero voltage on the 3v3 pin. It’s a common enough problem that it’s even mentioned in the official boot problems thread.

Make sure the probe you are measuring with does not slip, and simultaneously touches any of the other GPIO pins, as that might instantly destroy your PI, especially shorting the 3V3 pin to the 5V pin will prove to be fatal.

Continue reading “Shorting Pins On A Raspberry Pi Is A Bad Idea; PMIC Failures Under Investigation”

This Clapperboard Prints Movie Posters

The clapperboard is a device used in video to synchronize audio and video. Its role in movies is well known and its use goes back in one form or another to the 1920s. [Gocivici] is a big movie fan and created a clapperboard that is able to print out posters of recently announced movies when the clapper is clapped.

The poster is not a big, full color job, but rather a black and white one, roughly the size of a movie ticket. [Gocivici] keeps his movie tickets in a journal and wanted to be able to keep small posters in there along with them. A thermal printer is used to print the poster along with the title, the release date, and some information about the movie. In addition to the printer, the hardware involved is a Raspberry Pi, a switch, and an LED. The clapperboard itself is 3d printed and then painted. A bit of metal is used to keep the clappers apart and give a bit of resistance when pressing them together. A nice touch is a metal front, so you can use magnets to keep your posters on the board.

[Gocivici] has detailed build instructions up along with a video (available after the break) showing the printer in action. The 3d models are available as well as the code used to create the posters after grabbing data from TMDb. If you need your clapperboard to be as accurate as possible, take a look at this atomic clock clapperboard.

Continue reading “This Clapperboard Prints Movie Posters”

Doom On The NES

“But can it run Doom?” is perhaps the final test of hacking a platform. From calculators to thermostats, we’ve seen Doom shoehorned into a lot of different pieces of hardware. Many times we’re left scratching our heads at the mashup, and this is no exception.

[TheRasteri] wasn’t satisfied with the existing ports of Doom, so he decided to bring the classic game to a classic console, the NES. In the video embedded after the break, he helpfully points out the system requirements for running Doom, and compares them with the specifications of the NES. Spoilers: not nearly enough.

How did he manage the feat? Taking inspiration from Nintendo’s own SuperFX chip, he embedded a co-processor in the cartridge, and fed the video stream from the cartridge back into the NES. It might not be fair to call it a co-processor, since it’s a Raspberry Pi with thousands of times the processing power of the 6502 that powers the NES. The idea might seem familiar, and in fact it was partially inspired by [Tom7]’s similar hack last year.

Using a Cypress USB controller to feed the graphics bus, [TheRasteri] is able to run Doom on the Raspberry Pi, take the visuals from the game, and convert them into blocks of graphics the NES expects to load from the cartridge. The best trick is that he apparently managed to squeeze everything into a normal NES cartridge. He plans to release a build video on his channel, so keep an eye out.

Meanwhile, don’t forget to take a look at those calculators and thermostats we mentioned.

Continue reading “Doom On The NES”