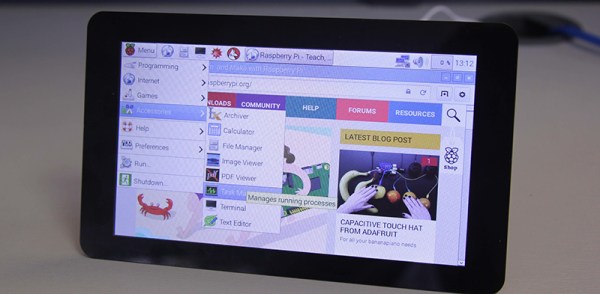
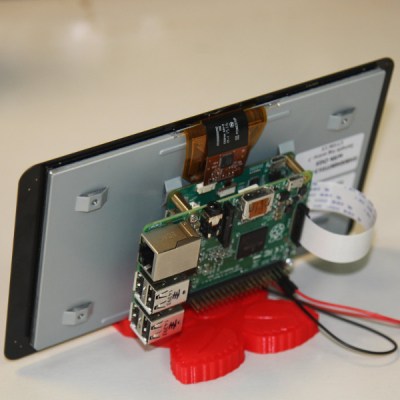
nintendo

Nin10do Retro Game Console Stands Above All Others

If your living room entertainment area is not home to a Raspberry Pi based retro game console, you no longer have any excuses. Break out your soldering iron and volt/ohm meter and preheat the 3d printer, because you will not be able to resist making one of the best retro game consoles we’ve ever seen – The Nin10do.

It’s creator is [TheDanielSpies]. Not only did he make the thing from scratch, he’s done an extraordinary job documenting all the build details, making it easier than ever to follow in his footsteps and make one of your own. He designed the case in Autodesk and printed it out with XT Co-polyester filament. He uses a Raspi of course, along with an ATX Raspi board from Low Power Labs to make the power cycling easier. There’s even a little stepper that opens and closes a cover that hides the four USB ports for controllers. Everything is tied together with Python, making the project super easy to modify and customize to your liking.

All code, schematics and .stl files are available on his github. It even has its own Facebook page! Be sure to check out the vast array of videos to help you along with your build.

Continue reading “Nin10do Retro Game Console Stands Above All Others”

Smile For The Raspberry Pi Powered Photo Booth

[Roo] was tasked with finding a better way to take corporate employee photos. The standard method was for a human resources employee to use a point and shoot camera to take a photo of the new recruits. The problem with this method is many people feel awkward trying to force a smile in front of other people. Plus, if the photo turns out poorly many people won’t ask to have it retaken so as not to feel vain or inconvenience the photographer. [Roo’s] Raspberry Pi powered photo booth solves this problem in a novel way.

The new system has the employee use their own mobile phone to connect to a website running on the Pi. When the employee tells the Pi to snap a photo, the system uses the Raspberry Pi camera module to capture an image. [Roo] actually 3D printed a custom adapter allowing him to replace the standard camera lens if desired. The photo can be displayed on an LCD screen so the user can re-take the photo if they wish.

The system is built into a custom case made from both 3D printed and laser cut parts. The front plate is a frosted white color. [Roo] placed bright white lights behind the front panel in order to act as a flash. The frosted plastic diffuses the light just enough to provide a soft white light for each photo taken. Once the photo is selected, it can then be uploaded to the company database for use with emails, badges, or whatever else.

[Roo] also mentions that the system can easily be changed to send photos via Twitter or other web applications. With that in mind, this system could be a great addition to any hackerspace or event. The code for an older version of the project can be found on the project’s github page.

Continue reading “Smile For The Raspberry Pi Powered Photo Booth”

Notification Cube

LED Notification Cube Is A Good First Project

Two years ago, [Matt] made a move away from his software hacks and into the physical world. He was part of a pilot program to provide mentorship to children as part of the Maker Education Initiative. This program gave him access to 3D printers, CNC machines, and laser cutters within the New York Hall of Science makerspace. [Matt] chose to build an illuminated notification cube for his first physical project. The idea being that smart phones have so many alerts, many of which are unimportant. His project would help him to visualize and categorize each alert to better understand its importance.

The brain of the system is a Raspberry Pi. [Matt] found a Python library that allowed him to directly control an RGB LED strip based on the LPD8806 chip. He wired the data pins directly to the Pi and used an old 5V cell phone charger to power the LEDs. The strip was cut into smaller strands. Each face of the cube would end up with three strands of two LEDs each, or six LEDs per side. [Matt] found a mount for the Pi on Thingiverse and used a 3D printer to bring it into existence. The sides were made of frosted laser cut acrylic. The frosted look helps to diffuse the light from the LEDs.

Over time [Matt] found that the cube wasn’t as useful as he originally thought it would be. He just didn’t have enough alerts to justify the need. He ended up reprogramming the Pi to pull weather information instead, making use of the exact same hardware for another, more useful purpose.

Open Source, DIY Soldering Robot

After [Brian] starting selling his own Raspberry Pi expansion boards, he found himself with a need for a robot that could solder 40-pin headers for him. He first did what most people might do by looking up pre-built solutions. Unfortunately everything he found was either too slow, too big, or cost as much as a new car. That’s when he decided to just build his own soldering robot.

The robot looks similar to many 3D printer designs we’ve seen in the past, with several adjustments. The PCBs get mounted to a flat piece of aluminum dubbed the “PCB caddy”. The PCBs are mounted with custom-made pins that thread into the caddy. Once the PCBs are in place, they are clamped down with another small piece of aluminum. A computer slowly moves the caddy in one direction, moving the header’s pins along the path of the soldering irons one row at a time.

The machine has two soldering irons attached, allowing for two pins to be soldered simultaneously. The irons are retracted as the PCB caddy slides into place. They irons are then lowered onto the pins to apply heat. Two extruders then push the perfect amount of solder onto each pin. The solder melts upon contact with the hot pins, just as it would when soldered by hand.

The system was originally designed to be run on a Windows 8.1 tablet computer, but [Brian] found that the system’s internal battery would not charge while also acting like a USB host. Instead, they are running the Windows WPF application on full PC. All of the software and CAD files can be found on [Brian’s] github page. Also be sure to check out the demo video below. Continue reading “Open Source, DIY Soldering Robot”

The Raspberry Pi Action Camera

Action cameras like the GoPro, and the Sony Action Cam are invaluable tools for cyclists and anyone else venturing into the great outdoors. These cameras are not really modifiable or usable in any way except for what they were designed for. [Connor] wanted a cheaper, open-source action camera and decided to build one with the Raspberry Pi.

[Connor]’s Pi action cam is built around the Raspberry Pi Model A+ and the Pi camera. This isn’t a complete solution, so [Connor] added a bluetooth module, a 2000 mAh battery, and a LiPo charger.

To keep the Pi Action Cam out of the elements, [Connor] printed an enclosure. It took a few tries, but eventually he was able to mount everything inside a small plastic box with buttons to start and stop recording, a power switch, and a USB micro jack for charging the battery. The software is a script by [Alex Eames], and the few changes necessary to make this script work with the hardware are also documented.

This was the most intensive 3D printing project [Connor] has ever come up with, and judging by the number of prints that don’t work quite right, he put a lot of work into it. Right now, the Pi action cam works, but there’s still a lot of work to turn this little plastic box into a completed project.

Mapillary For The Raspberry Pi

If you live out in the boondocks, out of reach from the Google Maps car, you might have noticed there aren’t too many pictures of your area on the Internet. Mapillary is hoping to change that with crowdsourced photos of the entire planet, with mobile apps that snap a pic and upload it to the web. [sabas1080] is bringing this capability to the most popular ARM dev board out there, the Raspberry Pi.

The Raspberry Pi is not a phone, the usual way to upload pics to Mapillary. There’s no GPS, so geotagging is out of the question. The Pi doesn’t have a camera or a screen, and if you’re taking pictures of remote locations, a battery would be a good idea.

All these pieces are available for the Pi, though; [sabas1080] sourced a display from Adafruit, the camera is a standard Raspi affair, and the GPS is a GY-NEO6MV2 module from the one of the numerous Chinese retailers. Add a big power bank battery, and all the hardware is there.

The software is where this build gets tricky. Mapillary has a nice set of free tools written in Python, no less, but this is only part of the build. [sabas1080] needed to connect the camera, set up the display, and figure out how to make everything work with the Mapillary tools. In the end, [sabas] was able to get the entire setup working as a programmable, mobile photo booth.

Wildlife Camera

Remote Controlled Wildlife Camera With Raspberry Pi

If you are interested in local wildlife, you may want to consider this wildlife camera project (Google cache). [Arnis] has been using his to film foxes and mice. The core components of this build are a Raspberry Pi and an infrared camera module specifically made for the Pi. The system runs on a 20,000 mAh battery, which [Arnis] claims results in around 18 hours of battery life.

[Arnis] appears to be using a passive infrared (PIR) sensor to detect motion. These sensors work by detecting sudden changes in the amount of ambient infrared radiation. Mammals are good sources of infrared radiation, so the sensor would work well to detect animals in the vicinity. The Pi is also hooked up to a secondary circuit consisting of a relay, a battery, and an infrared light. When it’s dark outside, [Arnis] can enable “night mode” which will turn on the infrared light. This provides some level of night vision for recording the furry critters in low light conditions.

[Arnis] is also using a Bluetooth dongle with the Pi in order to communicate with an Android phone. Using a custom Android app, he is able to connect back to the Pi and start the camera recording script. He can also use the app to sync the time on the Pi or download an updated image from the camera to ensure it is pointed in the right direction. Be sure to check out the demo video below.

If you like these wildlife cameras, you might want to check out some older projects that serve a similar purpose. Continue reading “Remote Controlled Wildlife Camera With Raspberry Pi”