An orange 3D printed four digit clock with rotating segments

Be Mesmerized By The Latest Time Twister

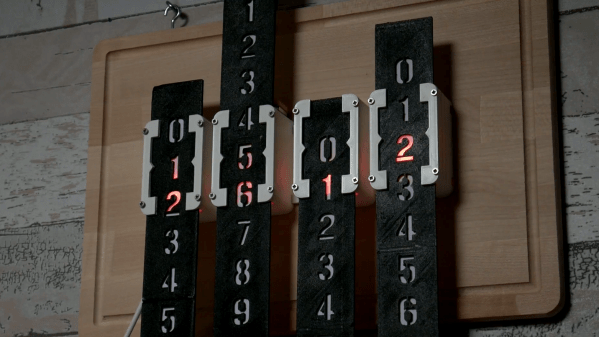
[Hans Andersson] has been creating marvelous twisting timepieces for over a decade, and we’re pleased to be able to share his latest mechanical clock contraption with our readers, the Time Twister 5.

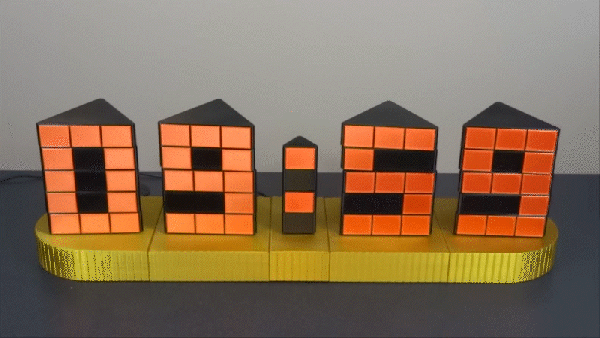
In contrast to his previous LEGO-based clocks, version five of the Time Twister uses 3D printed segments, undoubtedly providing greater flexibility in terms of aesthetics and function. Each digit is a mechanical display, five layers vertical and three segments horizontal, with a total of three unique faces. Each layer of each display can be individually rotated by a servo, and this arrangement allows for displaying any number between zero and nine. The whole show is controlled by an Arduino MEGA and a DS3231 real-time clock.

Watching these upended prisms rotate into legible fifteen-segment digits is enjoyable enough already, but the mechanical sound created by this timepiece in motion is arguably even more satisfying. Check out the video below to see (and hear) for yourself. If you want to build one yourself, all the details are here.

We last covered [Hans Andersson] and his very first Time Twister clock way back in November 2011. Since then we’ve come across many impressive mechanical clocks, like this seven-segment work of art. We’re constantly impressed by the outstanding craftsmanship of these mechanical clocks, and it’s inspiring to see one of our OG horologists back in the saddle once more.

Continue reading “Be Mesmerized By The Latest Time Twister”

Pomodoro timer helps you focus on tasks without burning out.

World’s Cutest Pomodoro Timer Is Also A Clock

Student and hacker [prusteen] recently fell in love with the Pomodoro method of time management. That’s where you concentrate on your task for 25 minutes, then take a five-minute break, and repeat this four times with a longer break at the end. Initially, [prusteen] was keeping track on their phone, but hated having to change the timer value between Pomodoros and break times. In order to keep the flow mode engaged, [prusteen] came up with this darling little study buddy that does it all with the push of a button.

By default, this tomato shows the current time, which we think is a handy and often-overlooked feature of Pomodoro timer builds. Press that momentary switch on the front, and it starts counting upward to 25 minutes. Then it beeps in stereo through a pair of buzzers when the time is up, and automatically starts a five-minute break timer. Press it again and the display goes back to clock mode, although judging by the code, doing this will cancel the timer.

Inside the juicy enclosure is an Arduino Nano, an RTC, and a 7-segment display. We love the attention to detail here, from the little green leaves on top to the anatomically-correct dimple on the underside. And we always like to see lids that snap on with magnets. So satisfying. Check out the brief demo after the break, which unfortunately does not include any lid-snapping action.

Do you need more interaction with your Pomodoro timer? Build yourself a pomo-dachi instead.

Continue reading “World’s Cutest Pomodoro Timer Is Also A Clock”

The Amiga 1000, Still Receiving New Peripherals 35 Years Later

In the world of retrocomputing it’s the earliest models that garner the most  interest, usually either due to their rarity, or sometimes just because of their flaws. The Commodore Amiga 1000 is a case in point, it was the machine everybody wanted but its A500 home computer sibling made the Amiga a success story. Peripherals for the 500 are plentiful then, while those for the 1000 remain a rarity. Thus it’s a treat to see an A1000 peripheral appear in the present day, in the form of a memory, clock, and SD card expansion called the Parciero. It packs 8Mb of SRAM to give the Amiga some truly quick fast memory, something that would have used an eye-wateringly expensive brace of chips back in the day but now has just a single package.

We like the description of the Parciero’s case as “about the size of a harmonica that’s been run over by a steam roller“, but it conceals the effect of the march of technology. Amiga enthusiasts are used to their peripherals being chunky affairs full of through-hole chips. Its creator [David Dunklee] is a retired senior US Space Force officer, and we appreciate his humour in the silkscreen layer. It’s a small-scale commercial product, but in a field so select as Amiga 1000 owners it’s unusual enough to make it noteworthy to all retrocomputer enthusiasts by virtue of its mere existence. We congratulate him for helping keep that little corner of vintage technology alive.

The Amiga 1000 may be the original, but it’s possible that it may not be the rarest Amiga.

Save Your Original Xbox From A Corrosive Death

Fans of retro computers from the 8-bit and 16-bit eras will be well aware of the green death that eats these machines from the inside out. A common cause is leaking electrolytic capacitors, with RTC batteries being an even more vicious scourge when it comes to corrosion that destroys motherboards. Of course, time rolls on, and new generations of machines are now prone to this risk. [MattKC] has explored the issue on Microsoft’s original Xbox, built from 2001 to 2009.

Despite looking okay from above, the capacitor inside the Xbox had already started leaking underneath. Leaving this in the console would inevitably cause major damage.

The original Xbox does include a real-time clock, however, it doesn’t rely on a battery. Due to the RTC hardware being included in the bigger NVIDA MCPX X3 sound chip, the current draw on standby was too high to use a standard coin cell as a backup battery. Instead, a fancy high-value capacitor was used, allowing the clock to be maintained for a few hours away from AC power. The problem is that these capacitors were made during the Capacitor Plague in the early 2000s. Over time they leak and deposit corrosive material on the motherboard, which can easily kill the Xbox.

The solution? Removing the capacitor and cleaning off any goop that may have already been left on the board. The fastidious can replace the part, though the Xbox will work just fine without the capacitor in place; you’ll just have to reset the clock every time you unplug the console. [MattKC] also points out that this is a good time to inspect other caps on the board for harmful leakage.

We’ve seen [MattKC] dive into consoles before, burning his own PS1 modchip from sourcecode found online. Video after the break.

Edit: As noted by [Doge Microsystems], this scourage only effects pre-1.6 Xboxes; later models don’t suffer the same problem, and shouldn’t be modified in this way.

Continue reading “Save Your Original Xbox From A Corrosive Death”

A Linear Stencil Clock Built For Quiet Operation

We around the Hackaday shop never get tired of seeing new ways to mark the passage of time. Hackers come up with all manner of interesting timekeeping modalities using every imaginable material and method of moving the mechanism once per whatever minimum time unit the hacker chooses to mark.

But honestly, there are only so many ways to make a clock, and while we’re bound to see some repeats, it’s still nice to go over old ground with a fresh approach. Take this linear sliding stencil clock for instance. [Luuk Esselbrugge] has included some cool design elements that bear a closer look. The video below shows that the display is made up of four separate stepper motors, each driving a vertical stencil via a rack-and-pinion mechanism. There a simple microswitch for homing the display, and a Neopixel for lighting things up.

The video below shows that the stencils move very, very slowly; [Luuk] says that this is to keep the steppers as quiet as possible. Still, this means that some time changes take more than a minute to accomplish, which is a minor problem. The Neopixel also doesn’t quite light up just one digit, which should be a pretty easy fix for version 2. Still, even with these issues, we like the stately movements of this clock, and appreciate [Luuk]’s attempts to make it easier to live with.

Don’t let the number of clocks you see on these pages dissuade you from trying something new, or from putting your twist on an old design. Start with fridge magnets, an old oscilloscope, or even a bevy of steel balls, and let your imagination run wild. Just make sure to tell us all about it when you’re done.

Continue reading “A Linear Stencil Clock Built For Quiet Operation”

Building This Mechanical Digital Clock Took Balls

In the neverending quest for unique ways to display the time, hackers will try just about anything. We’ve seen it all, or at least we thought we had, and then up popped this purely mechanical digital clock that uses nothing but steel balls to display the time. And we absolutely love it!

Click to embiggen (you’ll be glad you did)

One glimpse at the still images or the brief video below shows you exactly how [Eric Nguyen] managed to pull this off. Each segment of the display is made up of four 0.25″ (6.35 mm) steel balls, picked up and held in place by magnets behind the plain wood face of the clock. But the electromechanical complexity needed to accomplish that is the impressive part of the build. Each segment requires two servos, for a whopping 28 units plus one for the colon. Add to that the two heavy-duty servos needed to tilt the head and the four needed to lift the tray holding the steel balls, and the level of complexity is way up there. And yet, [Eric] still managed to make the interior, which is packed with a laser-cut acrylic skeleton, neat and presentable, as well he might since watching the insides work is pretty satisfying.

We love the level of craftsmanship and creativity on this build, congratulations to [Eric] on making his first Arduino build so hard to top. We’ve seen other mechanical digital displays before, but this one is really a work of art.

Continue reading “Building This Mechanical Digital Clock Took Balls”

Choosing The Right RTC For Your Project

When it comes to measuring time on microcontrollers, there’s plenty of ways to go about things. For most quick and dirty purposes, such as debounce delays or other wait states, merely counting away a few cycles of the main clock will serve the purpose.  Accurate to the tens of milliseconds, they get the average utility jobs done without too much fuss.

However, many projects are far more exacting in their requirements. When you’re building a clock, or a datalogger, or anything that relies on a stable sense of passing time for more than a few minutes, you’ll want a Real Time Clock. So called due to their nature of dealing with real time, as we humans tend to conceive it, these devices take it upon themselves to provide timekeeping services with a high degree of accuracy. We’ve compiled a guide to common parts and their potential applications so you can get things right the first time, every time.

Continue reading “Choosing The Right RTC For Your Project”