Dedicated Button For Toggling Screens

Anyone who regularly presents to an audience these days has known the pain of getting one’s laptop to work reliably with projection hardware. It’s all the more fraught with pain when you’re hopping around from venue to venue, trying desperately to get everything functioning on a tight schedule. [Seb] found that the magic keystrokes they used to deal with these issues no longer worked on the Macbook Pro Touchbar, and so a workaround was constructed in hardware.

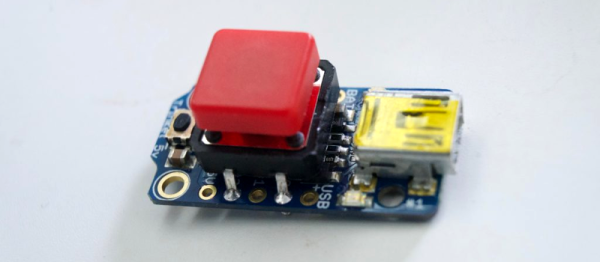
The build itself is simple – an Adafruit Trinket serves as the brains, with a meaty 12mm tactile button used for input. The Trinket emulates a USB keyboard and sends the Cmd-F1 keypress to the computer when the button is pressed. The button’s even mounted in a tidy deadbugged fashion.

While it’s not at all complicated from a build standpoint, the key to this project is that it’s a great example of using the tools available to solve real-life problems. When you’re in a rush with 300 people waiting for your talk to start, the last thing you need to be worrying about is a configuration issue. [Seb] now has a big red button to mash to get out of trouble and get on with the job at hand. It does recall this much earlier hack for emulating a USB keyboard with an Arduino Uno or Mega. It’s a useful skill to have!


Hacking Touch Screens To Count Pulses

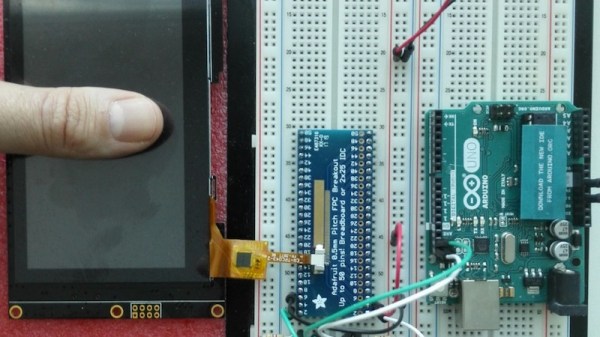
Heart rate sensors available for DIY use employ photoplethysmography which illuminates the skin and measures changes in light absorption. These sensors are cheap, however, the circuitry required to interface them to other devices is not. [Petteri Hyvärinen] is successfully investigating the use of capacitive touchscreens for heart rate sensing among other applications.

The capacitive sensor layer on modern-day devices has a grid of elements to detect touch. Typically there is an interfacing IC that translates the detected touches into filtered digital numbers that can be used by higher level applications. [optisimon] first figured out a way to obtain the raw data from a touch screen. [Petteri Hyvärinen] takes the next step by using a Python script to detect time variations in the data obtained. The refresh rate of the FT5x06 interface is adequate and the data is sent via an Arduino in 35-second chunks to the PC over a UART. The variations in the signal are very small, however, by averaging and then using the autocorrelation function, the signal was positively identified as a pulse.

A number of applications could benefit from this technique if the result can be replicated on other devices. Older devices could possibly be recycled to become low-cost medical equipment at a fraction of the cost. There is also the IoT side of things where the heart-rate response to media such as news, social media and videos could be used to classify content.

Check out our take on the original hack for capacitive touch imaging as well as using a piezoelectric sensor for the same application.

VR And Back Again: An XRobots Tale

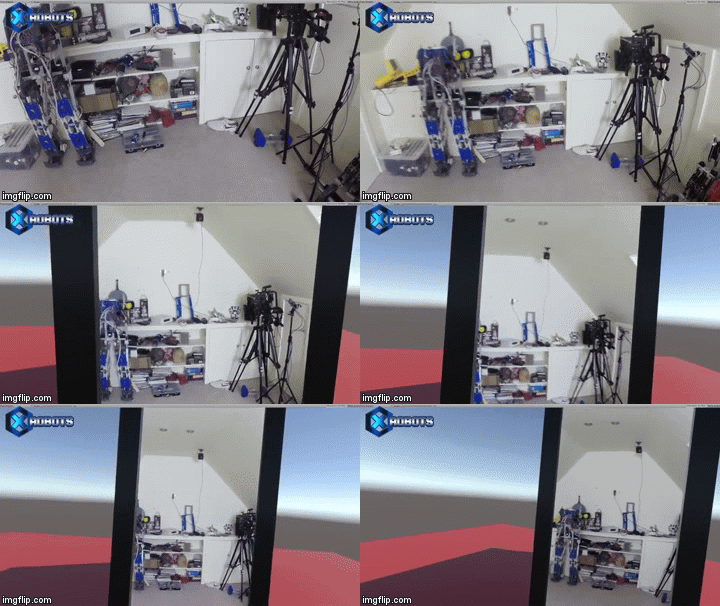
Our friend [James Bruton] from XRobots has engaged in another bit of mixed-reality magic by showing how one can seamlessly step from the virtual world into the real world, and back again. Begone, green screens and cumbersome lighting!

Now, most of what you’re seeing is really happening in post-production — for now — but the test footage is the precursor for a more integrated system down the road. As it works now, a GoPro is attached to the front of a HTC Vive headset, allowing [Bruton] to record in both realities at the same time. In the VR test area he has set up is a portal to a virtual green room — only a little smaller than a wardrobe — allowing him to superimpose the GoPro footage over everything he looks at through that doorway, as well as everything surrounding him when he steps through. Unfortunately, [Bruton] is not able to see where he’s going if he is to wear the headset, so he’s forced to hold it in one hand and move about the mixed-reality space. Again, this is temporary.

In action — well, it gets a little surreal when he starts tossing digital blocks through the gateway ‘into’ the real world.

Continue reading “VR And Back Again: An XRobots Tale”

Banana Phone Blocks Robocalls

Despite the implementation of the National Do Not Call Registry in the US (and similar programs in other countries), many robocallers still manage to get around the system. Whether they’re operating outside the law somehow (or they simply don’t care about it) there are some ways you can take action to keep these annoying calls from coming through. [Alex] is among those to take matters into his own hands and built a specialty robocall-blocking device.

Based on a Raspberry Pi, the “Banana Phone” is able to intercept incoming calls on standard land lines or VoIP phones. After playing a short message, the caller is asked to input a four-digit code. Once the code is correctly entered, the caller is presumed to be human, added to a whitelist, and then the Pi passes them on to the recipient. There are, however, some legitimate robocallers such as emergency services regarding natural disasters or utility companies regarding outages. For these there is a global whitelist that the Pi checks against and forwards these robocalls on to the recipient automatically.

This project was originally an entry into a contest that the Federal Trade Commission put on a few years ago for ideas about how to defend against robocalls. We covered it back then, but now there are full build instructions. Even though the contest is long over, the Banana Phone is still in active development so if you have a spare Pi lying around you can still set this up yourself. There are some other interesting ways to defend against robocalls as well, like including the “line disconnected” tone in your voicemail, for example.

Portable RetroPie Suitcase For Multiplayer On The Go!

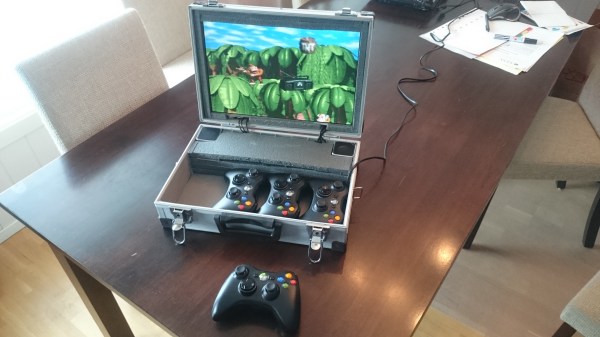
Portable gaming — and gaming in general —  has come a long way since the days of the original Game Boy. With a mind towards portable multiplayer games, Redditor [dagcon] has assembled a RetroPie inside a suitcase — screen and all!

This portable console has almost everything you could need. Four controllers are nestled beside two speakers. Much of the power cabling is separated and contained by  foam inserts. The screen fits snugly into the lid with a sheet of rubber foam to protect it during transport.

Tucked behind the monitor rests the brains of this suitcase console: a Raspberry Pi and the associated boards. [Dagcon] resorted to using a dedicated sound card for the speakers, diverting the output from the HDMI port. An LCD screen controller was also necessary as the screen had been re-purposed from its previous life as a laptop screen. [Dagcon] offers some tips on how to go about accomplishing this yourself and a helpful Instructables link.

Continue reading “Portable RetroPie Suitcase For Multiplayer On The Go!”

Slow 3.5″ Raspberry Pi LCD Hacked To 40 MHz With ESP8266

As microcontrollers become more and more common, we see more ways to get a lot of performance out of one chip. A great example of this was the ESP8266 which was originally seen as a cheap WiFi card but has since blossomed into its own dev platform thanks to the horsepower hidden within. To that end, [Martin] is trying to push the now-ubiquitous WiFi chip even further by rolling out his own LCD driver for it from scratch.

The display of choice is the KeDei LCD 3.5″ module which was originally intended for use with a Raspberry Pi. [Martin] points out that this display isn’t optimized for speed, but after everything is said and done he has its clock line running at 40 MHz. To get this kind of speeds from the LCD, he depopulates the first shift register and adds his own fast-propagation circuit to establish a more-traditional serial addressing mode. With use of a WLCD driver that [Martin] also wrote, it is now relatively easy to draw on the screen very quickly with an ESP module. Check it out in the video below.

If you’re looking for your own tiny, cheap, fast display, this is one cool way to do it but we would suggest spinning a carrier board for both the ESP and the added circuitry. We’re looking forward to future projects which puts devices like these inside of really tiny magic mirrors, or uses them in other places where a small graphical display would be handy.

Continue reading “Slow 3.5″ Raspberry Pi LCD Hacked To 40 MHz With ESP8266”