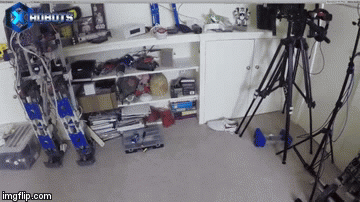
Directional Booklight Invisible To Everyone But You

Consistent contributor [Ken] has cooked up another contraption with his directional booklight. Combining an LED strip and privacy screen filter inside a wooden enclosure, this handy tool is made for someone who wants to read in bed without disturbing anyone else. The booklight sits on top of the page, the LEDs light up just the given area, and because the privacy screen only allows light to come straight off the page, only the reader can see any light and any other viewing angle is obscured.

[Ken] thought of everything. Rather than have the light stay on while the booklight is lifted to turn the page and possibly flash an unsuspecting slumberer, a tactile switch on the underside turns the light on only when it is pressed against the page, allowing very little light to escape.

Future upgrades include another switch on top to detect when the book is closed, and an accelerometer to detect when the reader may have fallen asleep.

We’ve reported a few of [Ken]’s projects before, like his 3D popup cardsunique weather display, and semi-real-life Mario Kart

Continue reading “Directional Booklight Invisible To Everyone But You”

Raspberry Pi And Kindle Together Again

We’ve seen a lot of projects recently that take advantage of the Raspberry Pi 2’s augmented abilities. With the increased processor power and double the memory, it puts a lot more utility in the user’s hands. The latest project that takes advantage of this is the Pi-nk, which combines a Pi with a Kindle for some text-based awesomeness. [Edit: Use the Wayback Machine.]

[Guillaume] has put together this detailed how-to which, unlike other builds we’ve seen in the past, uses wireless instead of USB for almost all of the connections, including the keyboard. Granted, this isn’t a new idea, but he’s presenting the way that he did it. To that end, all of the commands you’ll need to use are extremely well documented on the project page if you want to build your own. When everything is said and done, you’ll be SSHing into the Pi from the Kindle and using the popular “screen” program to get the Pi to use the Kindle as its display.

Additionally, [Guillaume] has posted some schematics for custom enclosures for the Pi-Kindle pair if you’re more ambitious. He points out that the e-ink display is great if the Pi is being run in text or command-line mode, and we’d have to agree. This is a very clean pairing of these devices and puts the strengths of both to great use!

Dreamcast Controller

A SEGA Dreamcast Controller With A Built-in Screen

[Fibbef] was hard at work on a project for a build-off competition when he accidentally fried the circuit board. Not one to give up easily, he opted to start a new project with only two days left in the competition. He managed to modify a SEGA Dreamcast controller to hold a color screen in that short amount of time.

The Dreamcast controller’s shape is somewhat conducive to this type of mod. It already has a small window to ensure the view of the visual memory card is not obstructed. Unfortunately [Fibbef’s] screen was a bit too large for this window. That meant he would have to expand the controller and the circuit board.

After taking the controller apart, he desoldered the memory card connectors. He then cut the circuit board cleanly in half vertically. He had to re-wire all of the traces back together by hand. It turned out initially that he had messed something up and accidentally fried the right half of the controller. To fix it, he cut a second controller in half and soldered the two boards together.

With some more horizontal space to work with on the PCB side of things, [Fibbef] now needed to expand the controller’s housing. He cut the controller into several pieces, making sure to keep the start button centered for aesthetics. He then used duct tape to hold popsicle sticks in place to make up for the missing pieces of the case. All of the sticks were then covered with a thick layer of ABS cement to make for a more rigid enclosure. All of this ended up being covered in Bondo, a common trick in video game console mods. It was then sanded smooth and painted with black primer to make for a surprisingly nice finish.

The screen itself still needed a way to get power and a video signal. [Fibbef] built an adapter box to take both of these signals and pass them to the controller via a single cable. The box as a USB-A connector for power input, and a composite connector for video. There’s also a USB-B connector for the output signals. [Fibbef] uses a standard printer USB cable to send power and video signals to the controller. The end result looks great and serves to make the Dreamcast slightly more portable. Check out the demo video below to see it in action. Continue reading “A SEGA Dreamcast Controller With A Built-in Screen”

Customized IPad LCD Screen Clips Onto Macbook As A Slick Second Screen

Macbook with iPad second screen

Last year, [Ben] found a good deal on iPad 3 LCD screens. He couldn’t resist buying a couple to play around with. It didn’t take him long to figure out that it’s actually quite simple to use these LCD screens with any computer. This is because the LCD panels have built-in Apple Display port interfaces. This means that you can add your own Display Port connector to the end of the LCD’s ribbon connector and just plug it into a computer. You’ll also need to hook up a back light driver, which [Ben] was able to find pre-made for around $35.

The hack doesn’t stop there, though. [Ben] wanted to have a nice, finished product. He laser cut an acrylic bezel for the LCD screen that was a perfect fit. He then milled out a space for the LCD to fit into. The acrylic was thick enough to accommodate the screen and all of the cables. To cover up the back, [Ben] chose to use the side panel of a PowerMac G5 computer case. He chose this mainly for aesthetics. He just couldn’t resist the nice brushed aluminum look with the giant Apple logo. It would be a perfect match to his Macbook.

Once the LCD panel was looking nice, [Ben] still needed a way to securely fasten it in the right place. He knew he’d want it next to his Macbook, so why not attach it directly to the Macbook? [Ben] got to work with his 3D printer and printed up some small plastic clips. The clips are glued to the iPad screen’s acrylic bezel and can be easily clipped on and off of the Macbook screen in seconds. This way his laptop is still portable, but he has the extra screen real estate when he needs it. [Ben] also printed up a plastic clip that turns the iPad’s USB power connector and the Display Port connector into one single connector. While this is obviously not required, it does effectively turn two separate plugs into one and makes the whole project that much more slick.

Easily 3D Print Mesh Screens

easy-way-to-3d-print-mesh-screens

If you need a way to make openings in your project enclosures look nice just head on over to the 3D printer. In the image above [Alfred] is showing off the result of his Slic3r hack for printing mesh grills.

It’s important to note that you need to make sure you’re using Slic3r version 0.9.8. This won’t work with newer versions because starting with 0.9.9 the software will add a raft to the bottom of your design.

The grill can be in any shape you desire. It starts by modelling this outline, then extruding the edges downward the same distance as your desired mesh thickness. After importing the design file into Slic3r [Alfred] uses the support material settings to choose this honeycomb design. He then sets the fill density to zero. This means the design will not be printed at all, only the fill material, resulting in these honeycomb screens.

Slic3r’s a fantastic piece of software. Check out this interview with Slic3r’s lead developer.

Laptop Backlight Converted From CCFL To LED

ccfl-to-led-backlight-conversion

[Lee Davison] acquired an Acer laptop that didn’t have a display anymore. He had enough parts on hand to add in an LCD panel and give it a CCFL backlight. But when he started looking for an inverter to drive the backlight he couldn’t find one. What he did have on hand were some smashed screens that had LED backlights and so the CCFL to LED backlight conversion project was born.

He tore into the LED display and found the driver board. Unfortunately he didn’t locate the datasheet for the exact LED driver, but he found one that was similar and was able to trace out the support circuitry on the PCB. This let him cut away the unneeded parts of the board without damaging the driver. He didn’t want to pull out the CCFL tubes until he was sure the LED conversion would work so he tried it out on another smashed panel (where does he come up with all these parts) and it worked great. Once he got everything in place he was very happy with the results. The only drawback to the system is that he doesn’t have the ability to dim the backlight.

Smashed Tablet In NES Case Lives Out Its Days As An Emulator

smashed-tablet-nes-emulator

The creator of this project started off with a 7″ tablet he received from a coworker. The screen was horribly smashed from one corner spreading out through the entire surface. But the hardware inside still worked, including the HDMI out port. He ended up transplanting the tablet hardware for use as an emulator.

After a bit of sizing up it was determined that the tablet hardware would fit inside the case of a broken NES. The battery would have been a tough fit, but this thing is always going to need to be connected to a television so there’s no need to work without mains power. The back plate was cut down to size and used as a try for mounting the motherboard in the case. Before that step he wired up a USB hub and mounted it so that two ports could be accessed through the original controller port openings.

There’s no details on the software used, but the final image in the gallery shows a game of Starfox being played.

[Thanks Cody]