Illustrated Kristina with an IBM Model M keyboard floating between her hands.

Keebin’ With Kristina: The One With The Curvy Centerfold

What do you get when you combine a Raspberry Pi 4B, a Kaypro keyboard, and a 9″ Apple ], you get the coolest AVR development workstation I’ve seen in a while.

A Raspberry Pi-based AVR workstation that uses a Kaypro keyboard and 9" monochrome Apple ][c display.
Image by [John Anderson] via Hackaday.IO
As you may have guessed, I really dig the looks of this thing. The paint job on the display is great, but the stripes on the keyboard and badging on are on another level. Be sure to check out the entire gallery on this one.

About that keyboard — [John] started this project with two incomplete keyboards that each had a couple of broken switches. Since the two keyboards were compliments of each other parts-wise, they made a great pair, and [John] only had to swap out three switches to get it up and clacking.

In order to make it work with the Pi, [John] wrote a user-mode serial driver that uses the uinput kernel module to inject key events to the kernel. But he didn’t stop there.

Although the Pi supports composite video out, the OS doesn’t provide any way to turn off the chroma color signal that’s modulated on top of the basic monochrome NTSC signal, which makes the picture look terrible. To fix that, he wrote a command-line app that sets up the video controller to properly display a monochrome NTSC signal. Happy AVRing on your amazing setup, [John]! Continue reading “Keebin’ With Kristina: The One With The Curvy Centerfold”

Selectric Typewriter Goes From Trash Can To Linux Terminal

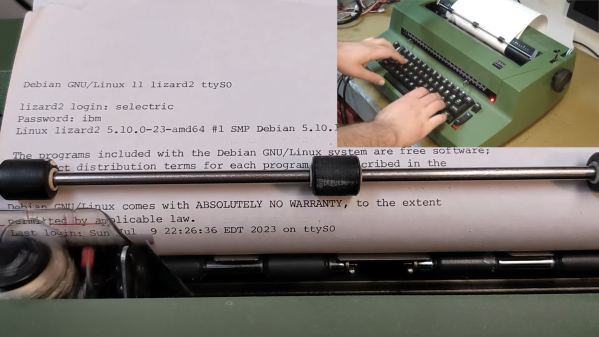
If there’s only lesson to be learned from [alnwlsn]’s conversion of an IBM Selectric typewriter into a serial terminal for Linux, it’s that we’ve been hanging around the wrong garbage cans. Because that’s where he found the donor machine for this project, and it wasn’t even the first one he’s come across in the trash. The best we’ve ever done is a nasty old microwave.

For being a dumpster find, the Selectric II was actually in pretty decent shape. The first couple of minutes of the video after the break show not only the minimal repairs needed to get the typewriter back on its feet, but also a whirlwind tour of the remarkably complex mechanisms that turn keypresses into characters on the page. As it turns out, knowing how the mechanical linkages work is the secret behind converting the Selectric into a teletype, entirely within the original enclosure and with as few modifications to the existing mechanism as possible.

Keypresses are mimicked with a mere thirteen solenoids — six for the “latch interposers” that interface with the famous whiffletree mechanism that converts binary input to a specific character on the typeball, and six more that control thinks like the cycle bail and control keys. The thirteenth solenoid controls an added bell, because every good teletype needs a bell. For sensing the keypresses — this is to be a duplex terminal, after all — [alnwlsn] pulled a page from the Soviet Cold War fieldcraft manual and used opto-interrupters to monitor the positions of the latch interposers as keys are pressed, plus more for the control keys.

The electronics are pretty straightforward — a bunch of MOSFETs to drive the solenoids, plus an AVR microcontroller. The terminal speaks RS-232, as one would expect, and within the limitations of keyboard and character set differences over the 50-odd years since the Selectric was introduced, it works fantastic as a Linux terminal. The back half of the video is loaded with demos, some of which aptly demonstrate why a lot of Unix commands look the way they do, but also some neat hybrid stuff, like a ChatGPT client.

Hats off to [alnwlsn] for tackling a difficult project while maintaining the integrity of the original hardware.

Continue reading “Selectric Typewriter Goes From Trash Can To Linux Terminal”

IBM Selectric Typewriters Finally Get DIY Typeballs

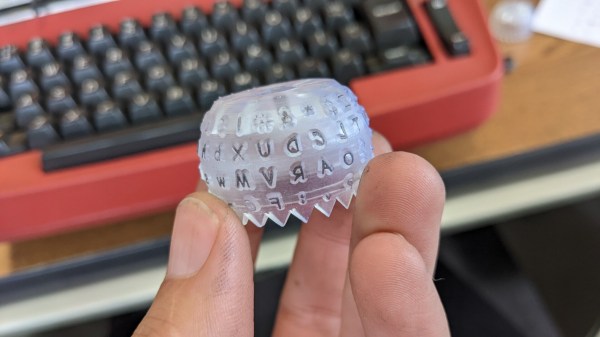
IBM’s Selectric line of typewriters were quite popular in the 1960s, thanks in part to an innovation called the typeball which allowed for easy font changes on a single machine. Unfortunately, as if often the case when specialized components are involved, it’s an idea that hasn’t aged particularly well. The Selectric typewriters are now around 60 years old and since IBM isn’t making replacement parts, those restoring these machines have had to get somewhat creative like using a 3D printer to build new typeballs.

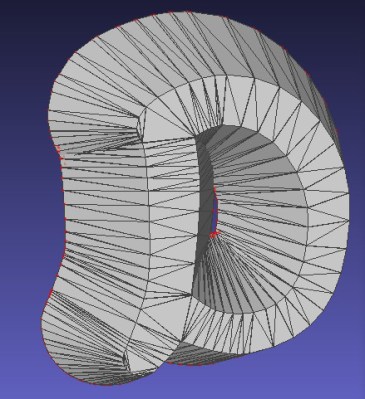
It sounds like it would be a simple, but much like the frustration caused with modern printers, interfacing automated computer systems with real-world objects like paper and ink is not often as straightforward as we would like. The main problem is getting sharp edges on the printed characters which is easy enough with metal but takes some more finesse with a printed plastic surface. For the print, each character is modelled in OpenSCAD and then an automated process generates the 3D support structure that connects the character to the typeball.

This process was easier for certain characters but got more complicated for characters with interior sections or which had a lot of sharp angles and corners. Testing the new part shows promise, although the plastic components will likely not last as long as their metal counterparts. Still, it’s better than nothing.

Regular Hackaday readers may recall that the ability to 3D print replacement Selectric typeballs has been on the community’s mind for years. When we last covered the concept in 2020 we reasoned that producing them on resin printers might be a viable option, and in the end, that does indeed seem to have been the missing element. In fact, this design is based on that same one we covered previously — it’s just taken this long for desktop resin 3D printing technology to mature enough.

Can You Help 3D Print A Selectric Ball?

The IBM Selectric changed typewriters as we knew them. Their distinctive ball element replaced the clunky row of typebars and made most people faster typists. When [Steve Malikoff] thought about 3D printing a type ball — colloquially known as a golf ball — it seemed like a great idea.

The problem? It just doesn’t work very well. According to [Steve], it is likely because of the low resolution of the printer. However, it isn’t clear the latitudes of the characters are correct. and there are a few other issues. It is possible that a resin printer would do better and there’s a call for someone out there to try it and report back. We are guessing a finer nozzle and very low layer height might help on an FDM printer.

Judging from the images, it looks like some of the balls do pretty well, but don’t get a full strike at the tilt angle. So it could be something else. However, it does sound like cleaning up the print so it fits is a major problem.

The Selectric was notable for several reasons — you can see an ad for the machine in the video below. The type ball meant you couldn’t jam keys. Since you didn’t have to unjam keys and you had the ribbon in a cartridge, you would have to work really hard to get ink on your fingers, even if you used the cloth ribbon instead of the arguably better carbon film ribbon. The Selectric II could even use a special tape to lift the carbon ribbon off the paper for correcting mistakes. No white-out liquid or fussing with little strips of correction paper. The fact that the ball moves means you don’t have to clear space on the side of the machine for the platen to travel back and forth.

Can you help? If you have a Selectric I or II and a high-quality printer, this would be a fun project to try and report back your results to [Steve]. If you are familiar with the later issue typeballs, you might not have seen the wire clip that [Steve] uses to hold the ball in place. However, you can see them in the video ad below. More modern balls use a plastic lever that acts as a handle so even with cloth ribbons you have less chance of getting ink on your hands.

Although there were Selectrics meant to interface with a computer, you can refit any of them to do it with some work. The Selectric also has a role in one of the great techno spy stories of all time: The GUNMAN project.

Continue reading “Can You Help 3D Print A Selectric Ball?”

Vintage IBM Daisywheel Prints Again After Reverse Engineering

Just before the dawn of the PC era, IBM typewriters reached their technical zenith with the Wheelwriter line. A daisy-wheel printer with interchangeable print heads, memory features, and the beginnings of word processing capabilities, the Wheelwriters never got much time to shine before they were eclipsed by PCs. Wheelwriters are available dirt cheap now, and like many IBM products are very hackable, as shown by this simple Arduino interface to make a Wheelwriter into a printer.

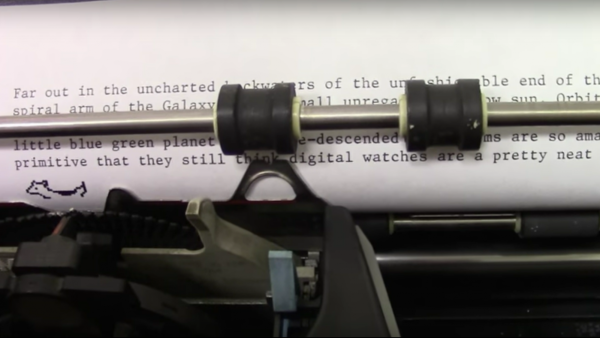
[Chris Gregg] likes playing with typewriters – he even got an old Smith Corona to play [Leroy Anderson]’s The Typewriter – and he’s gotten pretty good with these largely obsolete but lovable electromechanical relics. Interfacing a PC to the Wheelwriter could have been as simple as scrounging up an original interface card for the machine, but those are like hen’s teeth, and besides, where’s the sport in that? So [Chris] hooked a logic analyzer to the well-labeled port that would have connected to the interface card and reverse engineered the somewhat odd serial protocol by banging on keys. The interface he came up with for the Wheelwriter is pretty simple – just a Light Blue Bean Plus and a MOSFET to drive the bus high and low for the correct amount of time. The result is what amounts to an alphanumeric printer, but with a little extra code some dot-matrix graphics are possible too.

Having spent a lot of time reverse engineering serial comms, we can appreciate the amount of work this took to accomplish. Looking to do something similar but don’t have the dough for a logic analyzer? Maybe you can free up $22 and get cracking on a similarly impressive hack.

Continue reading “Vintage IBM Daisywheel Prints Again After Reverse Engineering”

Typewriter Types, Plays Music

[Chris Gregg] had a dream. He wanted to convert use a typewriter as a printer. Sure this has been done before, but [Chris] wanted to create his own version. He picked up a 60’s era Smith Corona electric typewriter, with the hopes of driving its key switches with a computer. You can imagine his surprise when he discovered the keys were not electric switches at all, but a complex mechanical system which triggered a clutch to strike the actual paper. Realizing this was not going to be a simple wiring job, [Chris] set the project aside, where it remained for several years.

A conversation with [Bruce Molay], a coworker at Tufts University reignited [Chris’] interest in project. [Bruce] suggested using solenoids to press the keys. [Chris] dove in, and quickly had 48 solenoids on hand. The first problem was mounting the solenoids on the keys. [Chris’] roommate happens to be [Derek Seabury], president of Artisan’s Asylum Hackerspace. [Derek] created an acrylic frame which holds the solenoids and fits directly over the typewriter’s keyboard. This meant that no modifications needed to be made to the typewriter itself. Simply lift off the solenoid array and you’re ready to rock like it’s 1965.

The next step was driving all those solenoids. For that, Chris worked with [Kate Wasynczuk], one of his students at Tufts. [Chris] designed a board using Texas Instruments  TPIC6A595 shift registers. The TIPC “power logic” series work like regular 74 series logic, but have seriously beefy outputs. These chips can handle up to 50 volts and 1.5 amps pulsed output current – plenty for [Chris’] 24 volt solenoids. [Chris] taught himself schematic entry and PCB layout in Eagle. After only two tries, he had a working board from OSHPark.

An Arduino Uno converts serial over USB output to a bit stream ready to clock into the shift registers. On the computer side, [Chris] wrote up a basic CUPS driver which allows him to print from his Macbook. The perfect demo for this project turned out to be musical. Click past the break to see The Smith Corona perform “The Typewriter Symphony”, by Leroy Anderson. This may be the first time this particular piece of music has been performed with actual words being typed, rather than random keys.

Continue reading “Typewriter Types, Plays Music”