2025 One Hertz Challenge: STM32 Blinks In Under 50 Bytes

Many of us have run a Blink program on a microcontroller before. It’s effectively the “Hello, World!” of the embedded space. However, few of us have ever thought about optimizing our Blink code to be as miniscule as possible. But that’s precisely what [Rudra Lad] did for this entry into the 2025 One Hertz Challenge!

This example of Blink, delay_blinky_13, is built specifically for the STM32F4 Discovery microcontroller development board. [Rudra] notes the code is “highly optimized” and compiles down to a binary size of under 50 bytes. The code doesn’t even use RAM, and it aims to get the blink as close to 1 Hz as possible. Many optimizations were used to crunch it down as small as possible. For example, the standard startup code isn’t used, with the entire program instead written in the Reset_Handler to save space. Bit-band is also used to write to peripheral registers to blink the LED, since this uses less instructions than the typical methods. Meanwhile, with many tweaks to the delay counting routine, [Rudra] was eventually able to get the blink frequency to 1.00019 Hz, as measured on a logic analyzer. That’s pretty darn close!

While it’s rare that you have only 50 bytes of binary space to blink an LED, work like this is a great way to flex your coding muscles. Code is on Github for the curious, and if you’ve worked up your own impressive tiny binaries, don’t hesitate to let us know!

Hackaday Prize 2023: PAROL6 – A GPL Desktop Robotic Arm

Parol 6 is a 3D-printed six-axis robot arm created by [Petar Crnjak] as a combination of the principles from a few previous projects. Aside from a pneumatic gripper, each axis is driven by a stepper motor, with at least a few of these axes being driven through a metal planetary gearbox for extra precision and torque.

From what we can glean from the work-in-progress documentation, there are some belt drives on four of the relevant axes and a mix of NEMA17 format steppers driving either 20:1 or 10:1 reduction boxes. There appears to be a mix of inductive sensors and traditional microswitches used, but it’s not so easy to work out where these are placed. Continue reading “Hackaday Prize 2023: PAROL6 – A GPL Desktop Robotic Arm”

The completed oscilloscope in parts, with the screen in the front connected with prototyping wires, protoboarded buttons on the right, and the BlackPill board somewhere behind

DIY STM32 Scope Is Simple, Cheap, And Featureful

Would you like to have a small digital oscilloscope? Do you have a spare BlackPill (STM32F401) board and a TFT display laying around? [tvvlad1234] presents us with a simple and educational digital storage oscilloscope design that barely needs any components for you to build one, and it’s packed with features just like you would expect from a self-respecting open-source project. Not just that — it can even stream data to your computer, in a format compatible with the TekScope software!

The same scope design, but now on a self-etched board
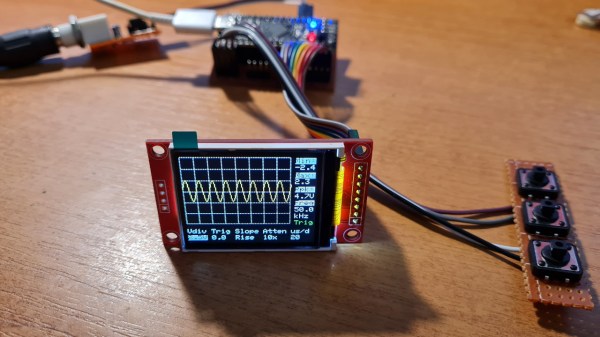
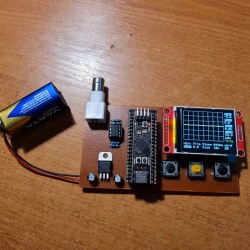
It’s hard to overshadow just how easy this scope is to build, use, and hack on. You really don’t need much in the way of parts, a protoboard will do, though you can also etch or order your own PCBs. The front-end is super straightforward to find components for and assemble, a few opamps and resistors is all you need. So after jumper-wiring the LCD and three push buttons to your BlackPill, you’re golden.

Of course, the simple frontend results in the input range being from -3.3 V to 3.3 V, but as you could guess, this is exactly the kind of project where you could tweak the resistors and even upgrade it later on. Are you a bit lost in how oscilloscopes work? [tvvlad1234] has an explainer for you, too!

This build could easily take up a honorary “temporary turned permanent” place on your bench, thanks to its McGyver-esque qualities. It’s also, quite possibly, a better scope than the red “soldering kit” ones we’ve seen online. All in all, it’s a strong contender in the “simple and powerful DIY scope” arena, before this, we’ve seen one built with an Arduino Nano, and one with a Pi Pico.

DIY USB Microphone Seems Overkill; Is Surprisingly In-Depth

Those of us who have been working from home through video calls for the past year can attest to the rising demand for conferencing gear such as webcams and microphones. Not wanting to spring for a boring off-the-shelf solution, serial hacker [Andy Brown] decided to design his own USB solution from scratch and show us the process from start to finish.

Deciding to go for a full digital design for the circuitry, the peripheral is based off of a MEMS microphone and an STM32 microcontroller doing the heavy lifting between it and a USB connection. [Andy] notes that MEMS microphones are very delicate and you have to design the PCB around the hole where the sound enters, which is why he went with a breakout board which has the component already soldered onto it.

As for the MCU, he reasons that since this is a off-one project which won’t be produced in large numbers, the 180 MHz ARM core shouldn’t be seen as overkill, since it also gives him more than plenty of headroom to do signal processing to make the sound clearer before sending it through to a computer by the USB audio device descriptor.

Once the components are chosen and the board designed, [Andy] goes into detail explaining the firmware he wrote for the STM32 to translate the PCM samples from the microphone’s I²S interface into a format better suited for the computer. He also describes how it then processes the audio, applying a graphic equalizer to reduce noise and then ST’s own Smart Volume Control filter, which works more like a compressor than a simple amplitude multiplication.

Finally, all files for the project, including board gerbers and the STM32 firmware are available at the bottom of his post, and to boot, a video demonstrating the project which you can check here after the break. [Andy]’s choice of microcontroller for this project is no surprise to us, given he’s already made his own development board for the STM32 G0 series. But if this digital microphone project is a bit too modern for you, why not try your hand at building a ribbon microphone instead?

Continue reading “DIY USB Microphone Seems Overkill; Is Surprisingly In-Depth”

Even More Firmware In Your Firmware

There are many ways to update an embedded system in the field. Images can fly through the air one a time, travel by sneaker or hitch a ride on other passing data. OK, maybe that’s a stretch, but there are certainly a plethora of ways to get those sweet update bytes into a target system. How are those bytes assembled, and what are the tools that do the assembly? This is the problem I needed to solve.

Recall, my system wasn’t a particularly novel one (see the block diagram below). Just a few computers asking each other for an update over some serial busses. I had chosen to bundle the payload firmware images into the binary for the intermediate microcontroller which was to carry out the update process. The additional constraint was that the blending of the three firmware images (one carrier and two payload) needed to happen long after compile time, on a different system with a separate toolchain. There were ultimately two options that fit the bill.

The system thirsty for an update

Continue reading “Even More Firmware In Your Firmware”

Putting The Firmware In Your Firmware

Performing over-the-air updates of devices in the field can be a tricky business. Reliability and recovery is of course key, but even getting the right bits to the right storage sectors can be a challenge. Recently I’ve been working on a project which called for the design of a new pathway to update some small microcontrollers which were decidedly inconvenient.

There are many pieces to a project like this; a bootloader to perform the actual updating, a robust communication protocol, recovery pathways, a file transfer mechanism, and more. What made these micros particularly inconvenient was that they weren’t network-connected themselves, but required a hop through another intermediate controller, which itself was also not connected to the network. Predictably, the otherwise simple “file transfer” step quickly ballooned out into a complex onion of tasks to complete before the rest of the project could continue. As they say, it’s micros all the way down.

The system de jour

Continue reading “Putting The Firmware In Your Firmware”

This Thermal Printer Has Serious Game

[Dhole], like the fox, isn’t the first to connect his computer to a Game Boy printer but he has done a remarkable job of documenting the process so well that anyone can follow. The operation is described well enough that it isn’t necessary to scrutinize his code, so don’t be put off if C and Rust are not your first choices. The whole thing is written like a story in three chapters.

The first chapter is about hacking a link cable between two Game Boys. First, he explains the necessity and process of setting the speed of his microcontroller, a NUCLEO-F411RE development board by STMicroelectronics. Once the rate is set, he builds a sniffer by observing the traffic on the cable and listens in on two Game Boys playing Tetris in competition mode. We can’t help but think that some 8-bit cheating would be possible if Tetris thought your opponent instantly had a screen overflowing with tetrominoes. Spying on a couple of Game Boys meant that no undue stress was put on the printer.

Chapter two built on the first chapter by using the protocol to understand how the printer expects to be spoken to. There is plenty of documentation about this already, and it is thoughtfully referenced. It becomes possible to convince a Game Boy that the connected microcontroller is a printer so it will oblige by sending an image. Since there isn’t a reason to wait for printing hardware, the transfer is nearly instantaneous. In the image above, you can see a picture of [Dhole] taken by a Game Boy camera.

The final chapter, now that all the protocols are understood, is also the climax where the computer and microcontroller convince the printer they are a Game Boy that wants to print an image. In the finale, we get another lesson about measuring controller frequency without an oscilloscope. If you are looking for the hack, there it is. There is a handful of success in the form of old receipts with superimposed grayscale images since virgin thermal printer paper by Nintendo costs as much as a used printer.

This story had a happy ending but grab your reading glasses for the smallest Game Boy and here’s someone who wrote their own Game Boy color game.