A couple of weeks back, we covered an interesting method for prototyping PCBs using a modified CNC mill to 3D print solder onto a blank FR4 substrate. The video showing this process generated a lot of interest and no fewer than 20 tips to the Hackaday tips line, which continued to come in dribs and drabs this week. In a world where low-cost, fast-turn PCB fabs exist, the amount of effort that went into this method makes little sense, and readers certainly made that known in the comments section. Given that the blokes who pulled this off are gearheads with no hobby electronics background, it kind of made their approach a little more understandable, but it still left a ton of practical questions about how they pulled it off. And now a new video from the aptly named Bad Obsession Motorsports attempts to explain what went on behind the scenes.
storage75 Articles
Sliding Shelves Supersize Storage
Organizing things in your home or workshop is a constant battle for some of us. Until we have access to a Tardis or bag of holding, maybe the next best thing is a sliding shelf system.
[HAXMAN] found a great set of sliding shelves online, but after recovering from sticker shock decided he could build something similar for much less. The frame for the shelving was built from 4×4 posts, some 2x4s, and strut channel track welded to steel 2x6s. Aluminum plates bolted to strut trolleys support the weight of the shelving units he built from plywood.
Everything was painted with a multi-material paint formulated for covering both wood and metal so everything has a uniform appearance. We love the bright shelving offset by the more classic black appearance of the rack. Just because its storage, doesn’t mean it has to look boring!
Looking for more clever storage solutions? You might like your to make your own shadow boards, favor Gridfinity, or just wonder what other readers do to organize their electronic odds and ends.
Continue reading “Sliding Shelves Supersize Storage”
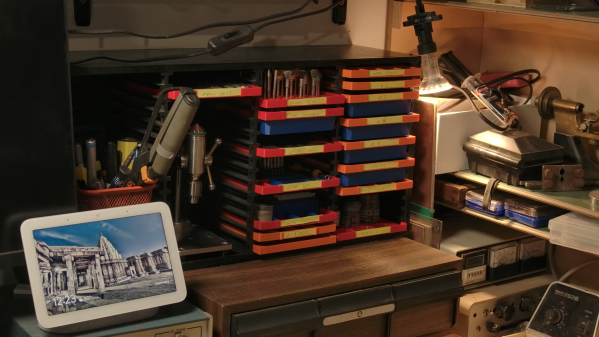
Thrift Store CD Rack Turns Into Small Parts Storage Playground
What in the world could an accessory for an obsolete audio medium possibly have to do with keeping all your unruly bits and pieces in order? First of all, we’re not sure the CD is quite dead yet; we’ve got about a thousand of them packed away somewhere, and we’re pretty sure they’ll be back in style again one of these days. Until then, though, the lowly CD rack might be just what you need to get your shop under control.
As [Chris Borge] relates the story, he stumbled over this CD rack at a thrift sale and quickly realized its potential. All it took was some quick design work and a bit of 3D printing. Okay, a lot of 3D printing, including some large, flat expanses for the drawer bottoms, which can be a problem to print reliably. His solution was simple but clever: pause the print and insert a piece of stiff card stock to act as the drawer bottom before continuing to print the sides. This worked well but presented an adhesion problem later when he tried to print some drawer dividers, so those were printed as a separate job and inserted later.
Sadly, [Chris] notes that the CD format is not quite Gridfinity compatible, but that’s not a deal breaker. He also doesn’t provide any build files, but none are really necessary. Once you’ve got the basic footprint, what you do with your drawers is largely dependent on what you’ve got to store. The video below has a lot of ideas for what’s possible, but honestly, we’re looking at all those little parts assortment kits from Bojack and Hilitchi piled up in a drawer and just dreaming about the possibilities here. Add a voice-activated, LED inventory locator, and you’d really have something. Off to the thrift store!
Continue reading “Thrift Store CD Rack Turns Into Small Parts Storage Playground”
IPhone 6S NVMe Chip Tapped Using A Flexible PCB
Psst! Hey kid! Want to reverse-engineer some iPhones? Well, did you know that modern iPhones use PCIe, and specifically, NVMe for their storage chips? And if so, have you ever wondered about sniffing those communications? Wonder no more, as this research team shows us how they tapped them with a flexible printed circuit (FPC) BGA interposer on an iPhone 6S, the first iPhone to use NVMe-based storage.
The research was done by [Mohamed Amine Khelif], [Jordane Lorandel], and [Olivier Romain], and it shows us all the nitty-gritty of getting at the NVMe chip — provided you’re comfortable with BGA soldering and perhaps got an X-ray machine handy to check for mistakes. As research progressed, they’ve successfully removed the memory chip dealing with underfill and BGA soldering nuances, and added an 1:1 interposer FR4 board for the first test, that proved to be successful. Then, they made an FPC interposer that also taps into the signal and data pins, soldered the flash chip on top of it, successfully booted the iPhone 6S, and scoped the data lines for us to see.
This is looking like the beginnings of a fun platform for iOS or iPhone hardware reverse-engineering, and we’re waiting for further results with bated breath! This team of researchers in particular is prolific, having already been poking at things like MITM attacks on I2C and PCIe, as well as IoT device and smartphone security research. We haven’t seen any Eagle CAD files for the interposers published, but thankfully, most of the know-how is about the soldering technique, and the paper describes plenty. Want to learn more about these chips? We’ve covered a different hacker taking a stab at reusing them before. Or perhaps, would you like to know NVMe in more depth? If so, we’ve got just the article for you.
We thank [FedX] for sharing this with us on the Hackaday Discord server!
The WebStick Is A Small, Cheap NAS
The ESP8266 was one of the first chips that provided wireless functionality at a cost low enough to be widely popular for small microcontroller projects. This project uses one to provide rapid, small, and inexpensive network-attached storage (NAS) capabilities wherever you happen to go.
With an ESP12F board at the heart to provide network connectivity, the small device also hosts a micro SD card slot and a USB-A port to provide power and programming capabilities for the device. It’s Arduino-compatible, and creator [tobychui] has provided the firmware source code necessary to bring it up on your network and start serving up files. Originally intended for people to host web services without experience setting up all of the tools needed for it, there’s services for storing and streaming music and video over the network as well.
While it includes a lot more functionality than is typically included on a NAS, [tobychui] notes that with a library, something like WebDAV could be added to provide more traditional NAS capabilities. As it stands, though, having networked storage with web hosting capabilities on a PCB with a total cost of around $5 is not something to shy away from. If you’re looking for something a little more powerful for your home network, take a look at this ARM-based NAS instead.
Get A Fresh Build Plate At The Push Of A Button
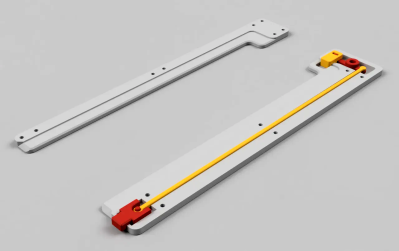
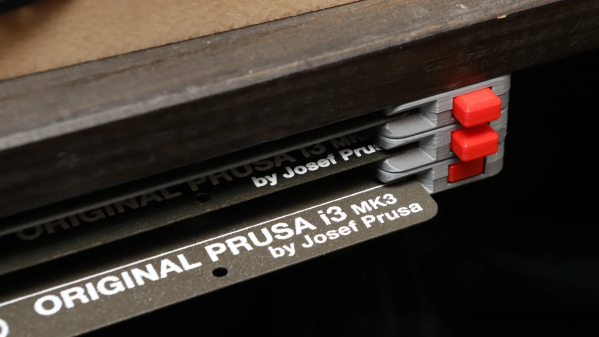
For best results, a build sheet for a 3D printer’s print bed should be handled and stored by the edges only. To help make that easier, [Whity] created the Expandable Steel Sheet Holder system that can store sheets efficiently without touching their main surfaces, and has a clever mechanism for ejecting them at the push of a button.

The design is 3D printable and made to be screwed to the bottom of a shelf, which is great for space saving. It can also be extended to accommodate as many sheets as one wishes, and there’s a clever method for doing that.
Once the first unit is fastened to a shelf, adding additional units later is as simple as screwing them to the previous one with a few M3 bolts, thanks to captive nuts in the previously-mounted unit. It’s a thoughtful feature that makes it easy to expand after the fact. Since build sheets come in a variety of different textures and surfaces for different purposes, one’s collection does tends to grow.
Interested, but want it to fit some other manufacturer’s sheets? The design looks easy to modify, but before you do that, check out the many remixes and you’re likely to find what you’re looking for. After all, flexible magnetic build sheets are useful in both resin and filament-based 3D printing.
DIY All-Flash NAS Vs. Commercial Hardware
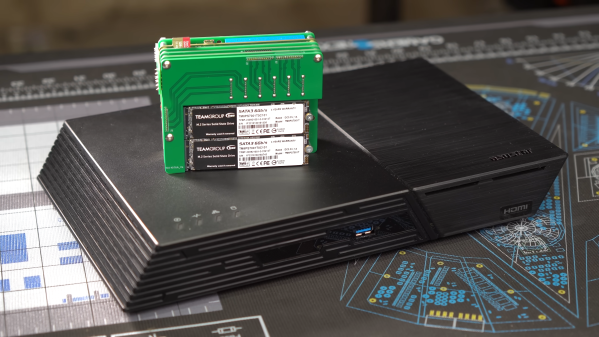
[Jeff Geerling] has tried building his own network-attached storage before, but found that the Raspberry Pi just wasn’t able to keep pace with his demands. He’s back with a new all-flash NAS build, and put his new design to the test against proper store-bought gear.
His build is based around the ROCK 5 Model B, which is able to truck data around far faster than most other single-board computers. Internally, it can top 1 GB/sec without too much hassle. He decided to build a NAS rig using the board, putting it up against the turn-key ASUSTOR AS-T10G3.
Using OpenMediaVault to run the ROCK 5 as a NAS, [Jeff] was able to get decent performance out of the setup. With a 3-drive RAID 5 configuration, he recorded write and read speeds of 100 MB/sec and 200 MB/sec respectively, over a 2.5 Gbps network connection. There were also some spikes and curious performance wobbles. While speed was better than [Jeff]’s previous Raspberry Pi experiments, it wasn’t capable of double or triple the performance like he’d hoped. In comparison, the ASUSTOR solution was capable of much greater speeds. It topped out at 600 MB/sec write speeds, and 1.2 GB/sec on reads.
If you’re looking to build a high-performance DIY NAS, the ROCK 5 may be a better solution than most Raspberry Pi boards. However, if you want speed over all else, existing commercial NAS solutions really have the edge. Video after the break.
Continue reading “DIY All-Flash NAS Vs. Commercial Hardware”


