Hacklet 116 – Audio Projects

If the first circuit a hacker builds is an LED blinker, the second one has to be a noisemaker of some sort. From simple buzzers to the fabled Atari punk console, and guitar effects to digitizing circuits, hackers, makers and engineers have been building incredible audio projects for decades. This week the Hacklet covers some of the best audio projects on Hackaday.io!

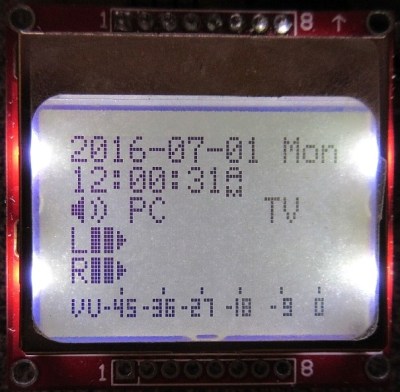
vumeterWe start with [K.C. Lee] and Automatic audio source switching. Two audio sources, one amplifier and speaker system; this is the problem [K.C. Lee] is facing. He listens to audio from his computer and TV, but doesn’t need to have both connected at the same time. Currently he’s using a DPDT switch to change inputs. Rather than manually flip the switch, [K.C. Lee] created this project to automatically swap sources for him. He’s using an STM32F030F4 ARM processor as the brains of the operation. The ADCs on the microcontroller monitor both sources and pick the currently active one. With all that processing power, and a Nokia LCD as an output, it would be a crime to not add some cool features. The source switcher also displays a spectrum analyzer, a VU meter, date, and time. It even will attenuate loud sources like webpages that start blasting audio.


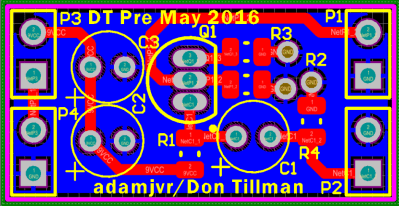
muzzNext up is [Adam Vadala-Roth] with Audio Blox: Experiments in Analog Audio Design. [Adam] has 32 projects and counting up on Hackaday.io. His interests cover everything from LEDs to 3D printing to solar to hydroponics. Audio Blox is a project he uses as his engineer’s notebook for analog audio projects. It is a great way to view a hacker figuring out what works and what doesn’t. His current project is a 4 board modular version of the Big Muff Pi guitar pedal. He’s broken this classic guitar effect down to an input board, a clipping board, a tone control, and an output stage. His PCB layouts, schematics, and explanations are always a treat to view and read!

pauldioNext we have [Paul Stoffregen] with Teensy Audio Library. For those not in the know, [Paul] is the creator of the Teensy family of boards, which started as an Arduino on steroids, and has morphed into something even more powerful. This project documents the audio library [Paul] created for the Freescale/NXP ARM processor which powers the Teensy 3.1. Multiple audio files playing at once, delays, and effects, are just a few things this library can do. If you’re new to the audio library, definitely check out [Paul’s] companion project
Microcontroller Audio Workshop & HaD Supercon 2015. This project is an online version of the workshop [Paul] ran at the 2015 Hackaday Supercon in San Francisco.

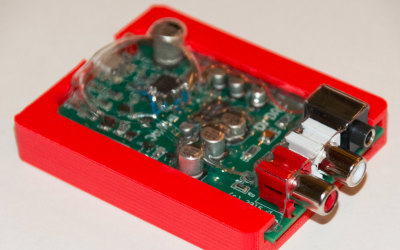
drdacFinally we have [drewrisinger] with DrDAC USB Audio DAC. DrDac is a high quality DAC board which provides a USB powered audio output for any PC. Computers these days are built down to a price. This means that lower quality audio components are often used. Couple this with the fact that computers are an electrically noisy place, and you get less than stellar audio. Good enough for the masses, but not quite up to par if you want to listen to studio quality audio. DrDAC houses a PCM2706 audio DAC and quality support components in a 3D printed case. DrDAC was inspired by [cobaltmute’s] pupDAC.

If you want to see more audio projects and hacks, check out our new audio projects list. See a project I might have missed? Don’t be shy, just drop me a message on Hackaday.io. That’s it for this week’s Hacklet, As always, see you next week. Same hack time, same hack channel, bringing you the best of Hackaday.io!

Modular Drum Machine Creates Random Rhythms

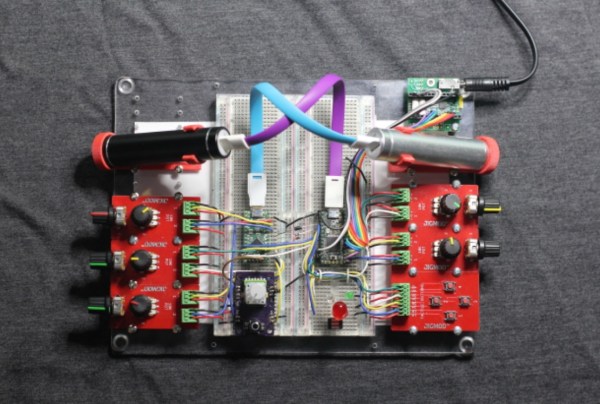
Don’t worry, the rhythms themselves aren’t random! That would hardly make for a useful drum machine. [kbob]’s creation does have the ability to randomly generate functional rhythms, though, and it’s all done on a breadboard.

The core of this tiny drum machine is two Teensy dev boards. One is an FM synth tuned to sound like drums, and the other is a random rhythm generator with several controls. The algorithms are from Mutable Instruments’ open source Eurorack modules. The entire thing fits on a breadboard with JIGMOD modules for the user interface. The machine runs on lithium batteries in the form of USB cell phone chargers. The battery holders were designed in Fusion 360 and 3D printed.

The function of the drum machine is pretty interesting as well. There are a set of triggers tied to the buttons on the machine. When a button is pressed, the drum machine plays that sound at the appropriate time, ensuring there are no offbeat beats. The potentiometers are polled once every millisecond and the program updates the output as required. There’s also a “grid” of rhythms that are controlled with two other knobs (one to map the X coordinate and the other for the Y) and a “chaos” button which adds an element of randomness to this mapping.

The modular nature of this project would make this a great instrument to add to one’s musical repertoire.It’s easily customizable, and could fit in with any of a number of other synthesizer instruments.

Continue reading “Modular Drum Machine Creates Random Rhythms”

Marvelous MIDI Button Box

Most DJ tools are just ripe for DIY rework. Everything at least speaks MIDI, and the firmware side of the equation that makes a physical interface for your laptop can be downloaded and flashed with minimal effort. And this means that there’s no time better than the present to wire up a ton of buttons to a Teensy and call it a controller.

[UmamiFish]’s build goes the extra mile, though, with a nice laser-cut box and holes for display LEDs as well as the 22 arcade buttons that are packed tightly into the enclosure. A 74HC595 shift-register IC handles the LEDs, but there’s no getting around a bunch of wiring in a build like this. It pays to be neat, and using ribbon cable helps keep some of the chaos under control.

Browsing around Instructables will turn up myriad similar controllers, should the exact configuration of this one not suit your needs. And if you want something with a little more of the real-disk feel, have a look at this controller that uses hard disk platters, or this log of a timecode-vinyl-to-MIDI build.

540 LEDs On A Geodesic Sphere

[burgerga] loves attending Music Festivals. He’s also a MechE who loves his LED’s. He figured he needed to put it all together and do something insane, so he build a huge, 15″ geodesic sphere containing 540 WS2812B addressable LED’s. He calls it the SOL CRUSHER. It sips 150W when all LED’s are at full intensity, making it very, very, bright.

As with most WS2812B based projects, this one too is fairly straightforward, electrically. It’s controlled by four Teensy 3.2 boards mounted on Octo WS2811 adapter boards. Four 10,000 mAh 22.2V LiPo batteries provide power, which is routed through a 5V, 30Amp heatsinked DC-DC converter. To protect his LiPo batteries from over discharge, he built four voltage monitoring modules. Each had a TC54 voltage detector and an N-channel MOSFET which switches off the LiPo before its voltage dips below 3V. He bundled in a fuse and an indicator, and put each one in a neat 3D printed enclosure.

The mechanical design is pretty polished. Each of the 180 basic modules is a triangular PCB with three WS2812B’s, filter capacitors, and heavy copper pours for power connections. The PCB’s are assembled in panels of six and five units each, which are then put together in two hemispheres to form the whole sphere. His first round of six prototypes set him back as he made a mistake in the LED footprint. But it still let him check out the assembly and power connections. For mechanical support, he designed an internal skeleton that could be 3D printed. There’s a mounting frame for each of the PCB panels and a two piece central sphere. Fibreglass rods connect the central sphere to each of the PCB panels. This lets the whole assembly be split in to two halves easily.

It took him over six months and lots of cash to complete the project. But the assembly is all done now and electrically tested. Next up, he’s working on software to add animations. He’s received suggestions to add sensors such as microphones and accelerometers via comments on Reddit. If you’d like to help him by contributing animation suggestions, he’s setup a Readme document on Dropbox, and a Submission form. Checkout the SolCrusher website for more information.

Thanks [Vinny Cordeiro], for letting us know about this build.

Continue reading “540 LEDs On A Geodesic Sphere”

Graduation cap LED display demo

Stealthy Mortar Board Unleashes Bling At Graduation Ceremony

Decorating graduation caps is often frowned upon by the administration but [Dan Barkus] is challenging his school authorities to keep from smiling when they see what he has in store. His build will dazzle the audience by mounting 1024 RGB LEDs in a 32×32 matrix on top of his cap, but hidden under the cap’s black cloth. When the LEDs are off he’s indistinguishable, and when he fires up the LEDs, shine through and put on a heck of a show. He can type messages on his phone to be displayed on the cap. He can even display images and animated GIFs.

LED array control components

The LED display is an Adafruit 32×32 RGB LED matrix panel.  To control the display, [Dan] uses a Teensy, a 32 bit ARM Cortex-M4 microcontroller board. Wireless communication is done via a JBtek HC-06 Bluetooth board.

The LED display can draw up to 4 amps at full white brightness so he picked up a USB battery with two output ports, one capable of 2.1 amps and the other 2.4 amps. He then hacked together a cable that has two USB connectors on one end, connected in parallel, and a DC jack on the other end. Altogether the battery bank is capable of up to 4.5 amps output combined out those two ports, meeting the LED display’s needs. The DC jack is plugged into the Teensy and all power goes through there.

One problem [Dan] had was that the Bluetooth module was booting up before the Teensy. It didn’t see the Teensy in time, causing the Bluetooth not to work. The solution he found is shown in the 2nd video embedded below. The fix powers the Bluetooth module separately, using a current limiting resistor and a capacitor to build up the voltage, delaying just long enough for the Teensy to win.

Continue reading “Stealthy Mortar Board Unleashes Bling At Graduation Ceremony”

Fallout Inspired Cellphone Wristwatch

[Mr. Volt] mentions that some of the commenters on his videos believed that he shouldn’t be making large, retro computer themed communicator watches. He believes they are wrong, naturally we are compelled to agree with him.

thrumbzIn his latest build he has produced a rather well-built and large cell-phone watch. After the untimely death of an Apple II cellphone watch, he decided to up his game and make one that could take more of a beating. The case is 3D printed, which is hard to believe given the good finish. He must have spent a long time sanding the prints. Some wood veneer for looks and aluminum panels for strength complete the assembly.

The electronics are a Teensy and a GSM module. It looks like he places calls by calling the operator since the wrist communicator only has four inputs: a red button, a blue button, and a momentary switch rotary encoder.

The communicator appears to work really smoothly, and it would certainly draw attention to him were he to wear it anywhere other than the Wasteland. Video after the break.

Continue reading “Fallout Inspired Cellphone Wristwatch”

Teensy Gets A Prop Shield

God of microcontrollers and king of electrons [Paul Stoffregen] is famous for his Teensy microcontroller dev boards, and for good reason. If you have a project that does more than blink a few pins, but doesn’t need to run a full Linux build, any one of the Teensy dev boards are a great option. As a dev board, [Paul] has released a few ‘shields’ that add various functionality – for example the audio adapter board that is able to play CD quality audio and perform DSP and FFT operations. Now, [Paul] has launched a new shield designed for interactive light and sound effects on art installations and for the rest of the crew at Burning Man. It’s called the Prop Shield, and adds more sensors, audio amps, and blinkies than a Teensy has ever had.

The Teensy Prop shield is equipped with 10DOF motion sensors, including a FXOS8700 accelerometer/magnetometer, a FXAS21002 gyroscope, and an MPL3115 altimeter and temperature sensor. A two Watt LM48310 audio amplifier can drive 4 or 8 ohm speakers, and 8 Megabytes of Flash memory can hold all the data for audio or a very long string of APA102 individually addressable LEDs.

The combination of motion sensors, audio amplifiers, and LED drivers may seem like an odd combination, but this is a shield for very odd projects. Stage effect, wearables, and handheld props become very easy with this board, and haunted houses are about to get really cool. With the on-board Flash, this board makes for a very capable data logger, and although the altitude sensor only reads pressure up to about 40,000 feet, this could be a very handy board for high altitude balloons.

The Prop Shield is available now in [Paul]’s shop. There are two versions, one ‘wit’ the motion sensors for $19.50, and the other ‘witout’ motion sensors for $8.40. The distinction is based on the Philly Cheesesteak protocol.

For the last few weeks, [Paul] has put the prop shield in the hands of a few dozen beta testers. Their impressions are in a forum thread, and like all of [Paul]’s projects, the response has been very good.